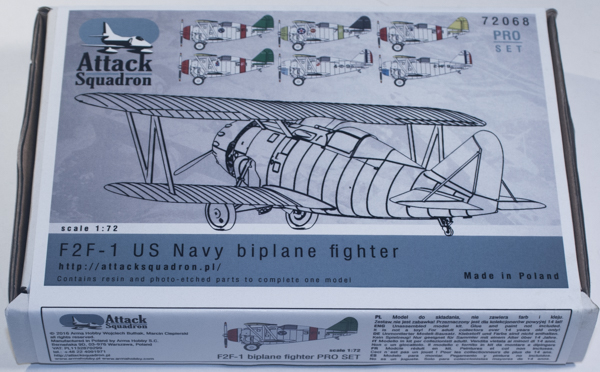
Attack Squadron 1/72 Grumman F2F-1
By Matt Bittner
Introduction
Taken from the instructions (which were provided by Rich Dann):
"The Grumman F2F-1 hailed a new era for naval aviation. It was the first single seat, enclosed cockpit, retractable gear fighter aircraft to achieve production and fleet usage. Drawing heavily on the experience with their FF-1 fighter, Grumman's F2F-1 was all-metal with fabric covered wings and flight controls. The Pratt & Whitney R-1535-72 Twin Wasp engine produced 650 horsepower, giving the F2F-1 a top speed of 231 MPH (371 KPH). 56 were produced, including the XF2F-1 prototype. A number of Navy and Marine Corps squadrons operated the F2F-1. Following fleet service, many were transferred to the Training Command as advanced trainers. The last F2F-1 was withdrawn from service in 1942."
The Kit
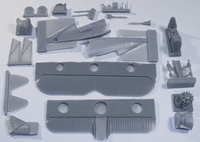
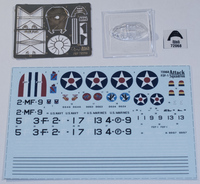
The Attack Squadron 1/72 Grumman F2F-1 consists of 26 pieces of gray resin, one vacuum-formed canopy, one clear piece of film which contains instruments for the instrument panel and a photoetch fret consisting of 16 pieces. Decals are for six aircraft:
- VF-3B, 1936, 3-F-1, Bu. No. 9624
- VF-5, 1937, 5-F-1, Bu. No. 9673
- VF-7, 1940 Neutrality Patrol, USS Wasp, Bu. No. 9367
- VF-4M, 1937, 4-F-9, Bu. No. 9997
- VF-2, September 1937, 2-F-1, Bu. No. 9646
- VMF-2, Summer 1937, 2-MF-9, Bu. No. 9663

|
Decals are exceptionally done and appear to be spot-on, registration-wise. Colors are really well done. The only thing missing - although not that big of a deal - are the colored stripes for the fuselage and upper wing. I don't consider this a big deal because this way you can be sure they will match the other areas of the model that need to be painted with these colors. Plus, it's an excellent reason to pick up the new Hataka paint set.
As with most aircraft models construction starts with the cockpit. However, it's not going to take long to put it all together; what will take longer is the painting. This is because Attack Squadron has designed the cockpit to be mainly a single-piece tub glued to one fuselage half. Everything but the seat, control column and instrument panel is molded in-situ with the single-piece tub. This is exceptional and the detail is outstanding. It will just take a little while to get everything painted correctly. While the majority of the cockpit would be finished in aluminum there are details that can be picked out in other colors. Plus, Attack Squadron also provides decals for the interior where needed. An exceptional touch.
Once the cockpit is painted and installed in one-fuselage half, along with the three-piece instrument panel (one-piece instrument film with two-pieces of photoetch) and the interior decals added, the fuselage halves can be glued together. Once those are glued together than the upper, forward fuselage piece can be glued on as well. This is where Attack Squadron has accomplished some ingenious engineering. Remember the Monogram 1/72 'tweener biplanes with their molded-on center struts? Well, Attack Squadron has done the same thing, molding the center struts for their F2F-1 in-situ with the upper, forward fuselage piece. That way you can be sure the upper wing will be aligned correctly.

|
Now that the majority of the fuselage is assembled you add the rest of the fuselage pieces along with the tail parts. The one-piece fin/rudder includes the tail-cone which will ensure everything lines up perfectly. You also glue on the stabs and front fuselage pieces (firewall, engine and cowl) and after you add the lower wings in the next step the F2F-1 is ready for painting (I would leave the rest off until after painting).
Once painting is accomplished then you can proceed with building-up the landing gear. This is the step that will - in my opinion - take the most time. The "connector" struts are built up using multiple photoetch pieces and you'll need to take your time to ensure everything is lined up. Each "connector" on one side of the landing gear consists of (I think) five or six parts. Unfortunately the most time-consuming part of the model also suffers a little on the instruction sheet. For example "PE8" is mentioned in step 8 of the instructions but nowhere else. What is "PE8" used for and where does it go? "PE13", "PE10" and "PE6" all assemble on to "PE0" and while you can infer where this assembly goes, what about the other side? I'm sure these pieces are handed.
But even with this slight confusion the kit is awesome. For example, Attack Squadron molded the resin of the main landing gear struts around a metal rod so there is no worry about the resin landing gear failing over time. Excellent touch.
The only other area where patience is a virtue is assembling the prop. The blades are separate from the hub and care must be taken to ensure they're glued in the proper position. My one concern with the kit is with the vacuum-formed canopy. They only provide one (always best to have a second "just in case") and it's molded closed. With all the excellent detail inside the cockpit you'll want to display the main canopy open to show it all off. That means cutting the windscreen away from the sliding portion which is always a concern and again, having a spare canopy would help in this instance as well.
Conclusion
Even with my minor concerns outlined above this is an excellent kit and one well worth tracking down. The sample provided is known as the "PRO" set which includes the photoetch and decals for multiple examples. If the past is any indication (for example, their Spitfire Mk.XI) they may release an "EZ" set with either a smaller p/e set - or none at all - plus decals for only one or two schemes. But in any event if you enjoy 'tweeners, especially US Navy, then by all means purchase this model. I truly hope they continue the genre and release other 'tweeners that have sorely been lacking from the 1/72 modeling world. And if they want to know of ideas, they just have to ask.
Huge, HUGE thanks to Attack Squadron for sending this to review. I hope to start it soon.
