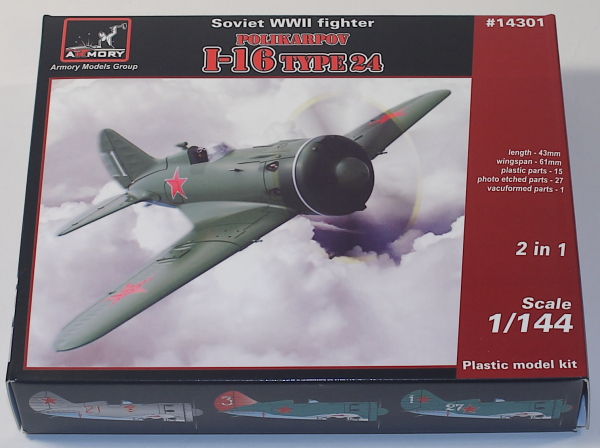
Armory 1/144 Polikarpov I-16 Type 24
By Matt Bittner
Introduction
Armory is best known for their aftermarket resin and photoetch. Everything they have produced to-date is top-notch and all is very well done. They have decided to plunge into the world of injected plastic and their first release is as well done as their aftermarket.
In keeping with how some manufacturers have released 1/144 kits, Armory has released 1/144 Polikarpov I-16 Type 24s, two-in-a-box. Hopefully this will mean that at some point in time someone will produce a decal sheet of I-16s which can be used with Armory's release.
The Kit
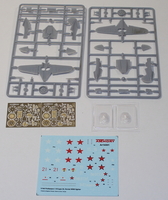
The Armory 1/144 I-16 Type 24 consists of 18 pieces of gray, injected plastic; a vacuum formed windscreen; and a photoetch fret with 27 parts on it. Remember this is a 2-in-1 release so there is two of everything. Decals, nicely printed and appear to be in register, are for four aircraft:
- Ser No 2421321, Pilot: flight sergeant G. Tsokolaev, 4th Guards Fighter Regiment, Soviet Baltic Naval Air Arm, Vystav airfield, Winter-Spring 1942. All surfaces are painted in Satin Grey-Silver (AII lacquer). Insignia on the upper wing surfaces weren't replaced
- Pilot: unknown, commander of 13th Separate Aviation Squadron, Soviet Baltic Naval Air Arm, Summer 1940. Upper surfaces painted in Satin Khaki-Green (AIIz lacquer), lower painted in Satin Light Blue-Grey (AIIg lacquer)
- Pilot: S. Surzhenko, 72nd Mixed Aviation Regiment of the Soviet Northern Naval Air Arm, August 1941. Upper surfaces painted in Satin Khaki-Green (AIIz lacquer), lower painted in Satin Light Blue-Grey (AIIg lacquer)
- Ser No 24R21891, Pilot: probably B. Safanov, 4th Squadron of 72nd Mixed Fighter Regiment, Soviet Northern Naval Air Arm, August 1941. Airplane is equipped with aerial camera gun PAU-22. Upper surfaces painted in Satin Khaki-Green (AIIz lacquer), lower painted in Satin Light Blue-Grey (AIIg lacquer)
Some of the photoetch is for the cockpit. The first step in the instructions have you build up the seat, and everything requires folding. First fold the actual seat followed by the armored back-plate. The seat is then finished by adding the seat belts. The next part of the cockpit is to fold the main cockpit floor/instrument panel. This piece is very unique on how it's folded to put the instrument panel into the correct location. The only thing that would make it better would be to have either a piece of film, or a decal, to represent the instrument dials. Note there is no sidewall detail at all so if you want to open up one - or both - of the cockpit doors (and they're separate pieces) you'll need to add that detail yourself. Also note there is no color call-outs at all for any interior detail.
Now the cockpit pieces are finished construction continues by building most of the main parts up. The fuselage halves are assembled and the upper, center part of the wing is added to the main wing-piece. To this is added the built-up cockpit before gluing the fuselage to the wing.
 To finish the main assembly the cowl pieces are added to the fuselage along with the upper fuselage part. The horizontal tail pieces are also added finishing up most of the main assembly. And here is where one needs to make a decision prior to continuing.
Out-of-the-box the front of the cowl isn't a bad piece of injected plastic. However, Armory does one better and allows you to add more detail with photoetch pieces. If you decide to go the photoetch-route, you'll need to remove plastic in the front of the cowl to which the photoetch pieces are added. You can also display the main vents open on the very front photoetch piece, which means bending all of the vents at 90 degrees. This will definitely make the model visibly more interesting.
From here it's best to paint the model. The final assembly consists of folding the photoetch landing gear doors and building up the landing gear. Note that the smaller, thinner landing gear struts Armory doesn't provide. Instead the instructions contain measurements so you can create them out of wire - wire is also needed for the wing's pitot tube. The tail wheel is a fold-up piece of photoetch, where it might look better if the actual "wheel" (represented mostly in 2-D) was replaced by something more "round".
There are a few things the instructions don't mention and the parts don't reflect. First of all there were two "port holes" on the upper fuselage in front of the cockpit opening that allowed more light in to see the instrument panel. These won't be difficult to add - just figure out their location and drill two holes, later filling them in with white glue or a "Kristal kleer" type of material. Two other items not mentioned in the instructions are two wires that lead from the wheel's centers into the fuselage; these were the cables used to "crank the landing gear" into the wheel wells, since they were manually retracted from within the cockpit.
Conclusion
This is an excellent first step from Armory into the injected plastic realm of model making. Everything about these I-16s is top-notch and while assembly will be a little time-consuming due to the photoetch, they will build into first rate models. Armory is to be commended for creating 1/144 injected I-16s and I'm looking forward to not only starting these, but seeing more built up.
Huge thanks to Armory for sending these I-16s to review.
