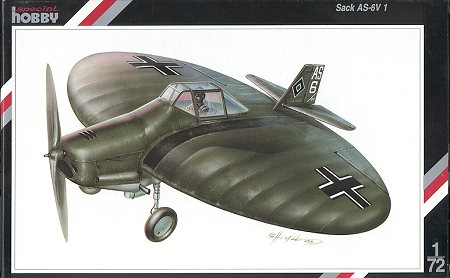
Special Hobby 1/72 Sack AS.6
By Morgan Girling
Overview
Arthur Sack had been inspired to investigate discoid aircraft by how well beer coasters flew in his local drinking establishment. After five flying models, he convinced the RLM in 1940 to let him build a man-sized version. The sixth, cleverly named the AS.6, was born in his Bavarian workshop, using the landing gear, canopy and some/all of the cockpit from a pranged Bf 109, with a distressed Bf 108 similarly donating everything firewall-forward. The rocket fighter unit 1./JG 400 tested it (unsuccessfully) in 1944, and it was destroyed in the waning days of the Reich by the retreating troops.
The Kit
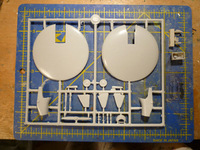 Needing a quick and simple weekend "recovery" project, I pulled this kit out of my stash for an out-of-the-box build, and was impressed with what I saw. The kit is molded in a slightly hard light grey plastic – the 17 pieces are dominated by the wing upper and lower halved. There is also a four-piece resin cockpit and a resin "sparrow strainer" for the cowling's cooling air intake. A crisply vacformed canopy brings the parts count up to an even two dozen – just right for a quick, non-demanding build. The molding quality was much better than I'd anticipated for a limited-run kit, having delicate recessed panel lines on the wing, little flash and requiring only a little touch-up needed on the elevator hinges. If you looked at the box art, which shows an aircraft with the typical saggy-baggy scalloped fabric covering, you'd rightly wonder about the non-scalloped wing with its panel lines. The references say that it had a plywood covered wing, so the panel lines are more accurate than the box art.
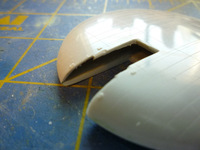 The wings went together well as did the cowling/fuselage halves and the resin cockpit. The lack of locator pins so typical on limited run kits isn't a problem. After that, however, things got more sporting. Lacking those locator pins, the assembly arrows in the instructions showing the cockpit going "somewhere" in the cowl/fuselage left placement rather open to interpretation. With some filing and trial fitting, though, it all came together. Fitting the cowl/fuselage to the wing proved to be a similar exercise in trial fitting. Landing gear, exhausts, oil cooler and tail skid were similary positioned by the TLAR (That Looks About Right) method of interpreting the placement arrows.
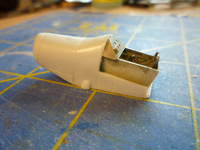 Only one canopy is supplied, which seemed odd as most kits with vacformed canopies give you two, with the tacit admission expectation that the first one will be your "experiment." I carefully cut it out and attached it with Humbrol ClearFix. Here again, there was a small fit problem – the canopy is formed with a flat bottom, instead of following the wing curvature. This creates a gap at the rear of the canopy, which I bridged by applying more ClearFix.
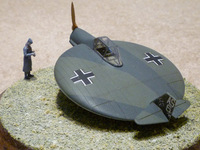 Finishing was typical, grey primer followed by RLM 65 (hellblau) undersides, and an RLM 70/71 (schwartzgrun/dunkelgrun) splinter pattern on top. The kit painting guide shows the top as being solid RLM 71 with a black anti-skid walkway on the port side. The few photos available online are poor quality but hint at a splinter pattern. I think either approach would be defensible, but omit the walkway as none of the photos show one. I finished the propellor with a woodgrain effect (radome tan, gloss, a streaky brushing of brown, and more gloss) and an RLM 02 prop hub. Painting the prop RLM 02 overall would be more typical, but I wanted a little color on the model and a "bare" prop is defensible given the aircraft's scrounged origins.
Accuracy
All models have some inaccuracies, some quibbling and some significant. The panel lines match the positions of the ribs and spars, but the actual plywood panels would be larger. I suspect that there are too many panel lines molded in, but they're so delicately done that it is easy to lose them in the painting process, particularly with the dark colors on top. Another nit-pick is that in the photos, the wing appears to be more flat-bottomed than is represented in the kit, particularly near the trailing edge. Again, unless someone has the photo in hand and squats down beside the model to check, nobody's going to notice.
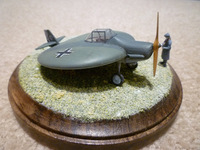 The sparrow strainer on the nose bowl is, frankly, a cheat. The Bf 108 has a large cooling intake in the nose bowl, through which the inverted-V Argus engine is clearly visible. Wanting a quick OOB build, and lacking an Argus to drop in, I resigned myself to the ersatz grillwork. Less seriously, various small openings in the cowling are represented by raised patches, and the exhaust manifold covers are similarly unvented. When it's all built, however, the strangeness of the whole draws the eye from these minor inaccuracies.
However, there is a major inaccuracy with regard to the cowling/fuselage. As mentioned above, the AS.6 used a Bf 108 front end, with a transition structure fairing it into the wing bottom and the canopy front. From the side, this looks like a parallelogram – the thrust line of the engine goes through, and is parallel to, the chord line of the wing. The model is molded with the thrust line a good 2mm above the chord line, which is noticable on such a small model. If you try to position the propeller in the right spot, you introduced about 3° downthrust, which is also quite visible and looks worse. In the end, because I wanted an OOB build, I ended up positioning it parallel to and above the chord line. (However, this would be an excellent model for your first kitbash because the transition section is quite a simple shape to fabricate from sheet styrene.)
Conclusion
While it is a slightly more time-consuming build than the parts count would suggest, it went together very straightforwardly and the results are pleasing to the eye. It's a great conversation operner because people always ask if it was a real aircraft.
