From Internet Modeler
Polish Flying Razor: Building the Aurora Fokker E.V
By Mike Muth
Jul 1, 2002 - 4:16:48 PM
As many aging Baby-Boomers creep into bifocals we tend to get nostalgic over kits from our childhood. No photo-etch, no lozenge decals, no resin, no interior detail, etc. You know, an easy model to make. After doing a few Fokkers with lots of lozenge decals and rib tapes, and a few Nieuports with lots of rigging, I needed a break. Enter this oldie but goodie, the Aurora/K&B Fokker E.V.
HISTORY:
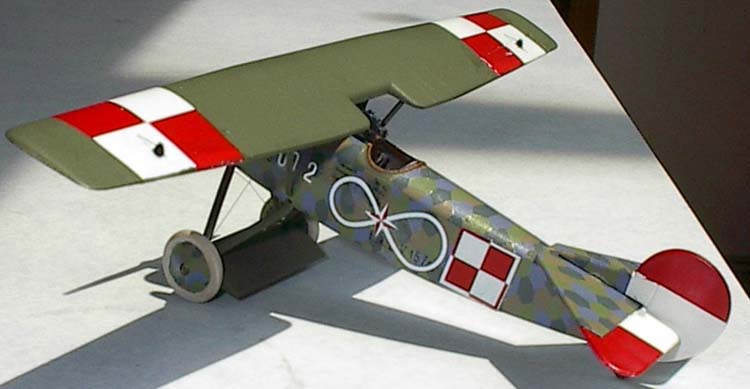
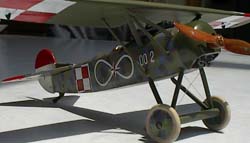
I had purchased an Aeromaster sheet of decals awhile back and decided to use it on this airplane. I also wanted to do a 1/48 plane in Polish markings. Previously, my Polish air force was limited to a few 1/72 airplanes. Fortunately, Aeromaster sheet 48-197, Flying Razors, included an E.V in Polish markings, #002.
 Who flew the plane? While always an iffy question since in the heat of operations pilots often flew whatever plane was gassed and ready, I decided to try to narrow things down. The sheet claims it was flown by Stefan Stec with #7 Eskadra (the forerunner of the Kosciusko Eskadra). Stec is generally considered the founding father of the Polish Air Force and is credited with the red and white checkerboard national markings. OK, I figured it was Stec, until I went hunting through some research for a picture to look at while making the model.
There is a great photo in Alex Imrie's Fokker Fighters of World War I. It is a close-up of the fuselage after a crash. It mentions the Kosciusko Esc., but no pilot. It turns out that it was flown by Lt. Ludwik Idzikowski, a famous post-war pilot who twice tried to fly the Atlantic. Next stop was an article on Polish markings in Insignia Magazine, Winter 1996. It has a profile of the plane but lists Franz Peter as the likely pilot. Peter, like Stec, flew for the LFT in WWI. Some confusion was cleared up regarding Stec being the pilot. He flew # 001, which was marked with a sideways S. #002 was marked with a sideways 8.
 Still having some doubts, I contacted some friends on the World War I mailing list. A new name, Stefan Bastyr, surfaced as the potential pilot. Bastyr, flying an Oeffag C II, was part of the first Polish operational flight which took place on November 5, 1918 from Lewandowka airfield against Ukrainian nationalist forces attacking Lwow (now Lviv in the Ukraine). Like Stec and Peter, Bastyr was also a former LFT pilot. Bastyr started out as an observer in the LFT, eventually becoming a pilot in 1918. Bastyr was an active operational pilot during the Polish-Ukrainian and Polish-Bolshevik wars, in addition to fulfilling his duties as Chief of Aviation for the 6th Army. He died on August 6, 1920.
My Polish friends seem to think Bastyr was the likely pilot of 002. In light of his active participation in the early days of the Polish Air Force, it seems likely that he would have his own plane. On to applying decals!
THE KIT:
Well, did I mention no photo-etch, no lozenge decals, no resin and no interior detail? This very basic kit is a delightful little jewel in spite of these supposed shortcomings. The cockpit is a simple build with a generic seat, control stick, floor and instrument panel. The fuselage easily closes around the cockpit. There is a large slot in the bottom of the fuselage that is easily filled with gap-filling super glue and some accelerator. Next up, lozenge. (I just couldn't get away from it.)
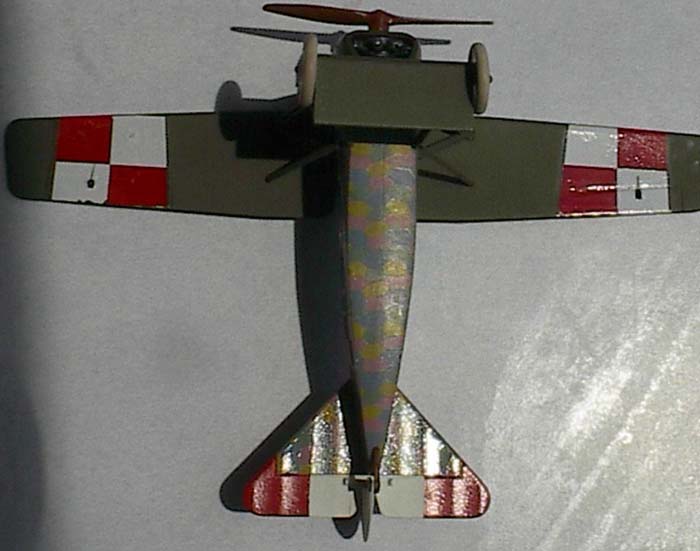
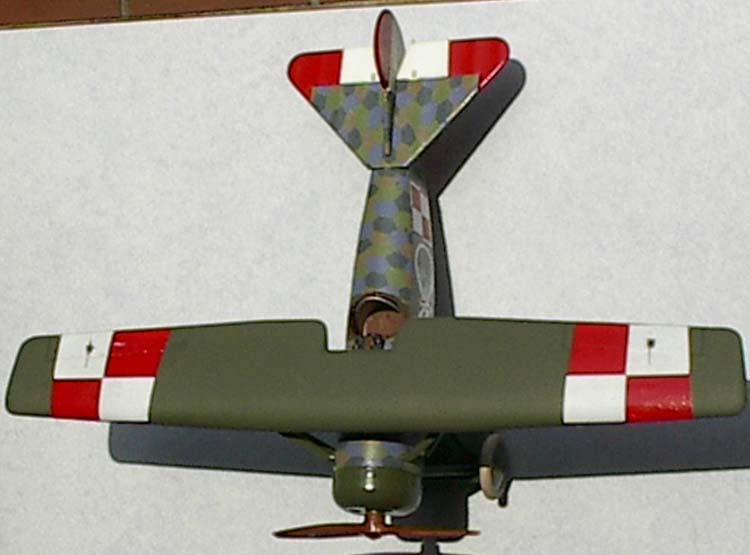
 I used Eagle Strike 4-color lozenge. It goes on easily without any noticeable air bubbles, tearing, etc. A dose or two of Solva-Set and the decal settles snugly around the raised fuselage details. I didn't have a ton of references, and decided to use lozenge on the fuselage top between the cowling and cockpit. I am uncertain if this is accurate, but it looks cool. I used the 4-color bottom for underneath the tailplane and fuselage. The rest of the plane, other than for the Polish markings, was airbrushed using Polly Scale Fokker Dark Green.
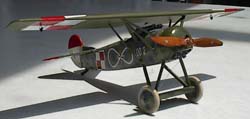
After the lozenge had completely set, I attached the machine guns. The instruction sheet shows the machine guns off-set on top of the fuselage, almost to the side. Photos show the guns should be more centered, which was accomplished with a hobby knife cutting two new holes. The wing is attached to the fuselage by inverted V-struts with 2 other struts for added support. The V strut is rectangular at the point where it fits into a similar rectangle on the wing. This makes for an easy fit and simple alignment. After it dried thoroughly, I attached the other two struts, tailplane, tail drag and fin/rudder.
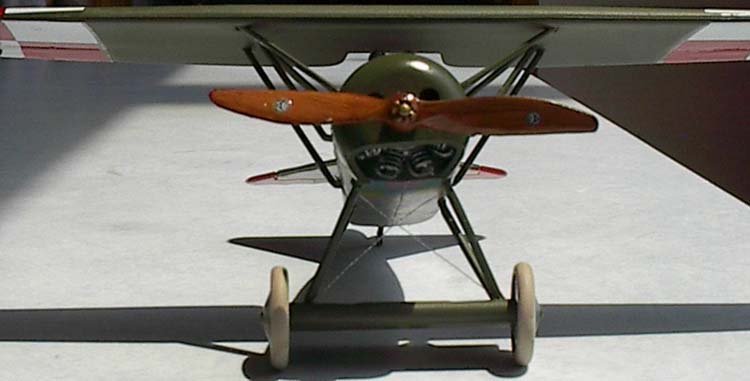
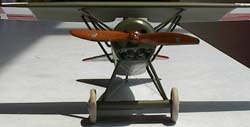 Next came the engine and cowling. The engine was painted silver and then a wash of black applied over it. There is no attachment point on the firewall to attach the engine. You simply place it inside the cowling and glue the cowling to the fuselage. Surprisingly, the result worked and the engine spun when the propeller turned. The cowling was airbrushed Fokker Dark Green and then had a few coats of Future applied to give it a glossy finish.
This left only the dreaded (by me) attachment of the landing gear. I've lost count of the number of good airplanes I've managed to ruin at this stage of building. I had previously attached the legs to the spreader bar and test fit the assembly to the fuselage before, during and after applying the lozenge. I airbrushed it Fokker Dark Green, drilled a few holes for the rigging, and attached it. I used silver thread for the landing gear rigging and ceramic wire for the aileron control horns, which I had painted black. The rudder and tailplane contain a nice scheme of red and white that was painted used ModelMaster Classic White and Guards Red. Voila! A Fokker E.V ready for national markings.
DECALS:
 To start with, on this model I used Eagle Strike 4 color lozenge for both the upper and lower surfaces. I like the muted shades of the colors and think it looks right. There was no problem with adhesion or air bubbles. The horizontal 8 easily went on, as did the small red star in the middle of it. A small piece of the red star disintegrated upon too much handling, but it isn't very visible. The number 002 needs to be cut so that the 00 is separated from the 2. The photo in Imrie's book shows that it was applied on the fuselage as follows: 00 2. The fuselage checkerboard fits fine.
Now for the wing checkerboards. Here some research again paid off. Traditionally, the Polish checkerboard has the white square in the upper right hand and lower left-hand corners. However, Stec liked a mirror image on his E.V and Insignia also shows 002 with the mirror image wing checkerboards. Looking at the crash photo in Imrie's book, the starboard wing seemed to have the mirror image approach. So, even taking into account all of the risks inherent in trying to interpret old black and white photos, I went with the mirror image.
 If only it was that simple. In applying the decals, which are tapered, I ended up applying one backwards. (Don't ask!) The result was I had to cut a lot of little pieces to make things look right. One more thing, the red color wraps around the wing. The decals allow for the overlap, but since the red color on the decal was applied after the white, the thinner red part of the decal that is designed to wrap around the front of the wing shattered. I was pretty careful with this step and for once will not blame my skills as the cause of the problem. Some more small red pieces to replace the shattered decal finished the job.
CONCLUSION:
This was an easy and fun build. The kit results in a model that looks like the Flying Razor. The only difficulty came with my inability to get the checkerboard decals on properly. I enjoyed the modeling and the research. Thanks go to my friends on the World War I mailing list and especially to Witold Kozakiewicz and Grzegorz Mazurowski for their help in this article. Any errors are mine and not a result of their help.
REFERENCES:
-
Imrie, Alex. FOKKER FIGHTERS OF WORLD WAR ONE, Vintage Warbirds #6, Arms and Armour Press, 1986, ISBN 0-85368-782-X
-
Napper, Graham "Polish Aircraft Markings", INSIGNIA, Winter 1996
-
© Copyright 2023 by Internet Modeler