Designed to meet an RLM (Reichsluftfahrtministerium - State Air Ministry) specification for a long-range, high speed and heavily armed destroyer (Zerstörer) aircraft, the two-seat Bf 110 certainly looked the part with its narrow, tapered fuselage atop a large wing and powered, initially, by a pair of big DB600 engines. But its speed and heavy armament could not compensate for its limited maneuverability and, despite early success in Poland and Norway, the type saw heavy casualties during the Battle of Britain.
I've had an old 1/32 Revell Bf 110G sitting in my stash for many years but never stoked up the courage to attack the raised panel lines and attend to the general lack of detail with the kit (of course the new Dragon kit is now on hand if a big Zerstörer is what you really need). So when presented with the opportunity to build Eduard's 1/48 Bf 110C/D for Internet Modeler I wasted no time in clearing my work bench.
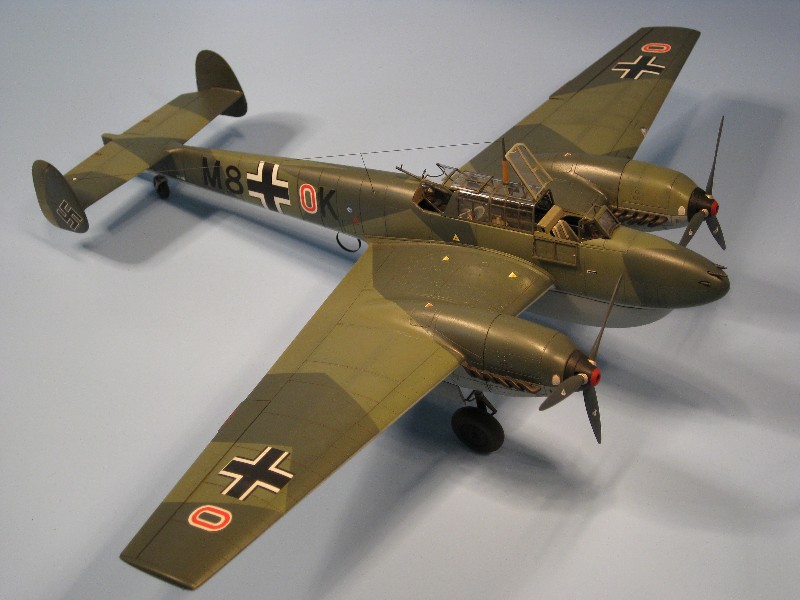
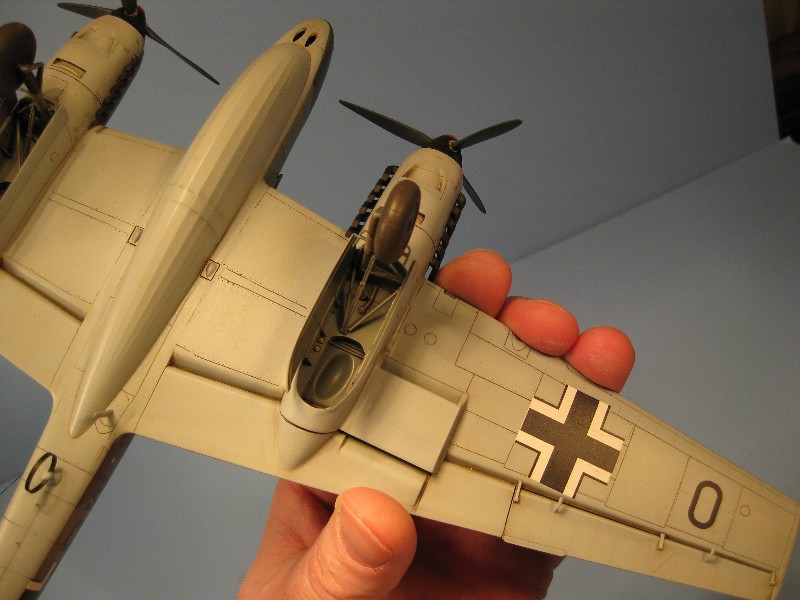
On reviewing the kit I decided almost immediately to build a Bf 110D long-range machine with the ungainly 'Dackelbauch' conformal fuel tank. The D model was developed in part to deal with the long distances involved in the Norwegian campaign and to give it a longer effective range as an anti-shipping aircraft.
Off we go...
Call it weird, but I always start my builds by focusing on the undercarriage, propellers, ordinance (if fitted) and other smaller sub assemblies. I only really start on the cockpit and airframe once these are built, painted and weathered. So it was with my long-range Zerstörer.
Each main undercarriage leg consists of eight components that fit together to form a reasonably stiff assembly. I prefer to build as much of the undercarriage assembly as possible before painting in order to get really solid join welds with Tenax.
The primary load bearing component is attached to the inside of the lower wing surface with its two legs protruding into the wheel well. The ‘V’ gear retraction arms are then attached to these legs. Builders need to be aware that the sidewall detail to the undercarriage bays must be added after the nacelles are added to their wings as you'll experience some major interference issues.
The main wheels are made of two parts, which works well when there is no tire tread. As soon as lateral tread lines appear you know you're going to face some rescribing unless the tread alignment is perfect. It never is.
I chose to build the tailwheel using the three component option. I drilled out the axles in each yoke component and the wheel hub. This makes it easier to build, tidy up and paint the two main assemblies. Small diameter plastic rod makes a good axle for assembling the tail wheel later.
Wings and Nacelles
I wasn't going to add any wing tanks to my BF 110, so the only required holes in the lower wing were for the main gear legs and the two yellow air tanks. Both of these are installed from the inside of the lower wing.
Each engine nacelle consists of six-parts that go together pretty well. Patience is required to achieve a snug fit for everything. Despite my best efforts I ended up having to redo quite a lot of rivet detail lost to sanding as I tied-up all the joins. The internal sidewall detail fits very nicely, but don't make the mistake I did and fit them before attaching the nacelles to the wings - the rib detail will get in the way of the undercarriage legs.
The upper and lower wings halves go together very well. Unusually for Eduard there was a lot of flash around the trailing edge of each wing and around the wing tips. Although quick and easy to remove, the significant amounts of flash were surprising.
Attaching the nacelles to the wings was the hardest part of the build to this point. Fit was really bad and I spent an age getting each nacelle to sit comfortably again each wing half. I had to add some thin strips of plastic card to one wing half to correctly align its corresponding nacelle. The other nacelle was better aligned but still left a significant gap on the upper surface join. Although the adjustments and need for filler were hardly unusual, it came as a bit of a surprise with the Eduard kit. Previous Eduard builds had resulted in next to no filler in any of the major joins.
Each wing half was finished of by adding the front and back PE radiator grills and housings and the ailerons. The grills had been given a black wash to reveal the mesh detail, while the housing interiors were painted pre-painted RLM 75.
Tail Feathers
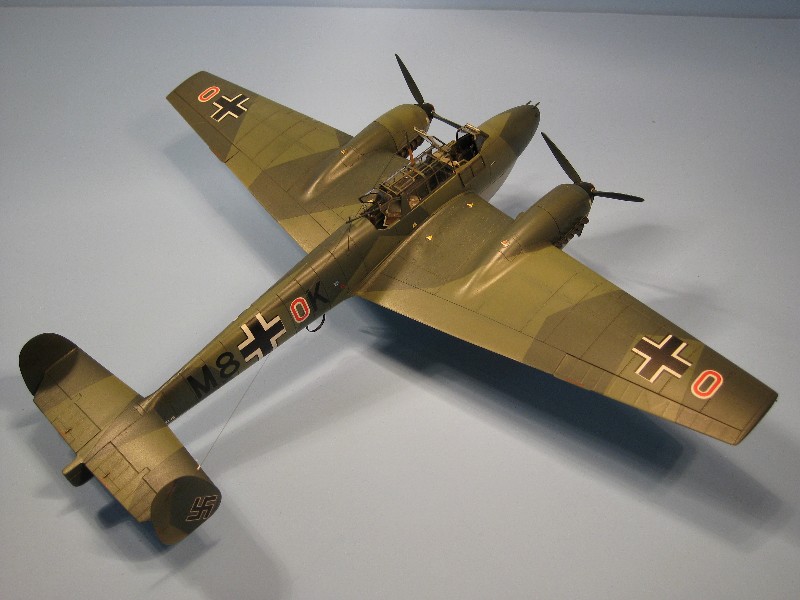
The twin tails of the Bf 110 were one of its distinctive features and this is nicely captured in only four components. The left and right horizontal surfaces are molded as single pieces, as are each fin/rudder. The fit of the fin/rudder with each horizontal surface is perfect, with no need for any touch up.
Nose
I chose not to show the nose gun bay in the open position and simply built the two-section nose cone without any internal detail. I left the guns out and would add the barrels later when painting was finished. As I lined them up I noticed that the nose-to-fuselage lap joint wasn't as neat as I would have liked so I fabricated a backing plate for the nose cone and sanded away the offending lap joins. Once attached, I simply rescribed the panel line around the nose section.
Cockpit
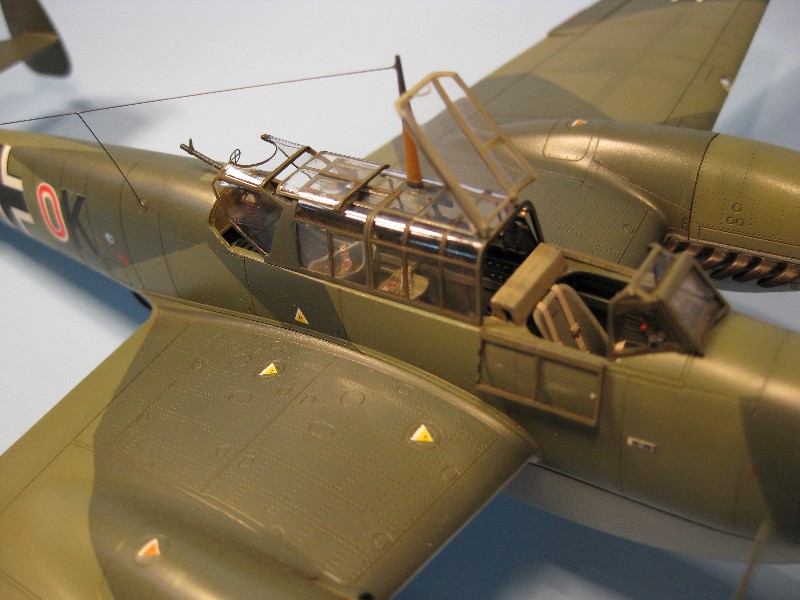
One of the reasons I always start with gear and props etc, is my lack of confidence with cockpits and canopies. When I look at other builder's models I'm always drawn to the cockpit to see 'how they did it'. And of course the Bf 110 has a cockpit that says 'look closer, you can see everything'.
Fortunately Eduard has done a really superb job with the cockpit, allowing even a modestly capable builder like me achieve something to be quite proud of. A lot goes in to this cockpit including some very nice color PE for the pilot and radio operator/gunner's instruments. My approach to painting cockpits is to build it all first and then paint it black. A few light coats of the interior color shot from slant angles create a sense of depth as the black creates the necessary shadow. Once this is dry and pick out wiring and box detail with brush. Once dry, dry brushing reveals the surfaced detail.
But a word of warning. If, like me, you’re on the wrong side of 40, trial fitting and gluing of many small components can be a pain – literally. Eduard designers were clearly in a sadistic mood when they developed the parts breakdown for the ammo drums and engine exhausts. Each ammo drum had three components, including a tiny PE strap, for a total of 19 drums! Each exhaust stack had six individual manifolds that needed tidying up before gluing to a back plate, and although the end result is perfectly satisfying, I would strongly suggest that other builders invest in Quickboost’s resin exhausts and ammo drums if they want to avoid extended finger cramps.
Bringing it all Together
Once the cockpit was finished, the two fuselage halves were joined. As with every other Eduard kit I have built, the fit was superb. Wing halves, tail surface and nose cone were then added, along with large ventral fuel tank. I was forced to use some filler around the aft wing root/fuselage join simply to address some injection point sag issues. This was minimal.
Painting
After a good wash with soap and water, I gave the model a thin coat of Floquil grey primer (try it – it’s superb stuff). Once dry I wet sanded it with 2000 grit paper. I repeated this process a few times until I was satisfied with the finish. After a final soapy wash and overnight dry we were ready for painting.
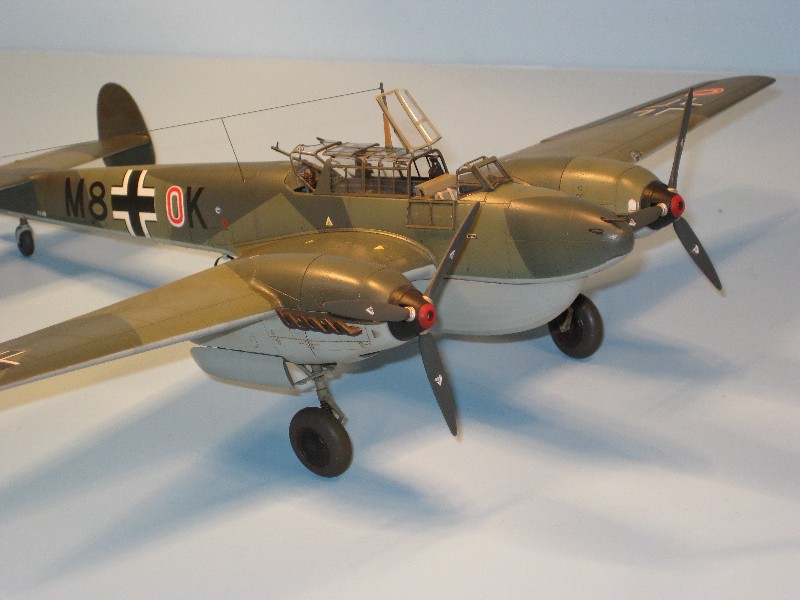
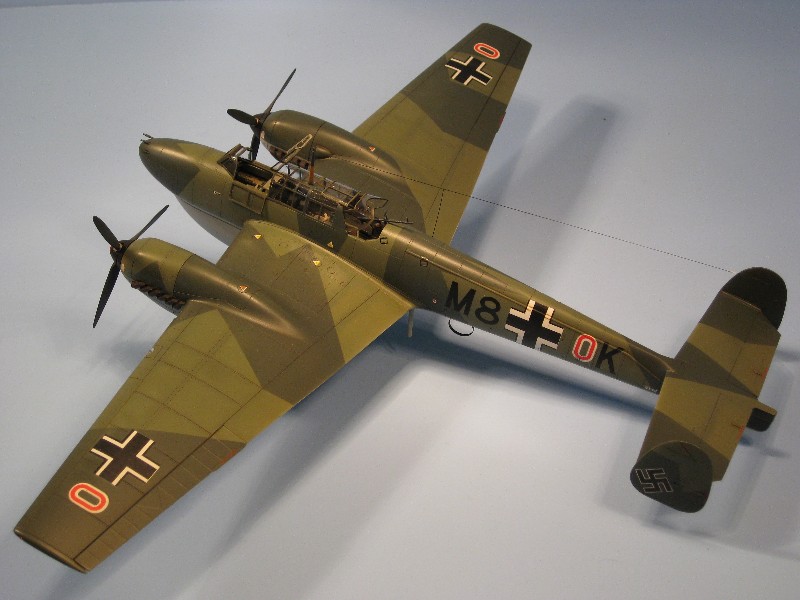
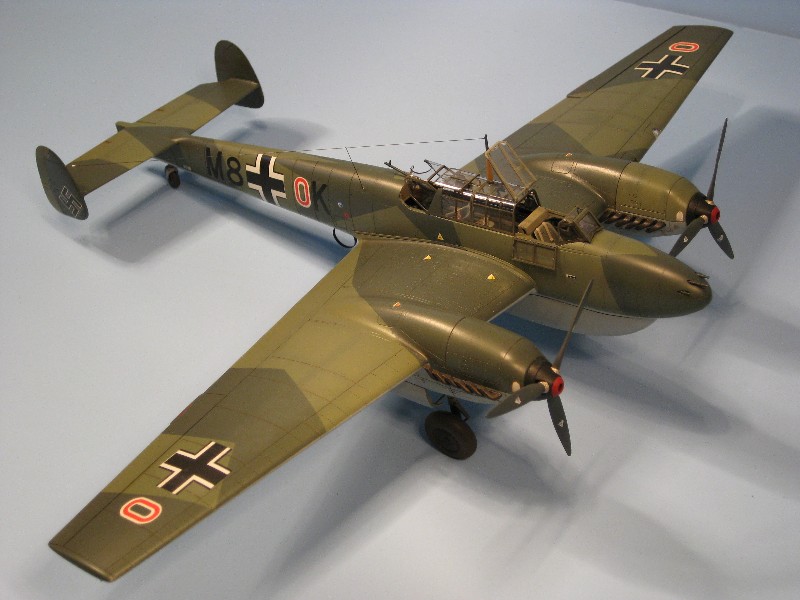
From the get-go I’d decided to build 'M8+OK', a long-range BF 110D with the large conformal 'Dakelbauch' auxiliary fuel tank - ugly is good. Painting was a relatively simple RLM 70/71 upper surfaces and RLM 65 on the undersides. Painting was also made ‘easier’ because of the sharp demarcation lines between colors.
First off I pre-shaded the entire model with Floquil Engine Black. Once dry, I shot three very thin coats of Model Master RLM 65 on the under surfaces over the space of half an hour. This was then left to dry overnight. Masking the under sides with Tamiya tape was next and this took quite a while, especially around the engine nacelles. With hard demarcation lines it’s quite tricky to get a nice curve under the nose. I then sprayed another thin coat of RLM 65 along the tape lines which helps to seal the join. If there is going to be any bleeding under the tape I’d rather it be the same color as that underneath.
The first top color was RLM 71 with three very thin coats applied in 30 minutes. This was left to dry for 24 hours. Tamiya tape was then applied, followed by a thin sealing coat of RLM 71 to the tape lines. Two coats of RLM 70 finished the camouflage and everything was left overnight to harden. I’m always very careful when I remove modeling tape. There’s nothing worse than being a bit too quick and pulling off a bit of paint in the rush to see how it all came out. Patience is a virtue. The Bf 110D came out of the paint booth looking pretty good, with just a few touch-up areas under the nose and extreme tail. I then applied three spray coats of Future (thinned 50:50 with 99% isopropyl alcohol) to protect the paint and give it a good surface for decaling.
Decals
I was very disappointed with the decal sheet. Unlike the sheets for the Eduard Lavochkin, Polikarpov and Fw 190 builds I’ve done for Internet Modeler, the Bf 110 set suffered from pretty bad registration issues that can be clearly seen on the wing national insignia and serial numbers. The registration issues are most noticeable on some of the smaller decals like the propeller logos and filler cap markings. With hindsight I should have requested a replacement set from Eduard or picked up an EagelCals sheet instead. Lesson learned. Next time I’ll spend a little more time looking at the decals before I apply them.
Despite the registration problem, decaling proceeded with few other issues. Solvaset applied above and below each decal helped them settle across panel lines. A few instances of ‘silvering’ were solved by pricking the offending decal with a needle and applying more Solvaset. Be prepared to hold your breath a lot when applying the small frame number decals – it’s a challenge! Once all the decals were dry, I gave the model a gentle surface wipe with a wet cloth to remove finger prints and (what looked like) calcium stains from the decaling process.
Once dealing was complete the model received another three light coats of thinned Future. This is an important step if, like me, you use oils to simulate weathering. The Future both seals the decals and protects the camouflage from the weathering process.
Weathering
For me, weathering is typically restrained. I’ve yet to master paint chipping using a silver pencil and the whole pastels thing is a class I need to take. Suffice to say that I chose not to practice on the 110. My usual technique is to paint the entire model with a milky-thin wash of Burnt Umber artist’s oil. Once the wash has started to flatten out (15-20 minutes), I remove the excess with small squares of kitchen towel, dragging in the direction of the air flow. If you’ve left it a bit too long, the oil can be helped off using towel wetted in a little Turpenoid . Again patience is a virtue here, for the cleaning has to continue until you there’s no more oil on the towel. By that point, every panel line and recess should be picked out with the wash, adding realistic depth and dimension to the surface.
Almost Finished
It’s now time to add all of those pre-assembled detail pieces. On went the main wheels and doors, the tail wheel, the engine exhausts and propellers, the pilot’s gun sight and the rear gunner’s machine gun. I then add the nose cannon barrels, the pitot tube and aileron mass balances under each wing. Finally I added the DF loop, the thin photo etch blind-landing approach and IFF antennas. Once everything had set I gave the whole model a misting of Floquil flat varnish to soften the high gloss. During wing construction I’d deliberately sanded off the navigation lights and drilled small holes for replacements. These I fashioned from plastic rod painted gloss red and green. Once the flat varnish was dry, I added these new navigation lights.
Glazing & Aerial Wires
The Bf 110 has a large greenhouse canopy that allows much of the cockpit detail to be seen and it didn’t make much sense to show the canopy all closed up. I had therefore already masked and painted the multiple canopy sections necessary for the fully open look. I attached the windshield and main canopy segment using white glue as this gave me some adjustment time and would dry transparent. The pilot’s dropped side panels, open roof segment and the gunners opening were all attached with super glue. The final act was to attached the aerial mast and fabricate the twin aerial wires. I used stretched black sprue for the wires and stretched white sprue for the insulators. Once the wires were loosely attached, a glowing match tightened the wires.
All Done!
This kit was quite a challenge compared to the other Eduard kits I’ve built. A lot of very small cockpit detail in both plastic and photo etch requires loads of time and attention. But the effort will pay off with a beautiful OOB cockpit that is clearly visible through the large, greenhouse canopy. There was also a lot more flash on this kit than the others and this required more clean-up time than usual.
My biggest issue with this kit was with the upper surface nacelle/wing join. Despite a lot of fitting and adjusting, the remaining gaps and steps required some significant work to blend in and I ended-up with a fair amount of rescribing/riveting. But that type of work shouldn’t faze most modelers - it comes with the territory. Other than the nacelles, Eduard’s kit went together really well, with very little filler required elsewhere.
All-in-all, the Bf 110 C/D is a nice plane to build. It has its quirks and it’ll never be a Weekend Edition, but it’ll make a very nice addition to your Luftwaffe collection.
Thanks to Eduard for the review copy.