Trumpeter 1/48 MiG-23M Flogger B
By Greg Goheen
Overview
The MiG-23M was Mikoyan-Gurevich’s answer to the United States F-111 and F-4 aircraft, blending a skillful combination of full span variable-geometry wings yet light and agile enough to be considered a true dogfighter. It was the first Soviet Air Force fighter to feature look-down/shoot-down radar capability, allowing it to track and guide weapons to an air target moving below the horizon as seen by radar. It’s powerplant included the Tumansky R-29A turbojet with an output of 27,500lb with afterburner to reach Mach 2.2+ at altitude. Likewise, it was a relatively inexpensive fighter to produce at the time, making it attractive to a cornucopia of current Allies and Axis countries worldwide.
The Kit
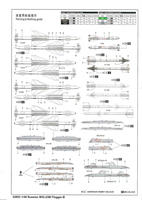
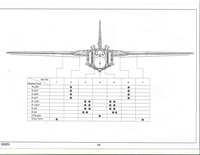
Trumpeter has apparently answered the call for an accurate MiG-23 in 1/48, as well as to likely compliment their earlier offering in 1/32. The rugged box contains a plethora of plastic and small fret of brass photo-etched detail parts. Likewise, modelers should be delighted with three entire sprues of ordinance, pylons and fuel tanks to have me nearly believe I was looking at an Eduard kit. Ordinance includes R-23R SARH missiles, R-23T IR missiles, R-24R SARH missiles, R-23T IR missiles, Vympel R-13M & R-13M1 AAM’s, Molniya R-60 Aphid AAM and 800L drop tanks. The clear pieces are translucent and blemish free, packaged extra carefully with thin foam wrap that is taped snugly in place and set inside the small reservoir inside the box to actually protect such delicate pieces. While some will view the engraved panel lines as just fine and delicate, I found them to be a bit too light. They are barely seen in many of the accompanying pictures of the contents of this kit and can hardly be felt when running your fingernail over the surfaces. I fear that by their being so delicate that they will easily be nearly eroded even with the lightest coats of primer and paint. This, of course, means many will spend countless hours not only counting rivets but likely re-scribing the entire kit to ensure panel lines can be seen, shaded and bragged about, as modelers often do. Overall engineering seems as straight-forward as the instructions, wherein I can’t help but offer a slight bit of cynicism. Much like the 1/32 offering, the seat is well engineered sans one glaring error, the bottom seat custom is not included. Perhaps Trumpeter, after doing a run of WWII aircraft in which parachute bags doubled as the bottom seat rest thought this was the norm. Still, this can be overlooked by simply fabricating a cushion from whatever materials the builder is most comfortable with, be it epoxy, plasticard or other material. The remaining detail of the cockpit seems fair, at best, as the detailing is not very accurate in terms of console or sidewall controls. It’s evident, with the sidewall control panels that these will have to be test fitted many times along with the cockpit tub as there are no location pins and they simply float in place. Test fitting the cockpit tub in position seems to help although without affixing the control panel into place it’s really anyone’s guess if your careful dry fitting is accurate once painted. The decals included for the cockpit assembly will be addressed below and I assure you it is not a pretty picture. The nosegear assembly is made up of four pieces that seem to epitomize much of what is seen in this kit, extremely small and delicate locating tabs that almost promise to be bent or broken if not acutely aware of you brushing against them. It seems a strange assembly too that well could have been molded in one piece as most manufacturers opt for and not missed any great detailing either. Again, this completed assembly has no real locating tabs to speak of and essentially has to be floated into place prior to installing the cockpit assembly. No great feat to accomplish, mind you, just a bit more time to ensure it is square in place before closing up the two fuselage halves.There is an interesting 2-piece u-shaped assembly that essentially blanks off the backside of the twin intakes.It’s actually a relatively cleaver idea that seems to work, although again with no locating tabs for this assembly care will be necessary to dry fit before committing with cement.
The intakes themselves are accentuated with PE parts for the splitter plates and look quite nice. There’s been word of the 1/32 version being a bit too squared off and chunky looking around the edges but in this scale they look quite nice. Proceed with a sanding stick if so inclined, as I’ll keep mine straight from the kit.
The splitter plates have the modeler affix a back panel to them that has two locator pins, although upon test fitting against the fuselage there appears to be some alignment issues that will likely require filler. This might be minimal if the locator pins are simply shaved off, for as fine and delicate as they are I sincerely doubt they add any real structural integrity to the joint here.
Photoetch, Paint and Decals
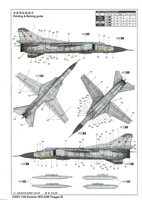
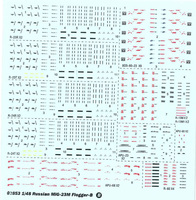
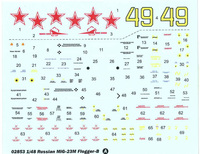
The photetch fret seems well constructed and a nice addition, allowing the modeler to use these pieces for delicate antennae, probes and even the open airbrake hatches. Likewise, a harness is included for the cockpit and will certainly round out this assembly quite nicely. The overall painting reference chart is quite good too in terms of including nearly all viable manufacturers including Gunze/GSI, ModelMaster, Tamiya, Vallejo and Humbrol, although the instruction sheet only references Gunze/GSI. And it appears for the most part that the colors called out for each part/assembly are fairly accurate too. What’s interesting, though, is that sole paint scheme provided for the kit features a rather lackluster and boring subject in being a monotone gray fighter. I think why I was disappointed here is given just how many countries flew the MiG-23, and frankly how they are pictured in ones minds-eye, this seemed like a cheap out for Trumpeter. I mean, let’s face it, when you see the countless reference photographs of both Russian as well as Chinese, Syrian, Iraqi and other’s who flew this aircraft, more often than not they featured fantastic camouflage in sand tones, browns and greens. Maybe a bit nitpicky of me to say this but I do have to admit being disappointed to not find at least one alternative scheme for this kit. I’m quite sure the aftermarket guys and girls are doing cartwheels right now and plotting the release of countless aftermarket decal sheets to fill this void. Decals, much the same as paint, is a love/hate thing with this kit. On the upside, the stenciling sheet is fantastically large and well detailed, assuring the serious modeler out there that they will be spending days simply adorning the ordinance with this kit appropriately. Hands down, no complains in this regard until you then venture to the small main decal sheet for “Yellow 49” upon the overall gray scheme. Yet even if this can be overlooked by some, what’s most disturbing as being grossly inaccurate are the decals for the instrument panel and sidewalls. Instead of a wealth of gloss black dials/gauges, as well as bright red and silver switches galore over that wonderful blue/green interior paint in the cockpit one will find “white” as being the primary color used for the instrument panel decals and quite liberally even. If the cockpit decals provided bad then the sidewall consoles were simply disturbing, as it appears these were simply drawn in an Illustrator-type program with no bearing on referencing the actual cockpit and its layout. Again, this shortcoming will certainly fair well for aftermarket manufacturers of resin and PE. And perhaps that was the intent of Trumpeter all along, knowing many do insist on these upgrades nowadays. I, however, do like the challenge of working with what’s in the box and given that the instrument panel is actually quite accurate without the silly decals I’m opting to test my patience and skills with some fine brush painting and detailing. My suggestion is to visitwww.wingsovereurope.com/mig_23_flogger.html and one will be overjoyed with the outstanding collection of cockpit reference photos to use to transform a ho-hum cockpit into a true jaw-dropping one.Conclusion
Okay, so all quirks aside I do have to say it’s nice to have this offering from Trumpeter, as it truly is better than the ESCI/ERTL, ala Italeri kit that was the only option. And frankly, isn’t that what makes modeling so much fun? Having options for what kit to build and even, when knowing there are shortcomings with a kit, one still takes on that challenge gladly to see if they can transform mediocre into masterful. While this kit cannot be dubbed mediocre, it will keep even the most seasoned modelers on his/her toes to ensure accuracy. Given it’s exceptionally low MSRP of $57.95 it is truly an exceptional value and delivers on a wealth of plastic. I’d suspect many aftermarket accessories such as resin cockpits, “corrected” resin splitter plates, PE interiors and exteriors, as well as decal manufacturers will be all to happy to help push the complete price well over $125 or more. But isn’t that the fun of this hobby, to decide what one is willing to do….build and super detail on your own or simply purchase the wealth of aftermarket accessories sure to be offered for a kit? Decisions, decisions. My thanks to Stevens International for the review sample.

