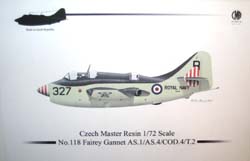
CMR 1/72 Fairey Gannet T. Mk.2
|
 |
Introduction
I’ve had this recurring dream of late whereby I’d win the
lottery; retire to my dream home on the coast and start collecting warbirds.
I’d start small – a late mark Spitfire, an early P-47 and
probably a Corsair, and grow from there. A second, probably less expensive
project, would be to add some unusual models to my collection by commissioning
a few large scale resin kits from master pattern makers like Paul Fisher,
Jerry Rutman and Radu Briznan (I’d pay them up front for the pattern
work and, if anyone else wanted one, split production proceeds 50:50).
One of those commissions would be for a big 1/32 Fairey Gannet with full
bomb bay detail and folding wings. And I’d build at least two of
them.
 |
My interest in the decidedly ungainly Gannet goes back to my youth. I saw
them up close at numerous air shows and found them a lot more interesting
to look over than a Phantom, Jet
Provost or Buccaneer (although the latter
would make the commissioning list if I ever moved on to jets). When Internet
Modeler presented me with the opportunity to build the CMR Gannet, I jumped
at the opportunity, easily passing on some other more classic aircraft
kits on offer.
First look
On inspecting the kit, the first thing I noticed was the weight of the
components. I wondered if the kit undercarriage legs would supported the
airplane once I’d added lead to the nose to balance it correctly.
Each wing is a single, solid molding with some very nice panel detail.
Most of the flap hinge fairings on the underside were poorly represented
because of casting bubbles that formed voids in the resin. Top and bottom
wing surfaces had a lot of these voids that would need work. Both of my
wing tip fuel vents were broken off and missing and would need replacing.
Most of the small components like undercarriage legs, props, tail hook
and so forth were quite heavily covered with flash and would need some
careful prep work to tidy up. The wheels were nicely cast. The kit certainly
isn’t a Paul Fisher, but it’s what you’d expect from
a small, limited-run resin kit.
First Steps
As with all my builds, I first soak the kit components overnight in
a container of soapy water to remove any release agent and grease from
previous handling. I don’t make nearly as many resin kits as injection-molded
one, but find that resin needs a really good clean to ensure paint sticks
later in the build. I use an old make-up brush to work up a lather before
rinsing and setting everything aside to dry.
Cockpit
I decided early on that I wasn’t going to spend much extra time
on detailing the cockpit. Once everything was buttoned up and painted,
you weren’t going to see much other than the seats. The vacuform
canopies weren’t the best either and even a coat of Future wasn’t
going to improve transparency that much. I therefore opted only to add
seat harnesses from aluminum foil. Construction is very straightforward,
with two subassemblies for the front and rear crew stations. The kit includes
a 2nd set of flight controls for the training version. Everything was
given a coat of Floquil black and, when dry, highlighted with some dry
brushing using white oil paint.
Fuselage
On inspection, the two fuselage halves were nicely aligned and hadn’t
suffered from any noticeable lengthwise shrinkage – an issue more
common with larger scale resin kits. The joining surfaces were very rough
and uneven with some considerable chipping extending on to the external
surfaces. To achieve a good joining surface I sanded the fuselage halves
against nicely wetted sanding paper glued to a piece of flat board. The
rudder is integral with the fuselage halves and the only other components
for a finished fuselage is a rear fuselage plug to cover where the radome
would be and a nose cap which includes the air intake detail. This last
piece was quite badly molded, with a lot of unsightly resin clogging up
the inside of the intake lips. Careful attention was needed to clear this
away and I was only partly successful.
Before inserting the cockpit assemblies, the insides were painted Floquil
Engine Black. Once this was dry, I mounted the two cockpit sections and
loaded each fuselage half forward of the wing root with lead shot held
in place with super glue. Once this was all dry, I joined the fuselage
halves, using an accelerator spray to quickly solidify the joins. Finally
I added the nose cap and the lower fuselage plug.
The next day I attacked the fuselage join lines and surface imperfections
with sanding sticks, Bondo and Mr. Surfacer 500. I remember sitting on
in chair in the driveway with bucket of water at my feet, sanding sticks
in hand, while watching the kids play with their buddies in the community
park - a great way to model. Once I was satisfied with the finish, I gave
the fuselage a final spray coat of Mr. Surfacer 1000 and rescribed those
panel lines lost to the heavy sanding. A very thin wash of black oil paint
helped highlight panel line deficiencies.
Tail Feathers
In addition to a large tail and rudder, Gannets also had small vertical
fins about mid-span on each horizontal stabilizer to assist with directional
control. These are well presented in the kit and only required a little
tidying up before being fitted to the main surfaces. The joints needed
a little work as the receiving cutout was a little wider than the fin
itself.
Wings
The wings ended up needing the most work. Although they are very nicely
detailed and solid, with no noticeable warping or shrinkage, there were
a lot of small and medium sized surface voids and some damage to the wingtips,
probably from shipping. Both undersurfaces had incompletely formed flap
hinge covers and trailing edges. I decided to give each wing a wash with
thinned oil paint to highlight all of the problems. I used small dabs
of super glue applied with a tooth pick to seal the larger holes and Mr.
Surfacer for the small ones. Several iterations of this process led to
a set of wing surfaces that, for the most part, were as good as injection
molded versions. Bondo helped fix the larger flap issues and I scratch
built a new set of vent pipes for the wing tips. As with the fuselage,
I gave each wing a final spray coat of Mr. Surfacer 1000 and rescribed
those panel lines lost to the heavy sanding.
Putting it All Together
Having spent so much time on building and prepping the fuselage and
wings, I was pleased to see that the wings fitted quite nicely into the
recessed fuselage openings. I did need to grind away and smooth a small
amount of resin under each turbine exhaust fairing, but that took only
a few minutes. As well as ensuring good alignment for the wings, the recessed
openings provide ample surface area for gluing. After a good dollop of
super glue, the wings were attached, aligned and left to dry. The tail
surfaces went on equally well. All that was required to finish the primary
structure was a little filler on both the main wings and tail surfaces.
Canopies
The vacuform canopies were by far the hardest part of the whole build.
Two canopy sets are provided, which is a good thing as I ruined the first
one by over sanding the bottom edges. The second canopy was treated with
more care and after much trial and error I managed to trim them to fit.
I then washed the two main pieces and dipped them in Future. Attaching
the canopies was very tricky as both sections were a little warped. White
glue and Tamiya tape did the trick though and a little extra glue helped
fill some of the gaps around the frames. After a good dry overnight, I
blended some of the rough edges using Bondo and Mr. Surfacer. I then carefully
masked the canopies using small squares of masking tape.
Undercarriage
As with most of the smaller components, the main undercarriage legs,
torque links and struts needed a lot of prep work, although the wheels
themselves were quite good. I decided to build up the undercarriage units
before painting as I always seem to mess it up once they’re painted.
Painting and Decals
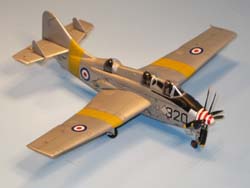
I decided early on to build the Gannet as a Mk.2 training aircraft as
I’ve always liked the overall aluminum finish with yellow training
bands. I also wanted to avoid having to rig the radio aerials common to
all the other variants, so the color scheme selection was a balance between
aesthetics and laziness.
CMR provides decals for a Fleet Air Arm (FAA) Gannet T. Mk.2, XA524,
based at Royal naval Air Station (RNAS) Ford in 1958. The only really
tricky aspect of this color scheme is the red and white hoped spinner,
which I eventually ended up painting freehand.
Painting itself was relatively straightforward, although any aluminum
finish is going to clearly show surface blemishes. Although I had spent
quite a few hours preparing the model for painting, I was still a little
disappointed with how much extra work I had to do following the first
coat of Floquil Silver. Despite numerous attempts at fixing blemishes,
a new coat of silver revealed a few more. Eventually I decided to settle
for what I though was a good enough finish. The yellow training bands
were an easy addition using Model Master Deep Yellow and took no time
at all. Lastly, I masked and painted the black antiglare sections. A few
coats of 50:50 Future/99% Isopropyl alcohol prepared the model for decaling.
Finishing
Having applied the decals and let them set overnight, I gave the whole
kit a few more coats of thinned Future. Later, I applied a thinned grey
oil wash to highlight the panel lines and soften the colors. At this point
I managed to rub off some of the silver paint that hadn’t been properly
protected by the Future. A little touch-up solved that issue. A few days
later I gave the whole model a light mist of Dull Cote to soften the glean
of the Future. Lastly I fitted the instructor pilot’s periscope
to the top of the canopy assembly.
Summary
The CMK Gannet was fun to build, although fussy. Despite the amount
of work needed to prepare the kit for painting, it was enjoyable modeling.
I’ll probably have to build the Trumpeter Gannet soon just for comparison.
The end result is so-so in my own eyes, especially as I think I made a
mistake in setting the two sets of blades close together. It’s too
late to change now, so enjoy them where they are!
Oh, and in case you’re interested in the other two commissions,
I’d probably have to go for a 1/32 Westland Wyvern and a big, beautiful
Blackburn Firebrand! Now where’s my lottery ticket?
Thanks to CMK for the review kit.
|
|


