Building Tank Master's 1/35
T70 Model 1942 Light Tank
|
 |
T70 Model 1942 Light Tank
I love to build Russian armor. There's nothing more beefy to me than
one of these subjects! Although quite simple in construction, the Russian
tanks were built to last and to prove this statement there are still Russian
tanks in use in many parts of the world, many, many years old. The T-70
was a powerhouse of a light tank built to replace the T-60 light tank
and its limits in use with twin engines that would push this light tank
along up to 32 MPH. Over 8,000 of these little tanks were produced by
the end of production in 1944.
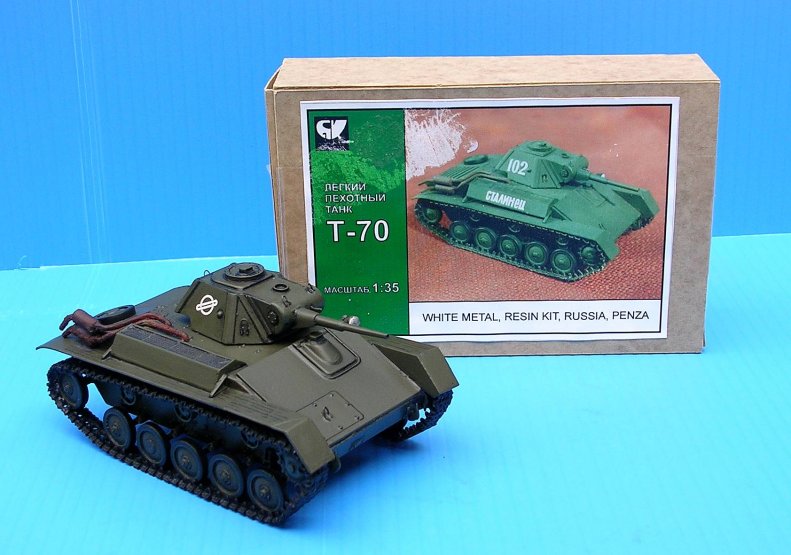
We are going to take a closer look at the building of the TankMaster's
kit "#T.011, T-70 Soviet Light Tank-1942", 1/35 scale, in this
build review. This kit is a combination resin/white metal kit imported
from Russia. (For a more detailed breakdown of the kit and kit parts,
see
Kent Kirkpatrick's "First Look" review HERE! )
First off, this kit is NOT for the rookie modeler on top of the normal
challenges that you will encounter with a resin and white metal kit there
are a few points of interest (to put it lightly!) that we will discuss
in the upcoming paragraphs that you will have to endure if you wish to
build this particular kit. This is by no means a "shake and bake"
style model kit and many hours will be spent in the construction and some
reconstruction of this kit.
Construction
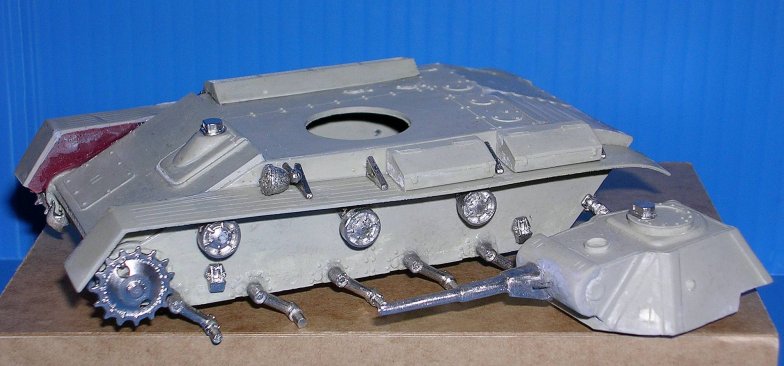
Let's get busy! I opened the kit box with a great deal of wonder as
this was my second kit that I had built from this manufacturer. I was
wondering what may be in store with this build. After separating all of
the parts, both resin and metal, I knew that there was going to be some
work involved here. The casting on some of the resin parts leaves a little
to be desired, my friends, as there are various blowouts, extra resin
leftovers, and just plain nasties on some of the resin parts that will
take some talent to straighten out. Some of these had to be left alone
by myself as to not disturb the overall integrity of the molding (example,
the exhaust mesh screen, for one). The details are quite good on some
of the resin parts, however, and do look true to scale for the T-70.
The metal pieces are well cast, but all will need cleaning and de-burring
of course, and detail is good on these also, and the only bad castings
were the vehicles horn assembly, with no trumpet present in the cast,
and the nonexistence of a machine gun barrel for the turret (which may
have been lost, or forgotten at the factory; all parts are in well sealed
zip-loc bag's).
Your other major challenge will be the kit's instructions, basically you
get a one page sheet with a couple of exploded diagrams (not drawn well,
either), and some basic labeling, all in Russian Cyrillic. I e-mail a
copy of the sheet to one of my multi-lingual friends, to help me out with
the translation, but unfortunately, most of the instruction turned out
to be basic vehicle specifications and a very basic paint scheme recommendation.
The most useful part of the instruction is a minute schematic showing
the size of the vehicles grab-handles that you must construct later. So
essentially, you're on your own here folks, as far as a construction sequence,
as well as any type of instruction at all spent a lot of time just mapping
out the necessary steps, as I went along with the build, which you will
have to as well, just think about what you are trying to achieve before
you begin to achieve it!
I'll try to keep the detailed instruction to a minimum, so this review
doesn't turn into a major thesis. To begin, the lower tank section is
divided into four separate pieces. The main lower hull, with three top
plate sections. The fit of these three sections is decent, but you will
have to trim and sand a little for better fit. The detail is clear also,
but the louvers on the rear engine plate were quite buggered up with a
lot of leftover resin trash. Some careful work with the x-acto and sanding
stick turned out a decent look.
After these pieces had set (by the way, I used two types/styles of superglue
throughout the entire build, regular and gel style, depending on the situation)
I began to plan the attachment of the white metal adornments, such as
front and rear tow hooks, drivers sight, front transmission side plate
cover and drive sprocket, and the guide idler wheel brackets. (I suggest
not to attach the upper guide wheels yet, to make the addition of the
treads MUCH easier later on.)
Most of these metal pieces positions are marked on the casting by pin
marks, but you must make the holes for the piece's mounting pins in the
resin. I chose my favorite pin vise and arsenal of precision drill bits
for this job, and proceeded to methodically drill and place all necessary.
 |
|
 |
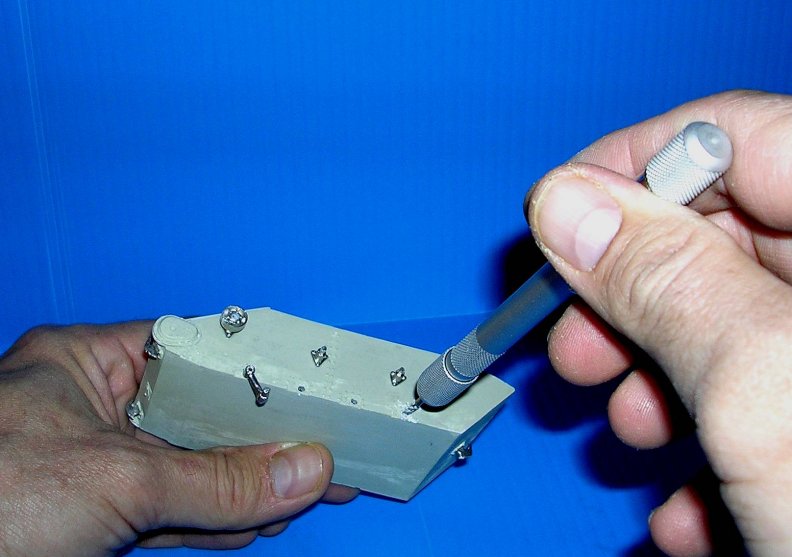
All metal parts will need to be trimmed and cleaned up before attachment,
as there are a little trash and seams to take care of first.
Moving on to the idler wheel arms, you have six per side, all of which
will also need their mounting holes drilled. I suggest choosing the drill
bit size carefully here, to facilitate a tight fit of these parts; only
because, since there is no stated ground clearance in the instructions,
you will want a tight fit when you are gluing these in place, as you will
have to make a judgment call with the clearance issue, and also keep the
ground clearance level. If the fit is tight, you won't have to struggle
with these parts flopping all about in the glue process the way that I
did it was to drill all of the holes, clean up all of the arms, and I
inserted each one without gluing. I then cleaned up all of the resin ground
wheels themselves, (which unfortunately is no small task) and this process
involves drilling each one out to the proper size and depth of the accompanying
support arm. BE CAREFUL when you are drilling as not to punch your way
clean through, because you will ruin detail of the wheel that can't be
replaced (such as very tiny bearing cover detail).
Once all of the wheels where ready, I placed each one on each support
arm, and leveled the tank in this manner, and also adjusted the ground
clearance. Next, with the wheels still dry-fitted, I glued each support
arm individually into the lower hull section, and most importantly, keep
checking level/clearance as you go, as these parts can move on you and
once glued in place, it will be difficult to remove them again without
some type of damage resulting. Set this aside to dry completely!
Next, we will move to the turret, which is a simple phase in the build,
but with one drawback. The turret assembly consists of on e solid resin
chunk, well detailed and quite clean, which needed only a touch on sanding,
the barrel assembly in white metal, the gunner sight, five grab-handles
that you must supply and form, and one machine gun in the mantlet; one
slight problem, no MG supplied in my kit, or it was lost in production,
packaging, or transit. Not a problem though, as at this scale, there is
not much detail to the coaxial 7.62mm MG, and if you follow most reference
photo's it's basically just a barrel jutting out of the oval mantlet hole.
So without going to much fuss, I set about looking for a distinct replacement
for the missing barrel, and quickly decided upon a basic common ball headed
straight pin as a replacement (cut to length, of course). I drilled a
minute hole in the mantlet, sunk the pin in deep in glue, and after it
was set, trimmed it to length using a couple reference photos as a judgment
call. Not too bad. There were some slight air bubble holes in the mantlet
that needed attention, but a small amount of putty took care of this.
The main barrel mated well with the turret mantlet, and after a slight
cleanup and a shallow drilling out of the barrel end, it was attached
with ease. The gun-sight offered up no problems at all. Using the diagram
supplied with the kit and a good reference shot (try
these right HERE! ) I made the handles out of light gauge wire and
attached with a touch of adhesive. Basically, at this point, turret construction
is done, sans paint and decals.
Now we will move to the next step, and also the next major kit flaw,
which is the attachment of the tanks fenders/tread covers. These are both
made from very thin (and brittle) resin, so be careful when handling and
working with these. Good detail is apparent. One of the two provided in
the kit was nearly perfect, with just a slight trimming required for a
decent look and fit, but the other one was a little problem here.
Seems as if the casting of this one was bad, or in transit the resin
was broken away (although there were no chips in the kit bag) and was
basically unusable in this state. Well, I needed to replace the missing/broken
resin with something suitable, so some sheet styrene was adopted for the
task. I carefully removed the remaining jagged edges of resin until I
came to rest at the flat surface of the upper plates, and then using the
good fender, proceeded to trace a pattern onto a thin sheet of styrene.
After a little cut and trim to fit, I attached the retrofit part with
a little adhesive, and an addition of a little putty around the edges,
had a very suitable replacement repair.
After a final sanding, this part, as well as its mate, was ready to
be attached to the hull assembly. Once again handle these carefully as
they are quite thin and brittle. Begin at the front, and lightly glue
as you follow back, making sure to keep the proper level and clearance
on each side evenly. You will then need to attach the white metal angle
support hangers to the tread guards, and this is a simple task if you
follow the instruction diagram for placement. At this point I then added
all of the additional hardware of the tank, including toolboxes, headlamp,
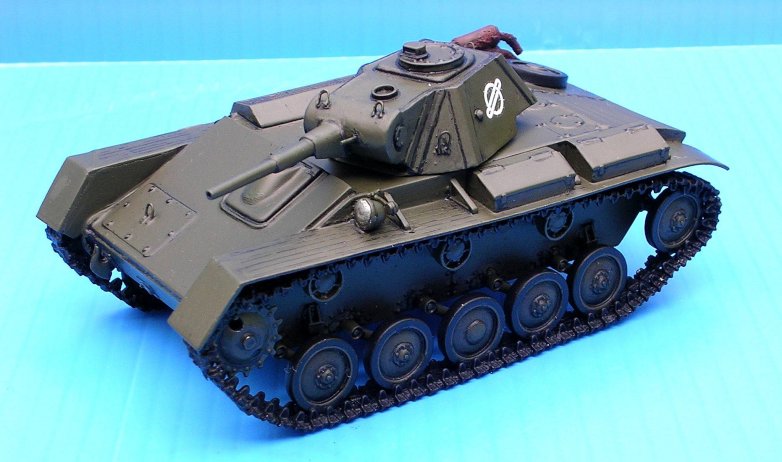
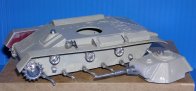
horn, and front hull grab handle. At this point we're ready for paint!
The suggested paint scheme for the tank in the instructions were, quite
simply, "Green" for the tank, and "Black" for the
treads. On the subject of green, there were a multitude of greens used
by the Russians throughout the war, depending on when and where the tank
was built, and what type of paint pigment was used. From the all-too-famous
bright "Russian Green", to darker olive drabs, there are many
variations. The color photo that I used for most of my reference was painted
in a dark OD, so I chose to match this as closely as possible.
Tamiya TS-5 enamel was my choice for better coverage of the white metal
parts. I painted both the tank & turret, as well as all of the ground
wheels dark OD, three light coats, and set aside to cure. I also chose
to lightly weather this tank with a dark, thin wash to bring out a little
extra detail in the kit parts.
The metal treads or tracks in the kit are our next focus, and quite
honestly, overall these treads are very good. They are nicely detailed
and true to scale accuracy, and quite pliable for easy "sag"
definition. They are cast in short segments of five individual treads
each, about 1" long total. There are also a number of individual
treads included for final mating of the treads to your tank kit. I laid
out enough of the treads to span the length of the tank times four, for
top and bottom tread sections on each side, respectively. These all needed
a slight trim for the interlocking tabs to fit, and after this was done,
I applied a drop of glue to each section. You could most definitely solder
these joints also, but I chose to use glue in this case. I gave the treads
a coat of flat
black as a primer coat at this time.
Before forming the treads to the tank, you must next have some ground
wheels to form them to! Since we have already gave our ground wheels the
base coat, all that is left is to paint the outer rubber rim flat black;
I use a Mark-All black pinpoint valve-action paint marker for painting
most 1/35 scale tank wheels. If you get enough paint on the pinpoint tip,
and touch the tip to the wheel surface, capillary action will pull the
paint onto and around the wheel making the job quite simple. I hold each
wheel on a round toothpick snapped in half, then stick the other end into
a piece of Styrofoam to hold until dry very simple and effective!
After curing, I glued all of the ground wheels into place on the support
brackets, and to keep the paint from chipping while fitting the metal
treads, I sprayed them lightly with a coat of clear flat. Next, I formed
a semicircle on the front tread section of the tread assembly, to facilitate
the front drive sprocket. Carefully placing the assembly onto the tanks
top guide wheels, I formed the treads to my liking around the sprocket,
and adding some tread sag in a few choice spots. The treads are molded
very easily with a pair of needle-nose pliers. After molding the top half,
I placed the bottom section on and basically did the same procedure. Continue
to the opposite side, being careful not to damage tank or treads. After
I was happy with the formation, I kept the two halves separate, and gave
each another coat of flat NATO black. A light wash of a burnt umber for
a touch of rust, and the tracks were ready to be installed. If you recall,
we left the upper guide wheels off of the original build earlier to make
the attachment of the treads a bit easier. Now is the time to get ready
to attach these to the support brackets
Carefully replace the tread sections back onto the idler and guide sprockets,
and place a small spot of superglue at every other wheel to attach in
place. Attach the upper guide wheels to the support brackets at this time.
You will have a small section at the front and rear tread assemblies for
placing in the final connecting individual tread pieces, and I suggest
painting these beforehand. Carefully work the tread pieces together, and
glue accordingly. If you were careful in handling your treads you should
just have a minor touchup here and there from the attachment process.
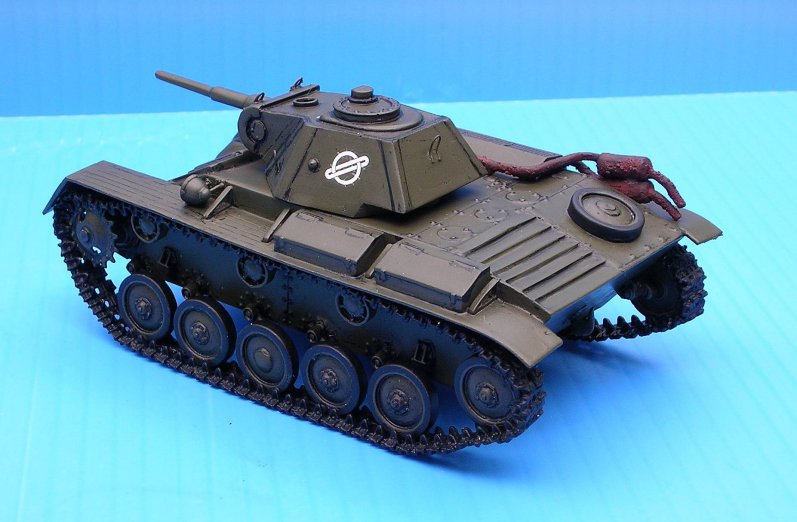
At this point in the build, we're almost complete, but there are a couple
of things left to do. The T-70 was equipped with a set of twin mufflers,
at the right rear top of the vehicle, one stacked upon the other in attachment.
These are made of white metal as well, so forming these to fit your tank
is very easy to do. Instead of painting my mufflers, I used the RUSTALL
system to realistically make a pair of rusty, crusty, used mufflers. There's
really no better way to re-create a rusty surface than with RUSTALL. After
completing the process, and letting the mufflers dry completely, I attached
them in place. Now all that's left to do is to add some markings to your
subject. There is no decal markings provided with this kit, so it's up
to you to decide which tank markings that you will use. I had a sheet
of leftover markings from another 1/35 scale T-70 of another make, so
I decided to use the division insignia pictured, which is of an unidentified
Ukrainian tank in 1943. When the decals dried, I gave the entire two light
coats of clear flat spray to seal the tanks finish, and that's it! Project
complete!
Conclusion.
At the beginning of this writing I had stated that this kit is NOT for
the beginning modeler, and I will stress this point again here. Honestly,
this kit has some major downfalls that come attached to it. Poor resin
casting and poor instruction, are two biggies, which make completion of
this kit extremely difficult. Quite frankly, if I had not made a promise
to Internet Modeler to construct this as a build review, it would have
been in the trash weeks ago. There are quite a few T-70 tank models on
the market currently, from various manufacturers, some with remarkable
detail and accuracy, at a much lower price, making this kit definitely
obsolete in my eyes. I can only recommend this kit to the experienced
modeler who is looking for a challenge, or one who desires to build a
resin/white metal kit only. I would like to thank TankMaster
for the review kit.
|
|