Bra.Z Models 1/144 ATL-98 “Carvair”
Conversion
Overview
 My
first experience with the Carvair dates back to when I learned how to
remove gold from England. Basically, you pound it into sheets, remove
the armor plating from your car, and replace it with the gold sheets.
Then you drive to the airport, load your car onto a Carvair, and fly off
to France, with the customs people none the wiser. At least, that’s
how Ian Fleming outlined it, and it would have been successful, too, if
it wasn’t for Sean Connery. While the Carvair appearance in “Goldfinger”
is not the most impressive usage of an airplane in a James Bond movie,
it nonetheless planted that seed of desire in the back of my head. It
has remained there until now, with this latest release from Bra.Z. My
first experience with the Carvair dates back to when I learned how to
remove gold from England. Basically, you pound it into sheets, remove
the armor plating from your car, and replace it with the gold sheets.
Then you drive to the airport, load your car onto a Carvair, and fly off
to France, with the customs people none the wiser. At least, that’s
how Ian Fleming outlined it, and it would have been successful, too, if
it wasn’t for Sean Connery. While the Carvair appearance in “Goldfinger”
is not the most impressive usage of an airplane in a James Bond movie,
it nonetheless planted that seed of desire in the back of my head. It
has remained there until now, with this latest release from Bra.Z.
The Conversion
For those who are familiar with Bra.Z. Models, you will undoubtedly
think of high quality resin castings with exquisite detailing. This one
is a bit different. Perhaps they did not like working with all that resin
material, or maybe they just wanted to try something new, but this conversion
is injection-molded plastic. Yep, plastic. You get the same high quality
detail, but in a media that matches the kit you will be converting. This
will greatly improve assembly, to be sure. Okay, there is one resin piece,
but more on that later.
Now, although this is labeled a conversion, and I suppose technically
it is, this will require absolutely no extra work on the part of the modeler.
Bra.Z. has created this as a direct replacement of the kit parts (the
kit being Minicraft’s beautiful 1/144 C-54/DC-4 kit), so there will
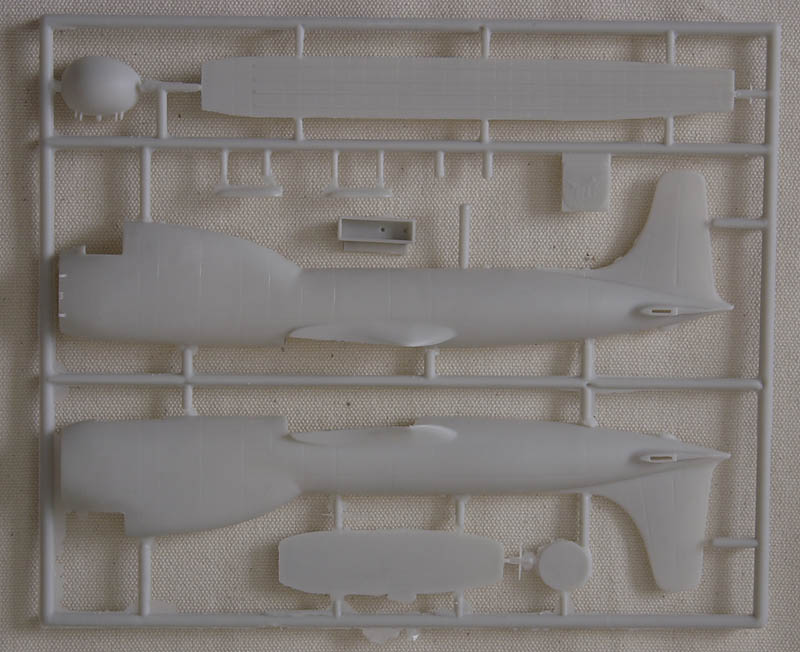
be no cutting or trimming needed. You get a single sprue of gray plastic
parts that includes the fuselage halves, a separate nose, a main cabin
floor, a rear bulkhead, and a cabin roof. This will allow you to build
your Carvair with the nose open (and perhaps Goldfinger’s car being
loaded?). However, the instructions indicate that you will need to place
3/4oz of weight in the nose, and I am not sure where you could fit that
if you build yours with the nose open. Something to consider.
The one resin piece I mentioned earlier appears to be an omission. The
instructions show the parts tree layout including this piece, which is
the nose gear well, but the sprue has a blank spot there. So you will
have to break out your trusty cyanoacrylate and tack this in place. Another
interesting feature of the Carvair is the bulged nose gear doors, which
are also nicely replicated in this kit. Looking over the pieces, this
is exquisitely done, with finely recessed panel lines throughout. There
is a bit of flash on the edges, which is understandable considering that
Bra.Z. Models likely does not have one of the Tamiya injection machines
in his basement, but there really is nothing there that a bit of sand
paper wouldn’t cure. I had mine off the sprues, cleaned up, and
test fitted together in about two minutes.
The instructions do not indicate anything other than the assembly of
the conversion parts, but the rest of the assembly will follow the Minicraft
kit instructions. Wings, tailplanes, engines, landing gear, and clear
parts all will come from the Minicraft kit. There are no decals included
in this conversion, but I am sure it will not be long before we see some
of the classic Carvair schemes come out (I believe F-DCAL
already has a few sheets done). While I am partial to that James Bond
Carvair, I believe that this conversion will look much more striking in
the livery of Aer Lingus.
For those looking for a simple conversion that will definitely turn
heads, this might be just the thing you need. Considering the price of
both the original kit and the conversion, it is not that pricey of a build,
either. My sincere thanks to Bra.Z.
Models for the review sample. For those new to airliner modeling,
the Bra.Z. line of accessories is well worth checking out. |
|