Italeri's 1/35 2.5 ton 6x6 TruckBy Mark Smith |
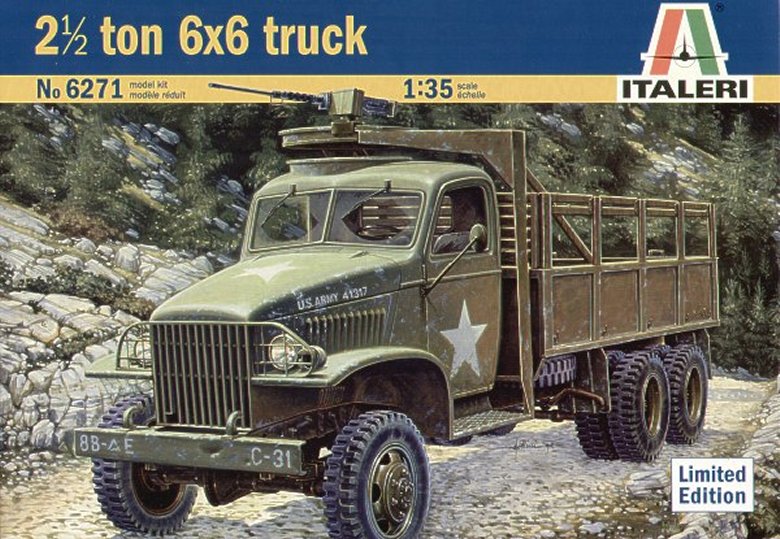 |
Building Italeri Model's kit #6271, "2 ½ ton 6X6 truck", in 1/35 scale
In this build review we will take a closer look at the construction
of Italeri Model's "2 ½ ton 6X6 truck", kit number 6271,
a limited edition plastic model in 1/35 scale. This kit is a re-release
of one of their older kits from the 1980's, but honestly speaking, although
over 20 years old, the kits still hold up to their newer counterparts
hands down!
 This
kit is molded to represent the uncommon version of the truck, the enclosed
all metal cab style, complete with the cutout machine gunners ring. I
will also point out that there is only one kit available today of the
GMC truck, the open cab version, which is offered by Tamiya Models.
This
kit is molded to represent the uncommon version of the truck, the enclosed
all metal cab style, complete with the cutout machine gunners ring. I
will also point out that there is only one kit available today of the
GMC truck, the open cab version, which is offered by Tamiya Models.
The kit consists of 180 parts, all molded in a dark olive drab plastic,
with a small sprue of 7 clear plastic parts for the windows and headlight
bezels. All parts are molded remarkably clean, with good detail and crisp
lines, considering the overall age of the kit itself. There is also a
small decal sheet with markings for two different vehicles, one for a
US Army truck of the 34th Infantry Division, and one set for the French
Army 101e Infantry Regiment.

The instruction sheet provided is a four-page foldout style format, with blow up style black and white drawings. The paint scheme is mapped out in the beginning quite well, listing all colors needed, in Model Master enamel and acrylic paint numbers. But you must look closely in the instructions for the corresponding paint color letters, as they are much smaller than the part numbers listed…I just went through beforehand and used yellow highlighter to enhance the paint letters so that they would be easier for me to spot.
 All
right, let's get busy! The build begins most sensibly with the construction
of the lower chassis, which is all separate parts, numbers 1 through 14.
Long side beams, cross members, rear bumper and rear pintle hitch are
all included here. This entire assembly went together cleanly, no additional
trimming needed to fit any parts at all. Note that these parts are well
detailed with bolt heads and rivets, and very accurate. Now, this is the
part in the build where you have to stop and think about your next steps,
as there are now parts described in the instructional steps that will
be different colors than your OD base color. Parts #15 through 32 include
the well detailed rear leaf spring suspension system, both rear axles
with two piece differentials, gas tank, battery box, and 8 rear tires,
plus the spare…needless to say, all tires were omitted from the build
at this point, and were built separately from this section of the build,
and finished accordingly. Again, each of these parts is very well detailed,
and the fit was once again wonderful. I must stress care in the alignment
of the rear and front suspension systems though, or your truck won't sit
right with all wheels on the ground. As long as you keep the chassis square
and fit all parts tightly, you won't have a problem. So far, so good!
All
right, let's get busy! The build begins most sensibly with the construction
of the lower chassis, which is all separate parts, numbers 1 through 14.
Long side beams, cross members, rear bumper and rear pintle hitch are
all included here. This entire assembly went together cleanly, no additional
trimming needed to fit any parts at all. Note that these parts are well
detailed with bolt heads and rivets, and very accurate. Now, this is the
part in the build where you have to stop and think about your next steps,
as there are now parts described in the instructional steps that will
be different colors than your OD base color. Parts #15 through 32 include
the well detailed rear leaf spring suspension system, both rear axles
with two piece differentials, gas tank, battery box, and 8 rear tires,
plus the spare…needless to say, all tires were omitted from the build
at this point, and were built separately from this section of the build,
and finished accordingly. Again, each of these parts is very well detailed,
and the fit was once again wonderful. I must stress care in the alignment
of the rear and front suspension systems though, or your truck won't sit
right with all wheels on the ground. As long as you keep the chassis square
and fit all parts tightly, you won't have a problem. So far, so good!

Still working on the lower chassis, parts 33 through 42 consist of the split rear and front drive shafts, transmission and front transfer case, front axle/differential, and the one-piece lower engine detail/front fender assembly. At this stage the instructions also prompt you to add the exhaust system to the lower chassis, but here again, this part will be omitted until later because of finish differences. The paint scheme calls for rust color paint for the exhaust, but I'm going to use the RUSTALL system on mine for added realism.
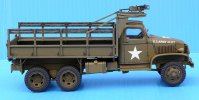
At this point is where the modeler must choose if he wants to build the truck with the front winch system, or just front bumper alone. I chose the latter only because I liked the look better. The front winch is a well-detailed part, actually six separate parts to form the winch, including a short piece of molded chain to attach to the end of the winch cable and hook realistically to one of the front tow hooks on the bumper. Either choice should end up with a super good look in the final. After the winch and bumper are added, the front leaf spring suspension is added, along with the steering system, which also quite accurately is made up of separate parts such as the steering arms, control arms, torsion bars, and brake drums. Again I will stress the attention to details of this kit is amazing for it's overall original age.
Now, I decided to construct and finish all of the kit's tires, including
the spare, and be careful as you do this because there are inside and
outside rear tires, and the front tires are also different from the rear,
but if you follow the number system no fault will be had.
All tire parts went together well, mated cleanly with just a hint of a
seam that will need to cleaned up a little when the glue dries. The color
scheme of course is flat black for the rubber, and OD for the tire rims,
so after a little smoothing of the tire seams, all tire assemblies were
sprayed OD, front and back, with Model Master acrylic. This paint dries
fast, adheres well, and the one coat of OD on the tire rubber will act
as a good primer for the flat black. After the Olive had dried, which
really takes no longer than 15 minutes to touch, I hand painted all of
the tire rubber flat black and set aside to dry again. Next, this is where
yet another RUSTALL product comes into play, a solution called DEADFLAT,
which is a water based matte varnish, quick drying also, with many different
usage's, but this time, several coats on the tire rubber really makes
them look "right", and once tried, you will see what I mean.
It makes the rubber look just like the real thing! Set all of your tires
aside to cure completely and let's move on.
 Now
we'll turn our attention to the construction of the cab and contents,
beginning with parts #73 through 88, which is the cab floor/seat mount,
and lower interior details, such as the steering column, gearshift and
brake levers, and the seat itself. Basically, all parts aside from the
seat and steering wheel are primarily OD in color (except for the tiny
gearshift knobs and brake lever handles~will be hand-painted later) so
this assembly can be constructed and painted as such. There is one problem
at this point in the build, though quite minor. The mounting hole for
the main gearshift in the floor of the cab is entirely too large, so large
in fact the piece falls completely through. After a short thought of how
to rectify this molding snafu, I came up with an easy fix…in my stash
I have some two part Tamiya Epoxy Putty, and just a tiny ball of this
goop pressed on the underside of the floor so that a bit of the epoxy
was forced into the hole made a desirable mount for the shifting lever.
This stuff dries rock hard, can be sanded, and takes paint well…problem
solved! I sprayed this assembly and the upper half of the cab, doors (without
windows!), hood louvers, cab back panel, and windshield frame with a couple
good coats of OD and set aside to dry.
Now
we'll turn our attention to the construction of the cab and contents,
beginning with parts #73 through 88, which is the cab floor/seat mount,
and lower interior details, such as the steering column, gearshift and
brake levers, and the seat itself. Basically, all parts aside from the
seat and steering wheel are primarily OD in color (except for the tiny
gearshift knobs and brake lever handles~will be hand-painted later) so
this assembly can be constructed and painted as such. There is one problem
at this point in the build, though quite minor. The mounting hole for
the main gearshift in the floor of the cab is entirely too large, so large
in fact the piece falls completely through. After a short thought of how
to rectify this molding snafu, I came up with an easy fix…in my stash
I have some two part Tamiya Epoxy Putty, and just a tiny ball of this
goop pressed on the underside of the floor so that a bit of the epoxy
was forced into the hole made a desirable mount for the shifting lever.
This stuff dries rock hard, can be sanded, and takes paint well…problem
solved! I sprayed this assembly and the upper half of the cab, doors (without
windows!), hood louvers, cab back panel, and windshield frame with a couple
good coats of OD and set aside to dry.
Add the bench seat (which is finished in MM#4676, Exhaust Metalizer; sounds odd but looks "right"), detail the shift knobs and brake levers with some flat black, and add the steering wheel. There is also a driver figure included in this kit, and the detail and mold of this figure is again very good, but I decided not to include him in the build, to keep the truck itself the main subject. If you want to include this figure (or any other in the cab) now is the time to do it. Focusing now on the upper half of the cab. There are two pieces to add here before you assemble the two halves together, one the trucks headliner/visor assembly, and the trucks dashboard. The dashboard is quite detailed, showing gauges, dials, radio and radio knobs, and a glove box. You've got the choice of one, hand detailing the dash, two, using the supplied dash decals (which are very good), or three, nothing at all because unless you build the truck with movable doors (which is possible, with a little scratching) you're really not going to be able to see the dash at all. Me, I used the dash decal and some Micro-Sol and it came out really well. Add these two pieces, and you're ready to assemble the complete cab, which consists of the lower cab assembly that we built, the upper cab assembly we were just working on, the cab rear panel, two doors, and the two louvered hood panels. I chose NOT to add the clear window parts as of yet, because I want to spray the entire truck with flat clear matte before I do. Didn't think it would be much of a problem to do so, which proved correct…but that's later on. You can assemble the windshield now if you wish, but I suggest leaving it off the build until later also.
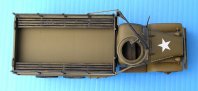
Time to build the bed of the truck, which includes parts numbered 100 through 114, and basically, if you follow the diagram in the instruction sheet, there aren't any hurdles to cross, with no fit problems at all. I did omit the tool rack here, as we will be detail painting these to add after the bed has been painted and detail weathered. You should also add the machine gun ring mount and braces before the painting is done, but leave off the gun itself for hand detailing. There's not much of a challenge with the paint scheme, as this entire assembly is colored OD also.
 O.K.,
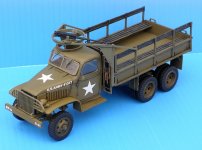
you should now have three completed subassemblies of this truck done at
this time, the chassis, the cab assembly, and the bed assembly, all painted
up, and looking pretty, plus a whole pile of wheels and tires.
O.K.,
you should now have three completed subassemblies of this truck done at
this time, the chassis, the cab assembly, and the bed assembly, all painted
up, and looking pretty, plus a whole pile of wheels and tires.
I turned my attention back to the chassis now, and began to attach the
tire/wheel assemblies. And if you were careful with the attaching of the
suspension system, the alignment should be right on. Rear tires are basically
added one at a time, inside tire first, then a ring spacer, outside tire,
then the wheel bearing cap (spacers and wheel bearing caps were hand painted
OD before assembly). Continue with all eight rear wheels, and then move
to the front. The front tires mount directly to the wheel drums, with
then again a small ring spacer topped off with a wheel bearing cap on
each side. Turn your truck over, and make sure that all is aligned well.
Attach the spare tire to the spare mount on the chassis. Now, I had mentioned
earlier that I was going to use the RUSTALL system for my exhaust, instead
of rust colored paint. If anyone has ever used this process of producing
the look of rusted metal, trust me, you will never use rust colored paint
to do this again! The final look of the rusted piece is so realistic that
you really can't tell that it is a piece of plastic (although RUSTALL
will also work on metal, plaster, and even paper!). Basically, it is a
rust colored wash type system of a specially formulated suspension that
contains no rust at all, but tiny bits of "non-rust" that attach
themselves to what your trying to "rust" and when dry becomes
a very convincing rusted look. I am writing a full feature article on
the RUSTALL system at this time, with a step-by-step photo instruction
of how to do this, plus some little known inside tips and techniques,
to be published at a later date.

 I
"rusted" my entire exhaust system, including the muffler, and
attached this to the chassis when completely dried. Looking really sweet!
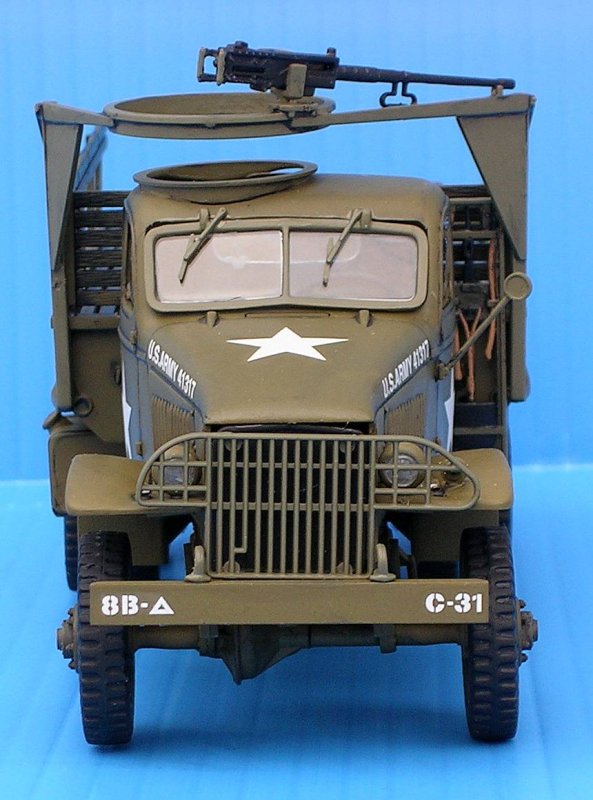
Mounting the cab assembly is next, and the alignment between chassis and
cab was perfect. There are some smaller parts to add at this point such
as the headlights (without the lenses), the turn signals, and the horn,
which all are mounted to the topside of the front fenders. I hand-painted
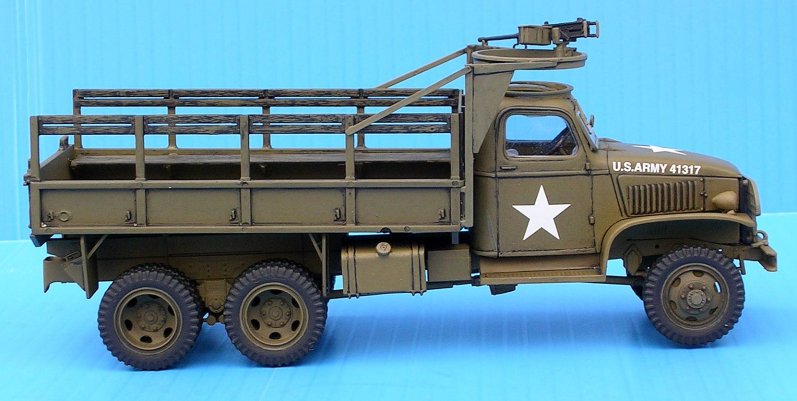
all of these before gluing in place. We're now ready to add the decals,
so you must decide which vehicle your going to represent here, and in
this case I chose the US Army version. The decal's are good quality, went
on easily, and without any hazing when dry. Follow the instructions for
proper placement, and refer to the box-art if any question.
I
"rusted" my entire exhaust system, including the muffler, and
attached this to the chassis when completely dried. Looking really sweet!
Mounting the cab assembly is next, and the alignment between chassis and
cab was perfect. There are some smaller parts to add at this point such
as the headlights (without the lenses), the turn signals, and the horn,
which all are mounted to the topside of the front fenders. I hand-painted
all of these before gluing in place. We're now ready to add the decals,
so you must decide which vehicle your going to represent here, and in
this case I chose the US Army version. The decal's are good quality, went
on easily, and without any hazing when dry. Follow the instructions for
proper placement, and refer to the box-art if any question.
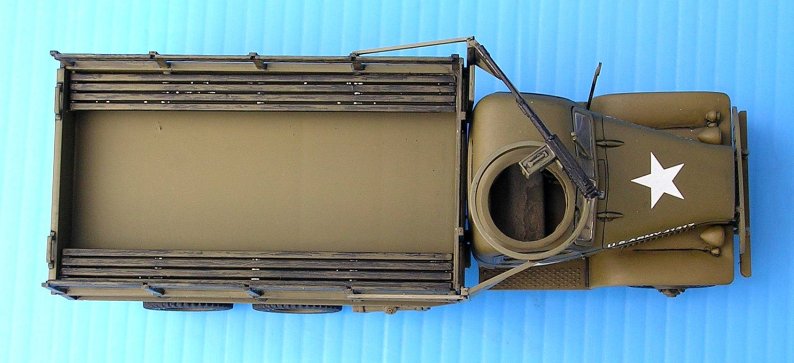
As the decals were drying, I now took to the task of the details of the truck bed, which include the machine gun, and the tool rack. The MG was simple to assemble and paint, consisting of five pieces, the main receiver/barrel assembly being flat black, and the ammo box and lower sliding mount OD In color. The tool rack contains a shovel, two-piece mattock, and an axe, which I painted accordingly, although there are no paint schemes for these tools in the instruction, a little imagination will put you on the right track. Attach both of these parts to the bed.
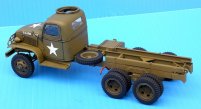
I'm now at the point in this build where I am going to add a little final dark washing here and there to bring out some subtle details, such as bolt heads, rivets, and wood-grain of the slat boards on the bed. When I was satisfied with this, and completely dried, I clear coated the chassis/cab subassembly, and the still unattached bed assembly. The main reason that I left the bed unattached was for the sole purpose of photos for this feature, so the reader could see what the truck looks like without the bed attached. So if you wish to attach the bed before sealing then by all means, do so.
We're on the home stretch now, folks, but there are still some small details that need to be added to your 6X6. First, the headlight lenses should be added to the headlights, and following this, you now can add the radiator/front grill assembly to the truck cab, (which of course needs to be hand painted before, as the radiator is flat black and the grille is olive). Then the two front tow hooks can be attached to the upper beam of the bumper, one on each side ahead of the grille.
 This
next paragraph contains the other two flaws of this kit that I found,
which number one is, the window parts don't fit well, and number two,
the vehicles rear view mirror is molded facing the wrong direction. Let's
start with the windshield…both left and right side panes are too
large to fit into the frame; a little careful sanding, just a little bit
at a time on the edges, and test fit until they drop in. Once the windshield
panes are in you can add the two separate windshield wipers, and make
the choice of either mounting the windshield in the open or closed position.
I tried both, and decided that the closed position looked much cleaner.
The small rear cab window is slightly undersize, as is the two doors,
but if you are really careful when you're gluing these in, you can center
them up in the frames and no one but you will know that they are just
a tad too small. And as always when working with clear parts, watch the
glue…one false move and you'll have a botched up window that's going
to need some extra attention to clean it up again. I mounted all of the
windows, one at a time, working inside the cab with a pair of tweezers
and a toothpick to help the centering process. Lastly, the windshield
was attached to seal the deal!
This
next paragraph contains the other two flaws of this kit that I found,
which number one is, the window parts don't fit well, and number two,
the vehicles rear view mirror is molded facing the wrong direction. Let's
start with the windshield…both left and right side panes are too
large to fit into the frame; a little careful sanding, just a little bit
at a time on the edges, and test fit until they drop in. Once the windshield
panes are in you can add the two separate windshield wipers, and make
the choice of either mounting the windshield in the open or closed position.
I tried both, and decided that the closed position looked much cleaner.
The small rear cab window is slightly undersize, as is the two doors,
but if you are really careful when you're gluing these in, you can center
them up in the frames and no one but you will know that they are just
a tad too small. And as always when working with clear parts, watch the
glue…one false move and you'll have a botched up window that's going
to need some extra attention to clean it up again. I mounted all of the
windows, one at a time, working inside the cab with a pair of tweezers
and a toothpick to help the centering process. Lastly, the windshield
was attached to seal the deal!
Conclusion
Overall, this re-release from Italeri proved to be a winner, a definite oldie but a goody! Excellent workmanship, attention to fine details and accuracy, and mostly a great fit except where otherwise noted, all make into a very pleasurable build experience. As a limited edition kit, if you really want to include this in your collection, it would be wise to pick up one (or more!) soon before they're history. It would be great if Italeri would decide to reissue their other GMC truck kit, original kit #201, the "Water Tank Truck", which comes with a full metal cab for this alternative as well. Highly recommended from this modelers' point of view!
Many thanks to Testor's for providing the model kit for my build review
Please read Kent Kirkpatrick's in-box review of this kit in the December 2005 issue of Internet Modeler for an in-depth look at the unassembled kit.
References
GMC CCKW 353 & 352- Wings and Wheels Publications
Ground Power Magazine #65 10/1999
Ground Power Magazine #66 11/1999