Cold War Hybrid:
Convair’s
YB-60 in 1/144
|
 |
Background
The mammoth YB-60 was Convair's proposal to the USAF for
a B-36 bomber replacement. In the late forties Boeing's Model 462 was
being developed into what would become the hugely successful B-52, but
it was considered a technologically  risky
program and the Air Force wanted a backup in case it failed. Convair swept
back the wings and tail surfaces of its B-36, and settled on the same
turbojet engine configuration as Boeing after giving serious consideration
to turboprop propulsion. The B-36G project (as it was originally called)
was to use about 70% of the B-36 airframe, saving Convair a lot of design
work and expense. However, using so much of the original wing was the
airplane's undoing - it just didn't allow for the higher speeds needed
(in fact the cruise speed turned out to be about 100 mph slower than that
of the B-52). After building two prototypes and flying only one of them,
the program was finally cancelled. The airframes were scrapped in 1954. risky
program and the Air Force wanted a backup in case it failed. Convair swept
back the wings and tail surfaces of its B-36, and settled on the same
turbojet engine configuration as Boeing after giving serious consideration
to turboprop propulsion. The B-36G project (as it was originally called)
was to use about 70% of the B-36 airframe, saving Convair a lot of design
work and expense. However, using so much of the original wing was the
airplane's undoing - it just didn't allow for the higher speeds needed
(in fact the cruise speed turned out to be about 100 mph slower than that
of the B-52). After building two prototypes and flying only one of them,
the program was finally cancelled. The airframes were scrapped in 1954.
 Ever
since my formative years as an aviation nerd I';ve been fascinated by
photos of the YB-60 and awed by its size. To date no model manufacturer
has produced a kit or conversion set for it, and since I love these one-of-a-kind
airplanes I just had to give the conversion a try. Years ago Mark Young
made a beautiful model in 1/72 scale using Monogram's B-36, but this thing
was huge, and there's no way I had room to display something like that.
Along came Hobbycraft with a very nice series of 1/144 th B-36 kits, and
then Cutting Edge with their 1/144 NB-52 conversion set (for the engines).
I was in business! Ever
since my formative years as an aviation nerd I';ve been fascinated by
photos of the YB-60 and awed by its size. To date no model manufacturer
has produced a kit or conversion set for it, and since I love these one-of-a-kind
airplanes I just had to give the conversion a try. Years ago Mark Young
made a beautiful model in 1/72 scale using Monogram's B-36, but this thing
was huge, and there's no way I had room to display something like that.
Along came Hobbycraft with a very nice series of 1/144 th B-36 kits, and
then Cutting Edge with their 1/144 NB-52 conversion set (for the engines).
I was in business!
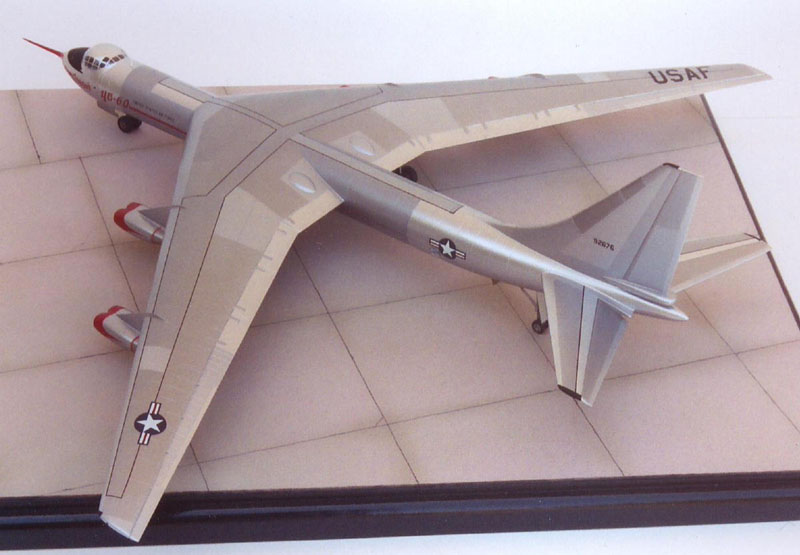
 Originally
Convair made their prototypes by separating the B-36 wing at the inboard
engine pylons and then angling the main spar back 38 degrees. The reciprocating
engine nacelles were removed, making a clean but thick wing. An inboard
"glove" gave the new leading edge a continuous line from wingtip
to fuselage, the tips themselves were extended slightly and squared off,
and the J57 engines were mounted two-to-a-pylon as on the B-52. New swept
tail surfaces and a more streamlined nose completed the major external
changes. Originally
Convair made their prototypes by separating the B-36 wing at the inboard
engine pylons and then angling the main spar back 38 degrees. The reciprocating
engine nacelles were removed, making a clean but thick wing. An inboard
"glove" gave the new leading edge a continuous line from wingtip
to fuselage, the tips themselves were extended slightly and squared off,
and the J57 engines were mounted two-to-a-pylon as on the B-52. New swept
tail surfaces and a more streamlined nose completed the major external
changes.
Wings
 Top
and bottom wing parts were worked on separately, and I started by grinding
off the nacelles. This left the parts very weak and wobbly, so I carefully
bonded sheet plastic on the insides of the top and bottom pieces with
styrene cement to back up the gaps. Suitable shapes of sheet were then
cut and bent to match the outer wing surface, and super-glued into place
to fill the holes left from the nacelles. I was careful to lay the wing
halves on a flat surface while all this was being done, otherwise I'd
end up with something shaped like lasagna. The outboard sections of each
wing half were then cut off at the place indicated by my top view drawing. Top
and bottom wing parts were worked on separately, and I started by grinding
off the nacelles. This left the parts very weak and wobbly, so I carefully
bonded sheet plastic on the insides of the top and bottom pieces with
styrene cement to back up the gaps. Suitable shapes of sheet were then
cut and bent to match the outer wing surface, and super-glued into place
to fill the holes left from the nacelles. I was careful to lay the wing
halves on a flat surface while all this was being done, otherwise I'd
end up with something shaped like lasagna. The outboard sections of each
wing half were then cut off at the place indicated by my top view drawing.
 I made a spar for each side out of square brass tubing. Each spar was
partially cut and bent at about a third of its length and epoxied into
the lower wing half just ahead of the main gear wells. I then lined up
the outboard lower wing pieces over the drawing and epoxied them to the
spars at the correct angle. Finally the top wing pieces were added. The
wing was now nice and rigid. I made a spar for each side out of square brass tubing. Each spar was
partially cut and bent at about a third of its length and epoxied into
the lower wing half just ahead of the main gear wells. I then lined up
the outboard lower wing pieces over the drawing and epoxied them to the
spars at the correct angle. Finally the top wing pieces were added. The
wing was now nice and rigid.
Finally I laminated sheet plastic to replace the rounded B-36 wingtips.
After everything was dried, puttied, sanded, and primed I rescribed aileron,
flap, and other surface detail.
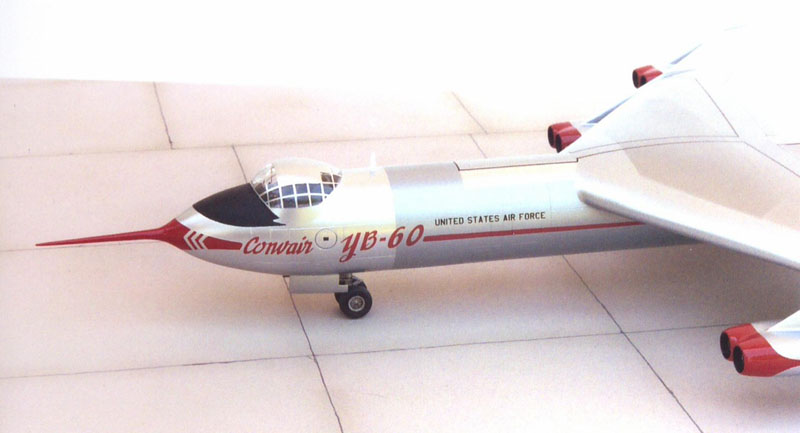
Fuselage
 After putting together the fuselage I cut off the nose just forward
of the cockpit, and the tail gun housing at the rear edge of the rudder.
A new nose and tail cone were turned on a lathe from basswood. Resin
copies were then cast and glued into place. I next removed the belly
radome behind the nose gear and plugged the area with sheet plastic. After putting together the fuselage I cut off the nose just forward
of the cockpit, and the tail gun housing at the rear edge of the rudder.
A new nose and tail cone were turned on a lathe from basswood. Resin
copies were then cast and glued into place. I next removed the belly
radome behind the nose gear and plugged the area with sheet plastic.
I also wanted to build the taxi strut under the rear fuselage. This
was used only for ground operations, and was retracted at the start of
the takeoff roll. Some photos show it retracted on the parked aircraft,
and it was evidently used when tail tipping was a concern (aft CG). I
cut the area out and boxed in the gear well with sheet plastic before
closing up the fuselage, then constructed a strut from plastic and brass
tube. The small wheels came from the spares box.
 The wing was now glued to the fuselage. A section from the top wing
half containing the fuselage/wing juncture was used and moved forward
to where the new leading edge would meet the fuselage, and a sheet plastic
spine was added behind that. This would give some support for the areas
I would have to build up. Because the inboard wing leading edge area
would need to be scratch built, I first thought of building some structure
to support a skin, but ended up making some balsa wood masters of the
wedges I needed and then casting resin copies. Once glued into place,
the resin parts were easy to shape and scribe. The wing was now glued to the fuselage. A section from the top wing
half containing the fuselage/wing juncture was used and moved forward
to where the new leading edge would meet the fuselage, and a sheet plastic
spine was added behind that. This would give some support for the areas
I would have to build up. Because the inboard wing leading edge area
would need to be scratch built, I first thought of building some structure
to support a skin, but ended up making some balsa wood masters of the
wedges I needed and then casting resin copies. Once glued into place,
the resin parts were easy to shape and scribe.
Tail
 All tail surfaces were made from superglue-laminated sheet plastic
which was then sanded to airfoil shape. The horizontal stabilizer was
made in one piece, then separated into three sections. The center section
was inserted from inside through cutouts made in the fuselage halves
before they were glued together. The elevators were cut out from the
outboard sections, refined, and then the outboard stabs attached to the
center section. The elevators were then reattached in a drooped position
. About 5 mm of the base of the original vertical tail was left attached
to the fuselage, but the rest of the B-36 fin and rudder was removed
and replaced. The radar antenna fairing beneath the rudder came straight
from the kit. All tail surfaces were made from superglue-laminated sheet plastic
which was then sanded to airfoil shape. The horizontal stabilizer was
made in one piece, then separated into three sections. The center section
was inserted from inside through cutouts made in the fuselage halves
before they were glued together. The elevators were cut out from the
outboard sections, refined, and then the outboard stabs attached to the
center section. The elevators were then reattached in a drooped position
. About 5 mm of the base of the original vertical tail was left attached
to the fuselage, but the rest of the B-36 fin and rudder was removed
and replaced. The radar antenna fairing beneath the rudder came straight
from the kit.
Engines
 Cutting
Edge's resin NB-52 kit includes beautiful little nacelles meant to convert
kits of the later model B-52 to the non-fan early aircraft, and these
were perfect for the YB-60. Because I needed four engine pylons to hang
them from, I laminated these from sheet plastic and sanded them to shape,
then drilled holes in the pylons and nacelles and pinned them together
for strength. Cutting
Edge's resin NB-52 kit includes beautiful little nacelles meant to convert
kits of the later model B-52 to the non-fan early aircraft, and these
were perfect for the YB-60. Because I needed four engine pylons to hang
them from, I laminated these from sheet plastic and sanded them to shape,
then drilled holes in the pylons and nacelles and pinned them together
for strength.
 Attaching the pylons to the wing got a little more involved. I wanted
to preserve the top of the pylon as it curved around and above the leading
edge, so I cut slots in the wing which allowed the pylons to be pushed
up into place from below. After a lot of fitting and trimming this worked
out well, the pylons were attached, and the rough spots were puttied
and smoothed. Attaching the pylons to the wing got a little more involved. I wanted
to preserve the top of the pylon as it curved around and above the leading
edge, so I cut slots in the wing which allowed the pylons to be pushed
up into place from below. After a lot of fitting and trimming this worked
out well, the pylons were attached, and the rough spots were puttied
and smoothed.
Finishing Up
 After
several iterations of sanding and rescribing the lost surface detail,
I sprayed the model with Tamiya's white aerosol primer and used various
shades of Alclad for the metal finish. I love the finish I get with Alclad,
but it takes a bit of prep. I don't know how many times I primed, fixed
the flaws, sanded, and repeated the process before I shot the first Alclad.
Even then I found areas I had to touch up. Various shades of Alclad were
used - this is one airplane that really benefits from taking the time After
several iterations of sanding and rescribing the lost surface detail,
I sprayed the model with Tamiya's white aerosol primer and used various
shades of Alclad for the metal finish. I love the finish I get with Alclad,
but it takes a bit of prep. I don't know how many times I primed, fixed
the flaws, sanded, and repeated the process before I shot the first Alclad.
Even then I found areas I had to touch up. Various shades of Alclad were
used - this is one airplane that really benefits from taking the time
 to
differentiate the metal panels. The red flashes on the fuselage sides
and nacelles, and the black antiglare panel were then masked and painted,
and the decals were applied. The Hobbycraft sheet provided the generic
USAF insignia, while I drew the red "Convair YB-60" titles and
tail numbers with Adobe Illustrator and had them expertly printed by Draw
Decal (thanks,Greg!). I also used black stripes from an old dry transfer
sheet I had stashed away for the wing walk areas. to
differentiate the metal panels. The red flashes on the fuselage sides
and nacelles, and the black antiglare panel were then masked and painted,
and the decals were applied. The Hobbycraft sheet provided the generic
USAF insignia, while I drew the red "Convair YB-60" titles and
tail numbers with Adobe Illustrator and had them expertly printed by Draw
Decal (thanks,Greg!). I also used black stripes from an old dry transfer
sheet I had stashed away for the wing walk areas.
The fragile stuff was added last. The B-36 main gear were used as is,
except the doors had to be modified slightly (since there were no longer
any in-wing nacelles at the strut location). The kit nose wheels looked
too big to me, and I replaced them with some from a Revell 747. The upper
blade antenna was made from sheet plastic, and the long nose probe came
from a toothpick sealed with super glue (sometimes the simplest solution
is best!).
 
This project entailed more effort than I thought (doesn't it always?),
but having a model of this unusual airplane on my shelf is worth it. I'd
like to do the XB-52 next to give it some competition!
|
|