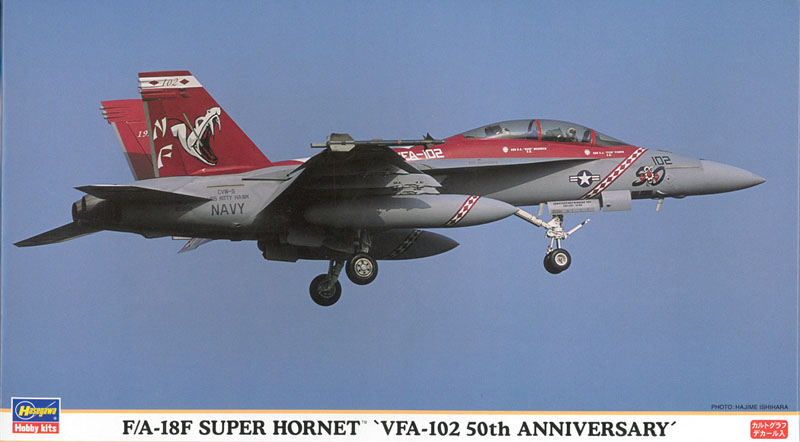
Hasegawa 1/72 F/A-18F
Super Hornet:
"VFA-102 50th Anniversary"
Photos by Carl Broberg |
 |
The Kit
 The latest edition of the 1/72 Hasegawa FA-18F arrived on my doorstep
a while back and this one is a real show stopper. The relatively new
two seat Super Bug kit has been reviewed several places since the original
release, so I will not spend a lot of time with the nuts and bolts of
the kit. The latest edition of the 1/72 Hasegawa FA-18F arrived on my doorstep
a while back and this one is a real show stopper. The relatively new
two seat Super Bug kit has been reviewed several places since the original
release, so I will not spend a lot of time with the nuts and bolts of
the kit.
The items that I think are worth mentioning are that the fit of this
one is considerably better than the fit of either the A or C single seat
versions, or the B/D two seat versions previously released by Hasegawa.
The new E/F kits are just that, a whole new kit, not a revamped early
kit. The original Hornet kit has some difficult fit areas around the
aft fuselage and intakes. The new one has a lot more parts and the method
of assembly of the fuselage is rather odd, but all in all, it makes into
a  very impressive model. The only two items worth mentioning on the negative
side is the lack of intake trunks inside the intakes, and the decent
but not very detailed interior. The lack of intake trunking on the original
kits was disappointing, but due to the rather small round intakes, it
was not really noticeable. The Super Bug has much larger, square intakes
and the lack on trunking is very noticeable. To compound the issue, they
made a seam right in the intake roof. It is workable, but troublesome. very impressive model. The only two items worth mentioning on the negative
side is the lack of intake trunks inside the intakes, and the decent
but not very detailed interior. The lack of intake trunking on the original
kits was disappointing, but due to the rather small round intakes, it
was not really noticeable. The Super Bug has much larger, square intakes
and the lack on trunking is very noticeable. To compound the issue, they
made a seam right in the intake roof. It is workable, but troublesome.
One welcome addition with the new E/F kits is the inclusion of some
of the newer missiles not available in the Hasegawa Weapons sets. Both
AIM-120s and AIM-9Xs are in the kit.
 Hasegawa
has probably released both the single and two seat versions of the Super
Bug kit at least a half dozen times each. Always with new markings as
Navy Squadrons transition to the new Super Hornet and apply squadron markings.
Apparently a lot of modelers don't like the "same old kit-just different
markings" approach. I think it is great as I tend to build several
of each type of aircraft that interests me. This way I get both the kit
and the markings, and I can be pretty sure the markings will actually
fit the model. Unfortunately, some of the aftermarket decal designers
do the layout in one scale and then "do the math" to produce
the other scales. They often also have to design the marking to fit several
different brands of kits. That might be OK for simple stuff, but with
the complex ones like this, the decals have to fit perfectly. Hasegawa
has probably released both the single and two seat versions of the Super
Bug kit at least a half dozen times each. Always with new markings as
Navy Squadrons transition to the new Super Hornet and apply squadron markings.
Apparently a lot of modelers don't like the "same old kit-just different
markings" approach. I think it is great as I tend to build several
of each type of aircraft that interests me. This way I get both the kit
and the markings, and I can be pretty sure the markings will actually
fit the model. Unfortunately, some of the aftermarket decal designers
do the layout in one scale and then "do the math" to produce
the other scales. They often also have to design the marking to fit several
different brands of kits. That might be OK for simple stuff, but with
the complex ones like this, the decals have to fit perfectly.
The Decals
 And
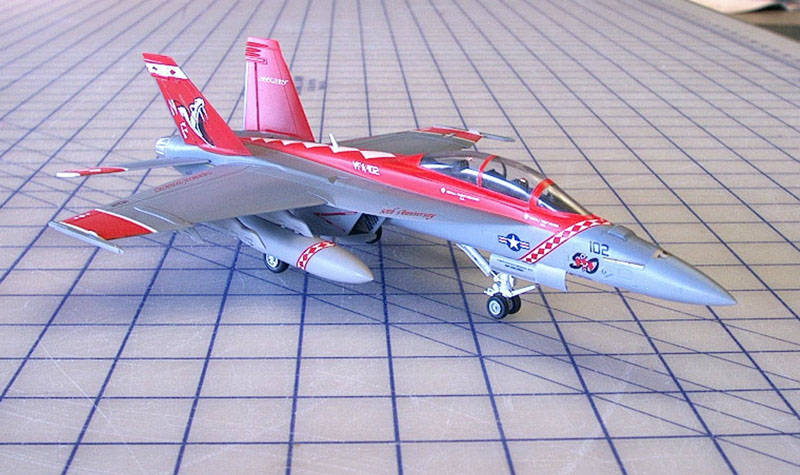
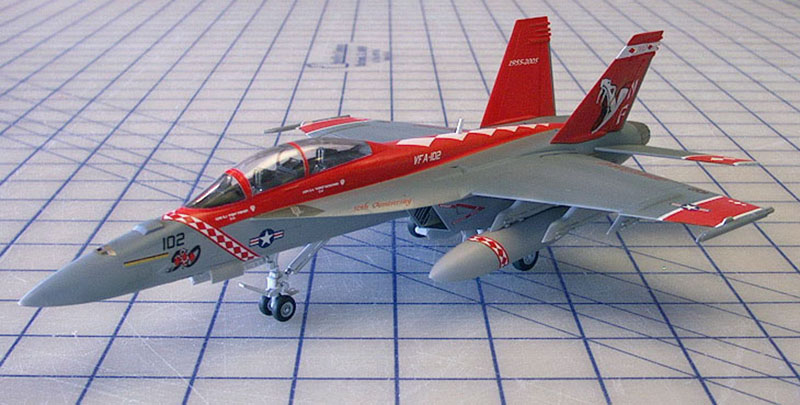
there is nothing "same old" about this set of markings. VF-102
is a recent F-14 squadron, and while their Tomcats were colorful, they
were not particularly noteworthy. Well, that changed with this 50th Anniversary
bird. This is one of the most colorful Navy birds to come along in quite
a while. And
there is nothing "same old" about this set of markings. VF-102
is a recent F-14 squadron, and while their Tomcats were colorful, they
were not particularly noteworthy. Well, that changed with this 50th Anniversary
bird. This is one of the most colorful Navy birds to come along in quite
a while.
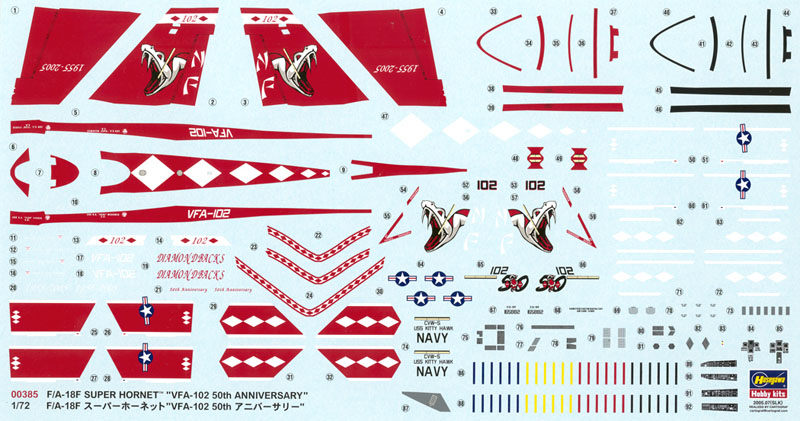
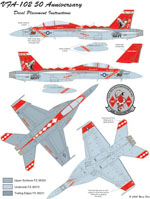 Hasegawa
decals come in two versions. The "house" decals tend to be somewhat
subdued colors and a Creamy White. The other version is done by the Italian
firm of Cartograf. These guys do good work. The colors are much improved
and you get a nice crisp White. The good news is that most of the Hasegawa
"special release" kits of late have had the Cartograf decals
and this is no exception. As you can see from the decal illustration,
this is a big sheet. Everything is in perfect register and all of the
details are very well done. Hasegawa
decals come in two versions. The "house" decals tend to be somewhat
subdued colors and a Creamy White. The other version is done by the Italian
firm of Cartograf. These guys do good work. The colors are much improved
and you get a nice crisp White. The good news is that most of the Hasegawa
"special release" kits of late have had the Cartograf decals
and this is no exception. As you can see from the decal illustration,
this is a big sheet. Everything is in perfect register and all of the
details are very well done.
A big plus is that they offer you two ways of doing all the Red and
White markings. You get two complete sets of the markings. One set has
both the Red and White and another with just the White markings. Another
plus is they always seem to be sure that the paint callouts match the
decal colors very well. Of course the paint callouts are Gunze Sangyo
and that does complicate things for us U.S. modelers.
 A
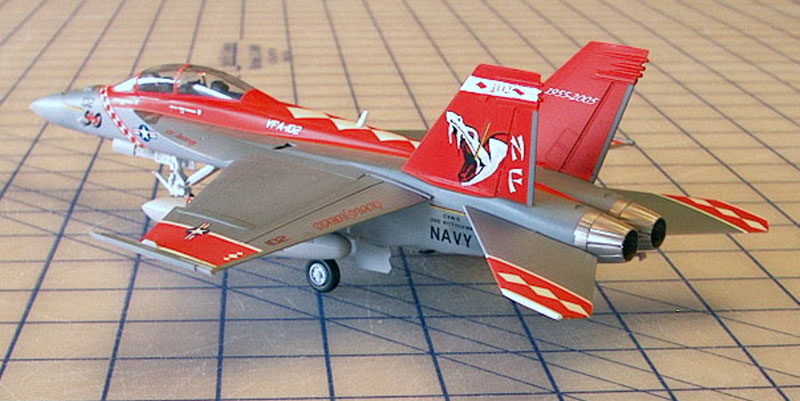
couple of small nitpicks for those who elect to use the full Red and White
decals. There are two small cutouts near the top on the decals for the
outside of the both vertical tails. One is for the Red anti-collision
light and the other for a small antenna. If you don't paint this area
of the vertical tail Red prior to applying the decal you will have a very
noticeable gray area after applying the Red Decal. Another nice feature,
but a bit of a challenge is the two layer approach to the canopy frames.
The instructions say to apply the Black decals, then the Red over the
Black. With the rather large clear canopy, it is nice to look inside and
see the accurate black interior frames rather than the usual Red of the
underside of the decals. A
couple of small nitpicks for those who elect to use the full Red and White
decals. There are two small cutouts near the top on the decals for the
outside of the both vertical tails. One is for the Red anti-collision
light and the other for a small antenna. If you don't paint this area
of the vertical tail Red prior to applying the decal you will have a very
noticeable gray area after applying the Red Decal. Another nice feature,
but a bit of a challenge is the two layer approach to the canopy frames.
The instructions say to apply the Black decals, then the Red over the
Black. With the rather large clear canopy, it is nice to look inside and
see the accurate black interior frames rather than the usual Red of the
underside of the decals.
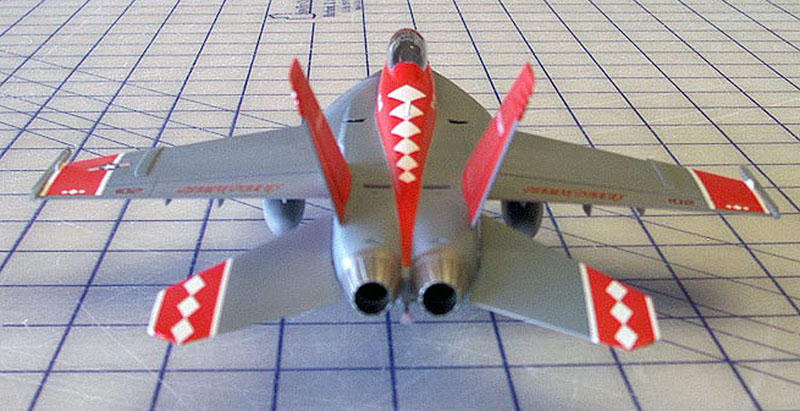
 Another item that requires some forethought is the outboard aileron
actuator on the underside of the wings. The instructions suggest painting
this a matching Red and then gluing it on after the decals are applied
in this area. My experience has been that trying to glue parts to a decaled
surface usually just ends in frustration. My approach was to paint the
part Red along with a small rectangle around the base of the part, then
cut out a small area of the decal prior to applying it. That way when
it was all done it was all firmly glued together and all Red like it
should be. Another item that requires some forethought is the outboard aileron
actuator on the underside of the wings. The instructions suggest painting
this a matching Red and then gluing it on after the decals are applied
in this area. My experience has been that trying to glue parts to a decaled
surface usually just ends in frustration. My approach was to paint the
part Red along with a small rectangle around the base of the part, then
cut out a small area of the decal prior to applying it. That way when
it was all done it was all firmly glued together and all Red like it
should be.
Of course if you choose the paint the Red and apply just the White
details, most of these problem areas are not an issue.
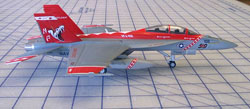
Conclusions
 All
this makes the whole process sound more complex than it really is. As
with most of these complex, fancy paint scheme models, it can take almost
as long to just decal the model as it did to actually get it to the decal
application point. But when it is done and on your shelf, I suspect you
will come back and look at it a lot. It is just a real eye catching addition
to the collection. All
this makes the whole process sound more complex than it really is. As
with most of these complex, fancy paint scheme models, it can take almost
as long to just decal the model as it did to actually get it to the decal
application point. But when it is done and on your shelf, I suspect you
will come back and look at it a lot. It is just a real eye catching addition
to the collection.
|
|