Eduard 1/48 Fokker D.VII(OAW)
|
 |
Eduard has created a fantastic cure for AMS!
A NOTE
Are you in a modeling slump? Are you tired of stressing out while building that perfect model? You know that the solution is to do a slammer, but you also don't feel like doing a simplistic snap-tight you're just going to give away. Well Eduard has given us a solution to our slump. I get reluctant to sit down and build a model under the gun, which when doing one for IM, although a privilege, that is the pressure I'm under: get the model done, photos taken, an article written and emailed early enough for the editors to do something creative with them. I tell you every time I've begrudgingly sat down to work on this beautiful kit, I've come away smiling from the fun and big reward of a detailed part or finish from very little work. If I had the power, I'd name this the 1:48th WW-I Kit of the Year!
 The
subject of this review is Eduard's long-awaited kit number 8131, a 1/48
rendition of the Fokker D-VII O.A.W. Some folks have hinted that this
was to be a late production version of this aircraft. However, on opening
the box, one quickly learns that there are enough parts in the box to
build two variations of the O.A.W. built D-VII. And the kit has an unusual
feature in today's market; you can build it with very little detail, or
full-blown with PE instruments and rigging, all right out of the box!
Either option will lead to a beautifully finished model. MSRP $39.95,
street price around $30.00.
The
subject of this review is Eduard's long-awaited kit number 8131, a 1/48
rendition of the Fokker D-VII O.A.W. Some folks have hinted that this
was to be a late production version of this aircraft. However, on opening
the box, one quickly learns that there are enough parts in the box to
build two variations of the O.A.W. built D-VII. And the kit has an unusual
feature in today's market; you can build it with very little detail, or
full-blown with PE instruments and rigging, all right out of the box!
Either option will lead to a beautifully finished model. MSRP $39.95,
street price around $30.00.

In addition I found an interesting letter in my kit. Apparently this only went to those organizations that do kit reviews, but it has some interesting information from Eduard:
Dear friends,
Please allow me to introduce our newest kit, the Fokker D.VII (O.A.W.), in 1:48th scale. This kit is the pilot project of a new line of Eduard plastic kits. With all of the experience gained with selling plastic kits over the past several years, we decided to change the style of our releasing procedure. In the future, we will reduce the number of various versions within each subject. These will be of the high end type of kit, containing high quality decals, detailed instruction sheets including well detailed color profiles, and color photo-etch components for the possibility of an up-grade of the completed kit. Our target is to bring out the perfect product, not a cheap one. This means that these kits will be a bit more expensive than a baseline kit, but the retail price is not expected to be prohibitive. We anticipate a price comparable to the ProfiPACK versions of the past, and that this will provide a good quality to price ratio for the customer.
The second change is in the releasing policy itself In the past, we had an open production style, so the kits were produced over a period of time, and in-stock units of these kits were quite high. The kits were available for a long time, usually a couple of years. From now on, we will produce a set batch of each release. This means, that we will produce a limited edition of each kit, usually in the neighborhood of 3000 pcs, and when the batch sells out, we will stop production of that item. The number of the item of each subject will also be reduced, as can be seen with the Fokker D.VII, where two versions of the aircraft are concentrated within one box. We expect the release of the 'interesting marking' version with the sellout of the basic product, but in a strictly limited edition of 1,000 pcs only. In this new line, we are preparing a number of interesting subjects. After the Fokker D.VII, a 1/35th scale Hetzer tank destroyer will-be released, followed by the- Polikarpov I-16 Rata in 1:48th scale. I do believe you will like this Fokker D.VII (O.A.W.). it is a new style of plastic kit, and I think it opens up an interesting period in this pleasant hobby and business. Thank you for your time with this letter, and check out our built-up Fokker.
Sincerely,
Vladimir Sulc,
CEO, EDUARD MA
So plan your next Eduard purchases accordingly!
JUST A LITTLE HISTORY
We need to remember one point of the D-VII's history before we go on to the build. Albatros lost the February 1918 fighter competition to Fokker, then was forced to build Fokker's airplane. Albatros had two production facilities, the main plant at Johannisthal, and Ostdeutsche Albatros-Werke, O.A.W. (East German Albatros Works at Schneidemuhl). The principle means of identifying an O.A.W. built airplane is th 'giraffe'î pattern of violet and green on the metal cowlings around the engine, a two-piece axle fairing split lengthwise, and painted half green half violet, and lots of cooling vents in the cowling. For more history on the D-VII see the kit inbox review in previous months IM.
THE KIT
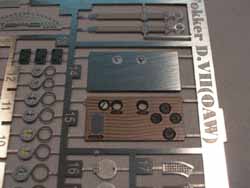
The variations found in this kit include two complete fuselages. One of them features the mid-production, early 'short' cowling which has lots of little half round 'bump/ cooling vents. The second fuselage with the late-production 'long' cowling and larger slotted cooling vents. There are also four different propellers from which to choose.
 |
 |
 |
|
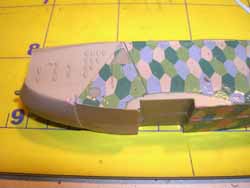
The short and long cowl versions. This lozenge
decaled panel is the major identifier between the two versions.
On the early versions this area is fabric covered, on the later
versions it is a removable metal panel.
|
||
Decals are provided for four relatively colorful aircraft complete with upper and lower lozenge and both lavender and blue rib tapes. Eduard has all four paint schemes on their website. Search around the Fokker D-VII images and you will find Adobe Reader files of the pages in the instruction booklet. CAUTION it's a SLOW download even with digital cable. Phone modems may not want to do this!
I've chosen to do the OOB option 'C' design of Rudolf Stark of Jasta 35b, principally because these are the same markings as found on the D-VII replica in the Museum of the United States Air Force, and it has an odd shade of pink/lavender. Well, actually, in the Fokker Anthology Datafile #2, Stark calls it lilac. I created my lilac using a 3 to 1 mix of Testors Model Master 2010 Piping Pink and 2013 Napoleonic Violet. The violet was also used full strength for the axle fairing.
Just for the record, I try to build all reviews straight from the box. No aftermarket decals or parts. I want you to see what the basic kit provides. However, on this kit, I used one aftermarket item. In my decal stash I had several different colored sheets of Pegasus wood grain decals. I used the light colored version of this product on the floorboard of this kit. Not much of a change from OOB but it is different.
On to building
I started by following the instructions, first tackling the engine followed by the beautiful PE instrument panel. While those were drying, I moved onto the wings and the subsequent extensive decaling. I would shift back and forth from wing decals to working on the other interior sub assemblies- the PE on one of the guns, the cockpit floor and the seat assembly/cockpit aft bulkhead.
 |
 |
 |
|
The one piece PE instrument panel. And a little
too much CA and too much pressure on the first part.
|
||
 |
 |
|
|
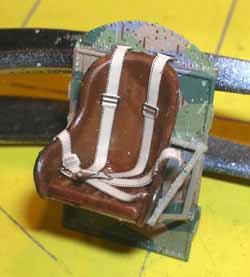
The finished seat assembly. I chose to attach
the shoulder straps to the back of the fabric bulkhead.
|
||
 |
 |
 |
|
The PE gun parts compared to the solid plastic
version
|
||
As to the wings, there are lots of lozenges sections on each upper and lower surface followed by rib tapes to do on this airplane and I wanted the decals good and dry when I needed to be handling the wings for final assembly. Here is where my first smile came from this kit. The lozenge decals went on easily and provided good cover and fit, and lay down quite well. Now some folks will be quick to shout that the rib detail is a little heavy. But once the lozenge is on, then those nice big rib bumps give you an excellent target to line up on when applying the rib stitching. In addition Eduard has provided interior lozenge decals for the fuselage. So, these too, needed time to thoroughly dry before construction continued. In all cases, I found Micro Sol to be sufficiently strong to get a good snug, lie-down on the Eduard decals. Also note that some of the decals have a little dark gray clear carrier film. I cut this off where the decal would be up against a hard edge.
 |
 |
|
|
The excess carrier film
|
||
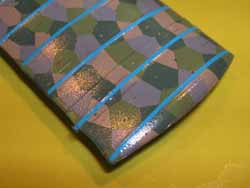 I
followed the decaling guidelines on the back of the instruction booklet,
first covering the lower surface of the wings with chord wise strips of
lozenge, allowing that to dry over night then applying the upper surface
lozenge. The next night I applied the rib strips. For those of you not
familiar with fabric covered airplanes, the covering is sewn on to each
rib with stitches at about one inch intervals. Without this stitching
the low pressure on the top of the wing would pull the fabric right off
the wing. Fabric strips were used to re enforce the fabric covering to
hold these stitches, then another strip of fabric was glued over the stitches
to hold everything in place. In this model these final strips are represented
by either blue or purple decals strips. Check the artwork in the back
of the instructions to determine which color you should use with which
finish.
I
followed the decaling guidelines on the back of the instruction booklet,
first covering the lower surface of the wings with chord wise strips of
lozenge, allowing that to dry over night then applying the upper surface
lozenge. The next night I applied the rib strips. For those of you not
familiar with fabric covered airplanes, the covering is sewn on to each
rib with stitches at about one inch intervals. Without this stitching
the low pressure on the top of the wing would pull the fabric right off
the wing. Fabric strips were used to re enforce the fabric covering to
hold these stitches, then another strip of fabric was glued over the stitches
to hold everything in place. In this model these final strips are represented
by either blue or purple decals strips. Check the artwork in the back
of the instructions to determine which color you should use with which
finish.

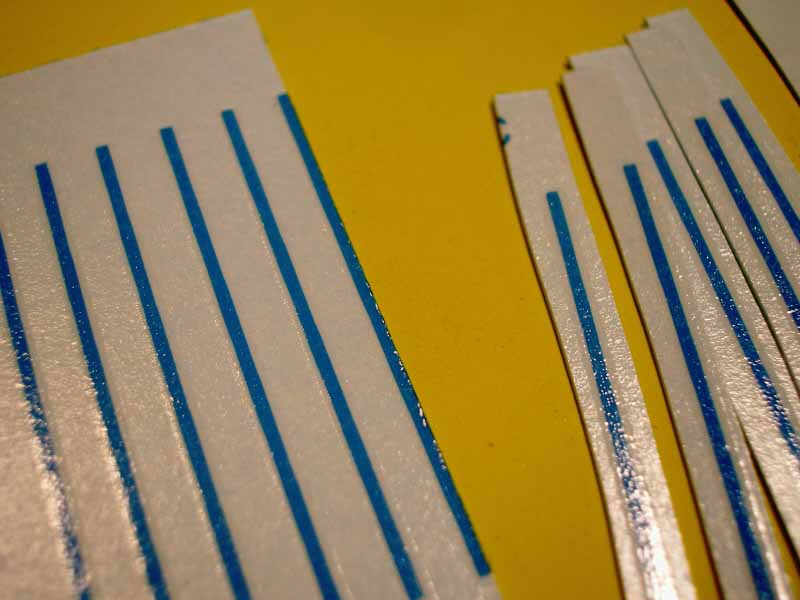
Be aware that Eduard supplies just enough rib tapes, very few spares! I found a fast method to do accomplish this tedious task. Place the lozenge wing surface in front of you, your water bowl and a paper towel, or other absorbent, between them. Slice 6 to 10 strips from the sheet with a little extra paper at one end of each strip. Using a pair of tweezers, dip one strip in the water and hold it until the decal ìrelaxesî-the paper straightens out slightly. This takes less than 10 seconds. Lift the strip out of the water and shake off any excess water. Now draw the strip of paper, decal down across the paper towel to blot off the remaining excess water. Turn the strip face-up and use the point of your knife to slide a short section of one end of the decal off the carrier. Place this section on the rib at the trailing edge of the wing and hold it in place with the knife tip, then pull the carrier paper forward toward the leading edge, and voila, the strip is in place with just enough water to allow a little repositioning if needed. It took me about 45 minutes (three hours total) to do each surface of the wing.
 |
 |
|
|
Trimming the strip for edge application
|
||
 |
 |
|
|
The upper and lower ribs really line up well.
|
||
 |
|
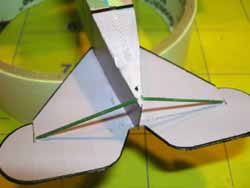
|
|
90 minutes of work and 90 minutes of scrap.
|
||
A STUDY IN ENGINES
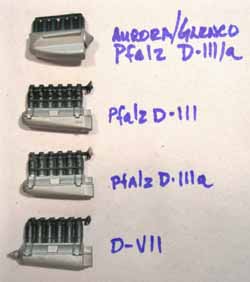 As
I said above, I started assembly with the engine. I got this kit with
a deadline for the September IM as I was in the process of building the
Eduard Limited Edition of the Pfalz D-IIIa and several old Glencoe kits
too. So I had several versions of Eduard's Mercedes and BMW engines on
my workbench. In this kit, the engine is a jewel unto itself, just a few
parts and very little flash. They literally fell together with very little
mismatch or flash. A throw-back to toy model days is a pin that is trapped
between the engine case halves to allow the propeller to spin.
As
I said above, I started assembly with the engine. I got this kit with
a deadline for the September IM as I was in the process of building the
Eduard Limited Edition of the Pfalz D-IIIa and several old Glencoe kits
too. So I had several versions of Eduard's Mercedes and BMW engines on
my workbench. In this kit, the engine is a jewel unto itself, just a few
parts and very little flash. They literally fell together with very little
mismatch or flash. A throw-back to toy model days is a pin that is trapped
between the engine case halves to allow the propeller to spin.

 While
waiting on the decals, work commenced on the little bits and cleaning
the stumps off of the flight controls after they were removed from the
sprues. Again another smile on my face when the flight controls and their
corresponding attachment points lined up easily and perfectly!
While
waiting on the decals, work commenced on the little bits and cleaning
the stumps off of the flight controls after they were removed from the
sprues. Again another smile on my face when the flight controls and their
corresponding attachment points lined up easily and perfectly!

The other sub-assemblies in the fuselage are relatively simple. The most challenging one was the seat support tubing assembly.
Fuselage assembly offers a small challenge because the interior components, ammo cans, seat assembly, and gun support tubing are mounted in slots on one side of the fuselage, and they have to mate up with corresponding slots on the other half of the fuselage. If they don't line up, then you'll never get the fuselage to close up. If you follow Eduard's suggested method, install the parts rear-to-front then you might have difficulty getting all of these parts to line up. I found the reverse order worked quite well. I installed the engine, mounts and firewall, followed by the forward most ammo can. I used a slow-setting glue, (Testors Model Master Liquid Cement for Plastic Models #8872, in the odd black bottle) to hold the can to the right fuselage half, then taped the fuselage together and guided the other dry end of the can into the appropriate slot in the left-hand fuselage. I then allowed the glue holding the can to dry, while the other fuselage side held it in place. I repeated this sequence with the full ammo can and then the instrument panel. This was followed by the floorboard, which went in easily with no alignment problems thanks to a nice square alignment pin that mated to the bottom of the fuselage.
 |
 |
Finally the seat assembly was installed with the same process. With all of these in place, the fuselage halves were glued together.
 The
last item in the main fuselage assembly is an innovative part from Eduard.
They've molded a strip of stitches to drop into a slot in the bottom of
the airplane. The engineering on this item was so good that I had to use
the side of my knife handle to 'roll' the part down in to its final location.
A drip of thin glue got it permanently in place.
The
last item in the main fuselage assembly is an innovative part from Eduard.
They've molded a strip of stitches to drop into a slot in the bottom of
the airplane. The engineering on this item was so good that I had to use
the side of my knife handle to 'roll' the part down in to its final location.
A drip of thin glue got it permanently in place.

The front cowling/radiator was added and the seams in the fuselage were cleaned up. My last pre-painting, pre-assembly action was to drill out the flight control cable pass through in the fuselage, wings and tail with a #77 drill bit. Why the odd size? Because that was the size of the holes in the plastic. The fuselage was washed in soap and water, dried and then the lozenge decals were applied. I took the extra step to remove the small excess decal carrier from the top edge of the side decals, and was rewarded with decals that fit perfectly.
 |
|
|
|
You CAN drill at a sharp enough angle to pick
up the holes shown on the horizontal stab!
|
||
FEAR OF MASKING.
 Naturally,
although I chose one of the simple paint schemes it involved custom mixing
a color and risking masking on a fully decaled surface. I had already
had a small blow off of some of the wing lozenge decals, and I was terrified
that masking to paint was going to destroy a good portion of the lozenge
on the wings and the fuselage. The good news is the decals held up to
both 3M Post It tape and 3M removable clear tape.
Naturally,
although I chose one of the simple paint schemes it involved custom mixing
a color and risking masking on a fully decaled surface. I had already
had a small blow off of some of the wing lozenge decals, and I was terrified
that masking to paint was going to destroy a good portion of the lozenge
on the wings and the fuselage. The good news is the decals held up to
both 3M Post It tape and 3M removable clear tape.

 I
finally moved on to getting the parts to look like an airplane. The lower
wing, stabilizer and elevators were attached. Now for the most frustrating
part of all biplanes, getting all of the struts to line up. Fortunately,
Eduard has done an OUTSTANDING job of getting all of the struts just the
exact length needed for each installation.
I
finally moved on to getting the parts to look like an airplane. The lower
wing, stabilizer and elevators were attached. Now for the most frustrating
part of all biplanes, getting all of the struts to line up. Fortunately,
Eduard has done an OUTSTANDING job of getting all of the struts just the
exact length needed for each installation.

 But
still, I'm going to plagiarize Tom Cleavers' method from his online review
of a build of an earlier Fokker D-VII. In this case, the 'N' struts of
the D-VII rise perpendicular to the lower wing. So simply glue the 'N'
struts to the lower wing and allow them to dry overnight with the struts
hanging down. Once these 'N' strut joints were thoroughly dry the top
wing was fitted and glued on.
But
still, I'm going to plagiarize Tom Cleavers' method from his online review
of a build of an earlier Fokker D-VII. In this case, the 'N' struts of
the D-VII rise perpendicular to the lower wing. So simply glue the 'N'
struts to the lower wing and allow them to dry overnight with the struts
hanging down. Once these 'N' strut joints were thoroughly dry the top
wing was fitted and glued on.

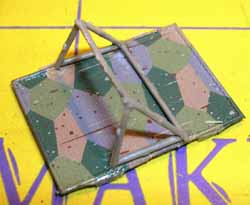
Take great care at this point because the wing is in a very fragile condition.
Eduard has done an EXCELLENT job of providing correctly place sockets for the struts to rest in. So the next step is getting the top wing firmly attached to rest of the plane is to fit the ìVî shaped struts, or cabane struts to the front spar. The front leg of this strut attaches to a depression in the cowl and the rear leg in a little socket just after the cowl line. With the two front cabanes providing a bit more stiffness to the wings, I added the front cabanes. Again this came out exactly as long as they needed to be. The final component in the wing attachment is the aft cabane. Once again these units were just the right length and fit perfectly between the wing and fuselage.
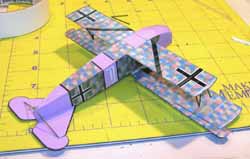
|
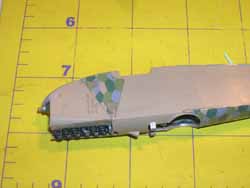
The 'just incase I destroy it on the way to the outdoor site' safety shot. |

Last fiddly bit to mess with was the landing gear. Eduard makes this the most difficult part on the whole model. You have to get 8 connections right all at once! Not to fear. The main landing gear struts fit fairly tightly into sockets in the axel fairing. If you use a slow setting glue to secure these 4 points then you have time to adjust the other ends of each strut to the proper location on the airplane, then secure the second ends with quick setting glue. Now gently adjust the axel fairing to its final position.
|
There are over 90 of these detail decals to apply. Note the aileron pull cable to the far right |

A closing apology. The plane you see in the photographs is not completely done. I hit the deadline to get this review off to IM when the plane could easily take another five hours of applying all the beautiful decals, and other fine PE parts. Most of the decals replicate the factory markings that each part bears the serial number of the aircraft they belong to; i.e. Fokker D-VII O.A.W. 4523/18. Ironically all of the serial number decals are for the airplane I built! I have included this one shot of how much decal detailing can take place on this kit.
What could Eduard do to improve this kit?
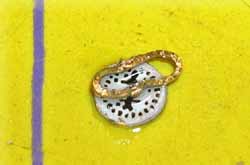
I found three things that, given how well this kit went together, need fixing: Four little black decals for the markings I used are mis-marked: the two decal part 6s should be used where the plans call for decal part 18 and vice-versa.
The brass collection chute on the left machine gun does not easily line up with the catch can below. Either a new hole needs to be added or the chute can be trimmed off flush with the top of the cowling. Lastly, the kit includes the fuselages and PE for two different versions of the O.A.W. D-VII, but the instructions fail to give placement instructions for much of the PE the early version airplane. A good look through the anthologies and close scrutiny of the paint schemes can resolve most of this issue. Not bad!
Once again, if you've never tackled a WW-I biplane, this is probably the easiest, yet most complete kit to come along for a long, long time, and given Eduard's comments in the letter above grab one for yourself now!
 |
 |
 |
 |
Paints used in this review
Testors Model Master Enamel
1706 Steel
2071 RLM Gray02
1785 rust
1745 Insignia White
1747 Gloss Black
1701 Military Brown
1720 Intermediate Blue
1781 Aluminum
2010 Piping Pink
2013 Napoleonic Violet.
XTra color German Topside Green
Thanks to Eduard for providing the kit for the review kit, straight from the factory.
References
-
Flying Scale Models, Vol 7 No. 51, Fokker D-VII Special
-
Albatros Publications Fokker D-VII Anthology 2