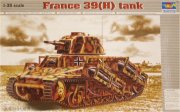
Build Review: Trumpeter French 39(H)
|
 |
Kit Review
The kit consists of 228 pieces,
molded on 3 sprues, plus the lower hull, and one-piece black vinyl tracks.
It is molded in light tan, medium hard plastic. The molding is clean, with very
little flash. One pair of slight shrinkage dimples on the upper turret
gun projection are easily filled. One-piece black vinyl tracks are supplied,
being nicely det
molded in light tan, medium hard plastic. The molding is clean, with very
little flash. One pair of slight shrinkage dimples on the upper turret
gun projection are easily filled. One-piece black vinyl tracks are supplied,
being nicely det ailed
on both sides and quite flexible. The ends are joined by heating the pins
on the overlapping section. I did not try any method of gluing. An eleven
page, 25 step instruction sheet is provided, with all parts called out
by letter and number. Gunze paint numbers are called out, however only
two of them are identified. Most of the ejector pin marks are either hidden
by subsequent parts, appear on hidden inner surfaces, or are shallow and
easy to remove or fill. ailed
on both sides and quite flexible. The ends are joined by heating the pins
on the overlapping section. I did not try any method of gluing. An eleven
page, 25 step instruction sheet is provided, with all parts called out
by letter and number. Gunze paint numbers are called out, however only
two of them are identified. Most of the ejector pin marks are either hidden
by subsequent parts, appear on hidden inner surfaces, or are shallow and
easy to remove or fill.
 The
32 cm. Rockets are very similar to The
32 cm. Rockets are very similar to the ones supplied in Tamiya's "Stuka zu Fuss" half-track kit,
as are the launch frames, though the detail is a little softer. The upper
hull is separated just forward of the driver's hatch. The reason for this
is that the self-propelled gun versions of this vehicle share a common
upper hull, with the larger aft portion not used on those versions. The
joint fits well and little filling or sanding is necessary. A basic interior
is provided, as well as a complete gun breech. No figures are included.
Decals for two versions are included, being printed on thin film and accurately
registered.
the ones supplied in Tamiya's "Stuka zu Fuss" half-track kit,
as are the launch frames, though the detail is a little softer. The upper
hull is separated just forward of the driver's hatch. The reason for this
is that the self-propelled gun versions of this vehicle share a common
upper hull, with the larger aft portion not used on those versions. The
joint fits well and little filling or sanding is necessary. A basic interior
is provided, as well as a complete gun breech. No figures are included.
Decals for two versions are included, being printed on thin film and accurately
registered.
Construction
Step 1 has you join the track ends together.  I
waited until after the lower hull was built and found that they are too
long. I had to cut off the overlap sections, as well as two more links,
to obtain the proper length. I cut notches in two cleats on either end
and used a staple through the center sprocket holes to join the ends.
The notches allow the staple to sit flush with the track surface, and
the joint can be hidden under one of the bogie wheels. I
waited until after the lower hull was built and found that they are too
long. I had to cut off the overlap sections, as well as two more links,
to obtain the proper length. I cut notches in two cleats on either end
and used a staple through the center sprocket holes to join the ends.
The notches allow the staple to sit flush with the track surface, and
the joint can be hidden under one of the bogie wheels.
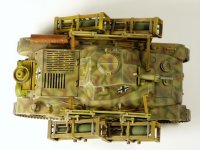
Steps 2 through 5 cover the suspension. I filed the mounting lugs on the
bogie units to improve their fit to the hull.
Steps 6 and 7 cover the hull interior parts. Nicely detailed par ts
provide a good basis for detailing if the builder wishes to leave this
area visible. ts
provide a good basis for detailing if the builder wishes to leave this
area visible.
Steps 8 through 12 cover upper hull assembly. Some filler needed at B20/D1
joint. I left off all the tools for painting and later installation. I
also found it expedient to trim the front inner curve of fender parts
B9 and B10 to match the curve of the lower hull front.
Steps 13 through 17 cover turret assembly and installation. I replaced
the kit gun barrel with tubing just to save time and filing. Be careful
in step 15. The turret is illustrated upside down, but the gun is drawn
right side up. No other fit or assembly problems were encountered.
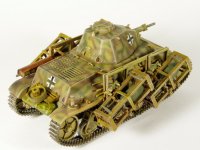
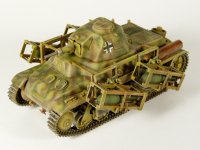
Steps 18 through 25 cover stowage rack and rocket assembly. I attached
D38 and D39 (two pieces each) to their respective brackets before gluing
the assembled crates to their mounting plates. Brackets D25 and D26 rest
on the fenders, and their braces glue onto the upper hull. These will
need to be adjusted slightly to get good contact.
Conclusion
I thoroughly enjoyed building this
kit. I encountered no significant fit problems other than the tracks being
too long. My example was cleanly molded, requiring minimal clean up and
very little filler. I used German markings from my spares box, but I did
apply one of the supplied decals to another kit. They went on well, needing
only a small amount of Micro Set/Sol to get them to lay down nicely. I
definitely recommend this kit, and am looking forward to building one
of the self propelled gun versions. Many thanks to MMD-Squadron for supplying
the review kit.
|
|


