Omega Models 1/72 Fokker V-29
|
 |
History:
There are many people in the world who can spit out facts about WW1
aircraft, but I am not one of them. I will therefore not give any comprehensive
historical data on this type. Suffice it to say that after searching the
internet I've discovered that it participated in 1918's Third Fighter
Competition in October and was, in the simplest terms, a parasol winged
Fokker D.VII. I found two other references that mention the V.29: Thijs
Postma's book Fokker, Aircraft Builders to the World and Profile Number
67. Had the war not ended it would, undoubtedly, have been ordered in
quantity as its 185 hp BMW IIa engine and lower drag gave it a performance
edge over both the D.VII and D.VIII.
The Kit:
Nicely packaged in a sturdy top opening box adorned with Omega's typical
color side and top view of the subject, this kit contains 20 resin pieces,
two rubber O-rings for tires, an instruction sheet and upper and lower
four-color lozenge decals.
Contained on four pouring blocks, the kit parts are cast in a pale
yellow resin and have excellent surface detail and are free from any obvious
defects. While most parts are contained in the delicate wafer of the casting,
making removal and clean up fairly easy, the tail surfaces and upper decking
are cast close to the pour blocks and will need more careful attention
during preparation.
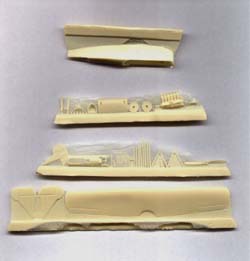 The
majority of the fuselage is cast as a single piece, including the radiator
and features some very petite detail. The forward fuselage has a single
opening for the cockpit and engine, with a corresponding upper decking
to complete the assembly. The cockpit walls are complete with structural
details and a seat, rudder pedal assembly, control stick and instrument
cluster are provided for the interior. These interior items are very crisply
cast and are by far the most delicate pieces in the kit, having some photo
etch replacements on hand might not be a bad idea. A lovely engine and
exhaust round out the interior and optional machine guns are provided
for the gun deck. Photos in the two references mentioned above do not
show any guns installed on the V.29, only the feed and empties chutes
being evident. Included in the assembly diagram for this section are color
callouts, given in AGAMA and Humbrol numbers. Although the color of the
fuselage interior is not addressed the reversed lozenge pattern would
be seen. The
majority of the fuselage is cast as a single piece, including the radiator
and features some very petite detail. The forward fuselage has a single
opening for the cockpit and engine, with a corresponding upper decking
to complete the assembly. The cockpit walls are complete with structural
details and a seat, rudder pedal assembly, control stick and instrument
cluster are provided for the interior. These interior items are very crisply
cast and are by far the most delicate pieces in the kit, having some photo
etch replacements on hand might not be a bad idea. A lovely engine and
exhaust round out the interior and optional machine guns are provided
for the gun deck. Photos in the two references mentioned above do not
show any guns installed on the V.29, only the feed and empties chutes
being evident. Included in the assembly diagram for this section are color
callouts, given in AGAMA and Humbrol numbers. Although the color of the
fuselage interior is not addressed the reversed lozenge pattern would
be seen.
Once the fuselage is assembled the tailplanes, prop, undercarraige,
tailskid and wing can be attached. Most people replace resin struts with
something a bit sturdier and since this is a parasol wing it would be
a good idea, although the kit struts are very nice. Likewise, replacement
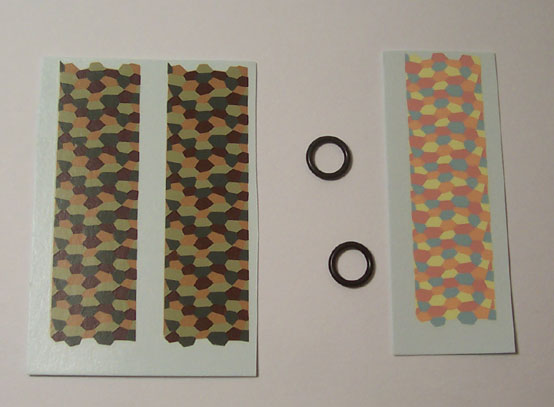
undercarraige struts might be considered. The kit's wheels are given in
two parts, a hub and an O-ring for the tire. The black of the O-ring seems
out of place on an aircraft of this vintage, a bit of research and paint
would correct this. Note also that over time the O-rings will dry, oxidize,
shrink, crack and fall off the wheels.
 The
kit instructions contain a brief history of the type, two photos, color
callouts, parts layout, assembly instructions and scale side and top view
drawings on a double-sided 8.5 X 11 sheet. What are missing from the instructions
are exterior color callouts. The photos included on the instruction sheet
and the box art show the fuselage covered in four color lozenge with a
natural aluminum cowling. An olive is listed with the other colors and
from what I've seen of other models of the type online it is the appropriate
color for the wing. No information is given on the color of the lower
wheel wing. On the D.VIII this part is the same color as the mainplane
as are all the struts. Minor points perhaps, and ones that can be resolved
with some research, but hopefully one that Omega will address these in
future releases. The
kit instructions contain a brief history of the type, two photos, color
callouts, parts layout, assembly instructions and scale side and top view
drawings on a double-sided 8.5 X 11 sheet. What are missing from the instructions
are exterior color callouts. The photos included on the instruction sheet
and the box art show the fuselage covered in four color lozenge with a
natural aluminum cowling. An olive is listed with the other colors and
from what I've seen of other models of the type online it is the appropriate
color for the wing. No information is given on the color of the lower
wheel wing. On the D.VIII this part is the same color as the mainplane
as are all the struts. Minor points perhaps, and ones that can be resolved
with some research, but hopefully one that Omega will address these in
future releases.
In a similar vein, no rigging diagram is provided, but I'm sure that
the rigging is the same as the D.VII and should be no trouble to deduce.
Rounding things out are the Lozenge decals, which look very nice. Two
short lengths of upper Lozenge are given for the fuselage sides and top
and one length of lower Lozenge for the bottom surface of the fuselage.
The upper lozenge will have to be approached with care as the given decal
doesn't seem to be quite long enough to cover the length of the fuselage
without some patching and the tailplanes will need to be decaled as well.
The lower lozenge might present a similar situation, but I imagine anyone
with some experience with lozenge would have no trouble with this.
Conclusion:
Even though the instructions have some grey areas and the decals will
have to be handled carefully, the kit itself seems pretty straightforward
and looks to be a quick build. Recommended to all WW1 types and Fokker
Fans.
Thanks to Jan Pala at Omega for the review sample. Also thanks to Jim
Schubert for some historical help.
|
|