UM 1/72 BT-42
|
 |
BT-42
The Soviet BT-7 was the basis
for the Finnish-built BT-42 assault gun. Its design incorporated the use
of obsolete British 114mm Mark II howitzers donated during the World War
I. The 114mm howitzer was inferior as a tank gun and was relegated to
a fire support weapon. Due to this fact the gun could only be fired from
a stationary position. The BT-42 appeared on the battle field in February
of 1943 but was soon replaced by the StuG 40.
The Kit
 The
box art is very well done with a color plate on the front and back when
you get ready to paint and apply decals. The color plate on the back shows
a Finnish BT-42 in an interesting tricolor camo-scheme. There is a Humbrol
color reference to use when when you are ready to paint this version.
The BT-42 kit contains a twenty-part sprue of photo-etch and 4 styrene
sprues containing 117 parts. The soft styrene parts are molded in their
trademark green drab color with no sinkholes but does have some protruding
injector pin on some parts. There is no flash residue. All parts appear
to be well defined and in scale. As the norm, you have a multi-lingual
(Ukraine, English and German) instruction sheet. You will find it is very
well illustrated with a Humbrol paint reference. To assist in assembly
there is a symbol legend for gluing, painting, drilling, etc. Included
is a numbered parts location diagram where unused parts are shaded to
eliminate confusion during assembly. Assembly begins with the lower hull
in steps 1 - 3. The lower hull is comprised of 12 parts and is put together
in the first step. Step 2 assembles the road wheels and The
box art is very well done with a color plate on the front and back when
you get ready to paint and apply decals. The color plate on the back shows
a Finnish BT-42 in an interesting tricolor camo-scheme. There is a Humbrol
color reference to use when when you are ready to paint this version.
The BT-42 kit contains a twenty-part sprue of photo-etch and 4 styrene
sprues containing 117 parts. The soft styrene parts are molded in their
trademark green drab color with no sinkholes but does have some protruding
injector pin on some parts. There is no flash residue. All parts appear
to be well defined and in scale. As the norm, you have a multi-lingual
(Ukraine, English and German) instruction sheet. You will find it is very
well illustrated with a Humbrol paint reference. To assist in assembly
there is a symbol legend for gluing, painting, drilling, etc. Included
is a numbered parts location diagram where unused parts are shaded to
eliminate confusion during assembly. Assembly begins with the lower hull
in steps 1 - 3. The lower hull is comprised of 12 parts and is put together
in the first step. Step 2 assembles the road wheels and  mounts
them on the lower hull. The dish-type road wheels are nicely detailed
but the molded on tires are somewhat disappointing. Suspension arms are
molded in a fixed position. Step 3 calls for the mounting of the length
and link tracks to the road wheels. The tracks are very small but finely
detailed on both sides. Upper hull assembly starts in step 4. The upper
hull is adequately detailed. Adding the photo-etched engine deck screen,
vent louvers and tow lugs will enhance the level of detail. Parts 86B
and 99B require you to shorten them by 13.5 mm for ideal fit. mounts
them on the lower hull. The dish-type road wheels are nicely detailed
but the molded on tires are somewhat disappointing. Suspension arms are
molded in a fixed position. Step 3 calls for the mounting of the length
and link tracks to the road wheels. The tracks are very small but finely
detailed on both sides. Upper hull assembly starts in step 4. The upper
hull is adequately detailed. Adding the photo-etched engine deck screen,
vent louvers and tow lugs will enhance the level of detail. Parts 86B
and 99B require you to shorten them by 13.5 mm for ideal fit.  The
ten-piece 144mm turret is assembled in steps 5 - 7. It is nicely detailed
especially when you added the photo-etched muzzle break. Assembly is straight
forward but you will have to file down the turret base (part 36D) in order
to fit the upper turret. Instructions tell you to drill out the main gun
barrel but don't forget to do the same with the engine exhausts (parts
73B). Also, use a round dental bit to open up the headlight assemblies
(parts 45A) for MV lenses. That would really enhance the appearance of
this model. Finally, you must make a choice to paint and mark your BT-42
in steps 9, 10 or 11. Your primary vehicle color choices are dark green
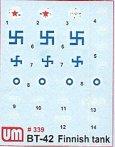
or a tricolor camo-scheme. The quality of the decals are excellent with
decal film that is very thin and the printing of the markings are fine.
There are markings for three vehicles. Two from unknown Finnish units
and one Russian captured BT-42 in Soviet markings. Positioning of the
decals do not appear to be difficult as they are all located primarily
on the turret. The
ten-piece 144mm turret is assembled in steps 5 - 7. It is nicely detailed
especially when you added the photo-etched muzzle break. Assembly is straight
forward but you will have to file down the turret base (part 36D) in order
to fit the upper turret. Instructions tell you to drill out the main gun
barrel but don't forget to do the same with the engine exhausts (parts
73B). Also, use a round dental bit to open up the headlight assemblies
(parts 45A) for MV lenses. That would really enhance the appearance of
this model. Finally, you must make a choice to paint and mark your BT-42
in steps 9, 10 or 11. Your primary vehicle color choices are dark green
or a tricolor camo-scheme. The quality of the decals are excellent with
decal film that is very thin and the printing of the markings are fine.
There are markings for three vehicles. Two from unknown Finnish units
and one Russian captured BT-42 in Soviet markings. Positioning of the
decals do not appear to be difficult as they are all located primarily
on the turret.
Conclusion
  The
BT series was pretty much nonexistent in small scale until UM started
to produce these variants. Like their BT-2, BT-5 and BT-7 kits this BT-42
does not lack for quality and is reasonably priced. UM has produced another
quality kit with crisp detail. I suggest a more experienced modeler take
this on due to the amount of very small parts. I would like to thank Squadron
Mail Order for the review kit. The
BT series was pretty much nonexistent in small scale until UM started
to produce these variants. Like their BT-2, BT-5 and BT-7 kits this BT-42
does not lack for quality and is reasonably priced. UM has produced another
quality kit with crisp detail. I suggest a more experienced modeler take
this on due to the amount of very small parts. I would like to thank Squadron
Mail Order for the review kit.
|
|


