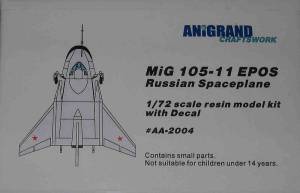
Building Anigrand Craftswork's 1/72nd MiG 105-11 EPOS
|
 |
Background
I could find very little information on
this craft codenamed Spiral EPOS (Experimental Passenger Orbital Aircraft).
I found some information on the web: for example, see: MiG
105-11. Rather than repeating that web site's contents, I will quote
from the description contained in the instructions with appropriate changes
to reflect my English corrections:
 "In
1964, the U.S.S.R. issued a five-year military plan that included the
"Spiral" space plane project. The MiG 105-11 EPOS was planned
as an experimental manned spacecraft that was under development at the
Mikoyan bureau as part of the Spiral program. The Spiral space system
consisted of an orbital spacecraft (the MiG 105) with a rocket booster
and a supersonic aircraft carrier (the Tupolev Article 50). After completing
its orbital mission, the spacecraft would re-enter the earth's atmosphere
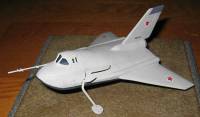
with the wings set at a 60-degree angle to serve as vertical stabilizers.
The program started without leadership support in 1965. Also, due to
technical difficulties, only the MiG 105-11 was built. The first flight
was planned for 1967 but was delayed for ten years until October 1976.
In total, eight test flights were made that included airdrop launches
from a Tu-95K bomber. In 1978, the program was ended when the funding
was halted in favor of the new Buran Shuttle." "In
1964, the U.S.S.R. issued a five-year military plan that included the
"Spiral" space plane project. The MiG 105-11 EPOS was planned
as an experimental manned spacecraft that was under development at the
Mikoyan bureau as part of the Spiral program. The Spiral space system
consisted of an orbital spacecraft (the MiG 105) with a rocket booster
and a supersonic aircraft carrier (the Tupolev Article 50). After completing
its orbital mission, the spacecraft would re-enter the earth's atmosphere
with the wings set at a 60-degree angle to serve as vertical stabilizers.
The program started without leadership support in 1965. Also, due to
technical difficulties, only the MiG 105-11 was built. The first flight
was planned for 1967 but was delayed for ten years until October 1976.
In total, eight test flights were made that included airdrop launches
from a Tu-95K bomber. In 1978, the program was ended when the funding
was halted in favor of the new Buran Shuttle."
In the Box
 As
you can see, this is a resin kit with a vacuum-formed clear piece for
the windows. The resin pieces are not too badly molded though there are
a few ragged edges and molding flaws but nothing drastic. When I looked
at the kit, I naively thought it looked like it would be a fairly straightforward
project: this was not entirely the case. Along with the kit parts comes
a small set of decals to replicate the machine at the Monino Museum in
Russia - the stars' outside white borders are out of register but that
is easily fixed with a bit of trimming. The instructions are clear enough
for the small number of pieces in the kit. The modeler is given the choice
of front landing gear: either wheels or a simple set of "legs",
with each leg standing on a palette. The wheel landing gear is roughly
hewn so I chose the simple "legs" option. As
you can see, this is a resin kit with a vacuum-formed clear piece for
the windows. The resin pieces are not too badly molded though there are
a few ragged edges and molding flaws but nothing drastic. When I looked
at the kit, I naively thought it looked like it would be a fairly straightforward
project: this was not entirely the case. Along with the kit parts comes
a small set of decals to replicate the machine at the Monino Museum in
Russia - the stars' outside white borders are out of register but that
is easily fixed with a bit of trimming. The instructions are clear enough
for the small number of pieces in the kit. The modeler is given the choice
of front landing gear: either wheels or a simple set of "legs",
with each leg standing on a palette. The wheel landing gear is roughly
hewn so I chose the simple "legs" option.
Assembly - Part One
 The
kit has a number of challenges that I discovered when dry-fitting the
pieces. First, the clear parts while decent, do not fit cleanly into the
space provided for the windows. The windows' shapes in the hull are a
little ragged. I re-shaped them as best I could and then sanded down the
clear parts to fit as best I could. The results were less than perfect.
The second problem was fitting the large upper and lower hull pieces together.
Dry-fitting them showed a massive gap at the front section. Further, when
I dry-fitted the completed interior in place, the hull parts were impeded
from closing entirely. To increase the space for fitting the interior
subassembly, I sanded the inside of the lower hull and then the same for
the underside of the cockpit interior subassembly. The instructions call
for an overall blue-grey interior. Questions to the Yahoo Space Modelers'
discussion list for more detail about the interior received little response.
I sprayed it blue-grey. Eventually, the hull "Closed": well,
it closed as well as it was ever going to close. Because of the less than
perfect fit of the windows, I decided to glue them in place prior to gluing
the hull pieces The
kit has a number of challenges that I discovered when dry-fitting the
pieces. First, the clear parts while decent, do not fit cleanly into the
space provided for the windows. The windows' shapes in the hull are a
little ragged. I re-shaped them as best I could and then sanded down the
clear parts to fit as best I could. The results were less than perfect.
The second problem was fitting the large upper and lower hull pieces together.
Dry-fitting them showed a massive gap at the front section. Further, when
I dry-fitted the completed interior in place, the hull parts were impeded
from closing entirely. To increase the space for fitting the interior
subassembly, I sanded the inside of the lower hull and then the same for
the underside of the cockpit interior subassembly. The instructions call
for an overall blue-grey interior. Questions to the Yahoo Space Modelers'
discussion list for more detail about the interior received little response.
I sprayed it blue-grey. Eventually, the hull "Closed": well,
it closed as well as it was ever going to close. Because of the less than
perfect fit of the windows, I decided to glue them in place prior to gluing
the hull pieces  together,
so I could ease the windows in place from both sides of the window, so
to speak. This was a good idea but some dust remained inside the windows
during the process, and this can still be seen, unfortunately. Prior to
gluing in the windows, I masked them off as carefully as possible, ready
for painting. Once the windows were in and the interior had been glued
in, I glued together the upper and lower hull. I filled the large gaps
around the sides and front of the hull with copious amounts of super glue.
This worked fairly well though the hull lost some its shape during this
process. together,
so I could ease the windows in place from both sides of the window, so
to speak. This was a good idea but some dust remained inside the windows
during the process, and this can still be seen, unfortunately. Prior to
gluing in the windows, I masked them off as carefully as possible, ready
for painting. Once the windows were in and the interior had been glued
in, I glued together the upper and lower hull. I filled the large gaps
around the sides and front of the hull with copious amounts of super glue.
This worked fairly well though the hull lost some its shape during this
process.
Next were the wings. There is no precise
indication of where to locate these and there are no locating pins. I
drilled two small holes in each abutting surface and used thin copper
wire in the holes to connect the parts. I gave the wings a slight anhedral,
which in retrospect may have been a mistake. The tail fin was glued on
in a similar way. Once the wings and tail were glued on, I finished filling
the remaining gaps using super glue.
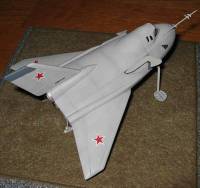
Painting
  I
sprayed the underside with my own mixture of "Scale Black" -
black enamel lightened with a touch of white. A few seams revealed themselves
leading to more super glue (I'd used almost the entire tube by now) and
sanding. I masked that off and sprayed with Model Masters acrylic "Camouflage
Gray" as the base. I sprayed a slightly darkened shade along the
panel lines then lightened slightly for the centers of each panel, followed
by a misting of the base color to blend things in. I painted the wheel
wells with the scale black, used burnt aluminum for the jet after burner,
and dark grey for the tail fin tip. I
sprayed the underside with my own mixture of "Scale Black" -
black enamel lightened with a touch of white. A few seams revealed themselves
leading to more super glue (I'd used almost the entire tube by now) and
sanding. I masked that off and sprayed with Model Masters acrylic "Camouflage
Gray" as the base. I sprayed a slightly darkened shade along the
panel lines then lightened slightly for the centers of each panel, followed
by a misting of the base color to blend things in. I painted the wheel
wells with the scale black, used burnt aluminum for the jet after burner,
and dark grey for the tail fin tip.
Assembly - Part One
 The
landing gear are a little roughly molded. You have a choice for the front
gear - either wheeled landing gear or these simple legs. I chose the latter
because the wheeled landing gear were a little rough-looking. I broke
one of the legs so I remade a new pair using plastic rod. Because I had
given the wings a slight anhedral, they almost touched the floor once
the back gear was glued on. I replaced the back gear's legs with a slightly
longer pair made from thin piano wire. I scratch built the probe sticking
out of the front of the fuselage, following the kit's instructions. The
landing gear are a little roughly molded. You have a choice for the front
gear - either wheeled landing gear or these simple legs. I chose the latter
because the wheeled landing gear were a little rough-looking. I broke
one of the legs so I remade a new pair using plastic rod. Because I had
given the wings a slight anhedral, they almost touched the floor once
the back gear was glued on. I replaced the back gear's legs with a slightly
longer pair made from thin piano wire. I scratch built the probe sticking
out of the front of the fuselage, following the kit's instructions.
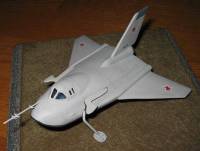
Decals and Finishing Touches
  I
gave the whole assembly a coat of Model Master acryl clear gloss and used
Future to prepare the surface for the decals. The decals went on nicely
but the white surrounding the red stars was slightly out of register.
Once all this had dried, I gave the model an oil wash with Payne's Grey
oil paint to fill in the panel lines. I
gave the whole assembly a coat of Model Master acryl clear gloss and used
Future to prepare the surface for the decals. The decals went on nicely
but the white surrounding the red stars was slightly out of register.
Once all this had dried, I gave the model an oil wash with Payne's Grey
oil paint to fill in the panel lines.
Conclusion
  This
is a short run resin kit that suffers from the typical problems associated
with such. However, the upside is that if you want to build an unusual
model like this then you have to put up with a few inconveniences. At
US$28 this is a fairly expensive kit that reflects its short run production
and the demise of the US dollar of late on the foreign exchange market.
Conditionally recommended for more experienced modelers with an interest
in the offbeat and who are prepared to deal with a less than perfect product. This
is a short run resin kit that suffers from the typical problems associated
with such. However, the upside is that if you want to build an unusual
model like this then you have to put up with a few inconveniences. At
US$28 this is a fairly expensive kit that reflects its short run production
and the demise of the US dollar of late on the foreign exchange market.
Conditionally recommended for more experienced modelers with an interest
in the offbeat and who are prepared to deal with a less than perfect product.
Acknowledgment
My thanks to Chris Mikesh of Nostalgic Plastic for the review kit.
|
|


