Monogram
1/8 Scale
"The Mummy"
|
 |
The Kit
 I’ve
wanted to do a kit for Halloween for a couple of years now. This year
it happened. I’ve
wanted to do a kit for Halloween for a couple of years now. This year
it happened.
I chose the Mummy since Boris Karloff was always one of my favorite
movie monsters, and his portrayal in the 1930’s movie was very convincing. The Monogram
kit I chose was released in 1983 – Aurora produced a bunch of monster
kits in the 1960’s, but I don’t know whether this was originally
an Aurora kit.
Construction
 This
is a straightforward kit, 31 pieces in all with very good detail in 1/8
scale, with optional pieces for glow-in-the-dark head, hands, feet and
serpent. Interesting, but I opted not to use them. Construction was quick
and easy. The fit on this kit was virtually flawless with minimal sanding
required. A minor peculiarity I noted was that the entire surface of
the contact points for glue throughout the kit all had an extremely smooth
sheen on them, much like a resin kit. But the box and instructions both
identify it as a plastic kit. I used Squadron green putty to fill slight
gaps where necessary. This
is a straightforward kit, 31 pieces in all with very good detail in 1/8
scale, with optional pieces for glow-in-the-dark head, hands, feet and
serpent. Interesting, but I opted not to use them. Construction was quick
and easy. The fit on this kit was virtually flawless with minimal sanding
required. A minor peculiarity I noted was that the entire surface of
the contact points for glue throughout the kit all had an extremely smooth
sheen on them, much like a resin kit. But the box and instructions both
identify it as a plastic kit. I used Squadron green putty to fill slight
gaps where necessary.
 The
bulk of the work was done at this stage. I used gray primer on everything,
then masked the Mummy’s exposed head and head, and spray-painted
it Testors Flat White. When that dried, I began the process of aging
the bandages by starting with a thinned acrylic wash of Model Master
British Gulf Armor Light Stone – this was perfect for simulating
desert dust, and had a good staining effect against the plain white.
The second wash was oil-based, using Model Master Flat Interior Tan,
a few shades darker than the first wash and good for bringing out detail
in the bandages and beginning the shading process. Next, I used this
same enamel, not in a wash but as regular paint, to strengthen the shading
effect. At The
bulk of the work was done at this stage. I used gray primer on everything,
then masked the Mummy’s exposed head and head, and spray-painted
it Testors Flat White. When that dried, I began the process of aging
the bandages by starting with a thinned acrylic wash of Model Master
British Gulf Armor Light Stone – this was perfect for simulating
desert dust, and had a good staining effect against the plain white.
The second wash was oil-based, using Model Master Flat Interior Tan,
a few shades darker than the first wash and good for bringing out detail
in the bandages and beginning the shading process. Next, I used this
same enamel, not in a wash but as regular paint, to strengthen the shading
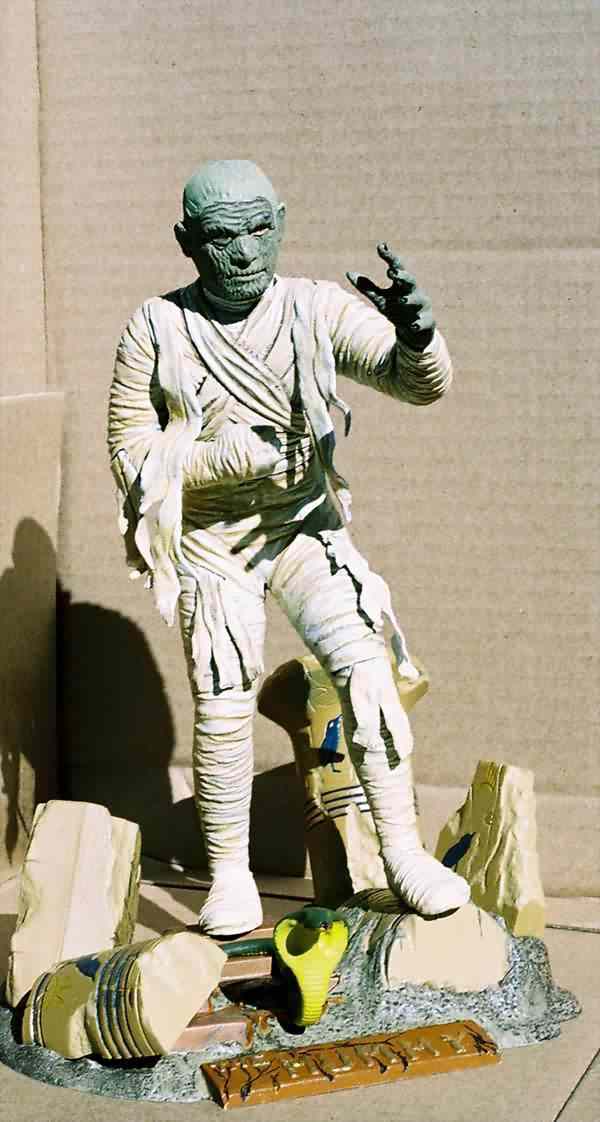
effect. At  the last stage, I touched up certain upper surfaces of the
bandages with flat white again. The Mummy’s hand, head and hair
are Polly S Yellow Gray, a color from their Fantasy series that looked
about right to depict dead flesh. I gave the head and hand a wash of
Raw Umber to bring out the detail and age the flesh. I left the hair
alone. the last stage, I touched up certain upper surfaces of the
bandages with flat white again. The Mummy’s hand, head and hair
are Polly S Yellow Gray, a color from their Fantasy series that looked
about right to depict dead flesh. I gave the head and hand a wash of
Raw Umber to bring out the detail and age the flesh. I left the hair
alone.
The
base is British Gulf Armor Light Stone treated with a wash of Raw Umber.
The steps are Testors Brown, which comes out looking like a very light
shade of rust. The artifacts are Testors Afrika Mustard in the spray
can, lightened with Flat Interior Tan in the broken places. For the details
on the hieroglyphics such as the birds, I mixed Gold with Blue Angel
Blue, both Testors colors.  Some of the scribe marks were treated with
Burnt Sienna. The serpent is painted in Floquil British Dark Slate Grey,
a great dark olive color for a snake, with a zinc chromate underside.
The sign, like the steps, is Testors Brown with gold letters. Some of the scribe marks were treated with
Burnt Sienna. The serpent is painted in Floquil British Dark Slate Grey,
a great dark olive color for a snake, with a zinc chromate underside.
The sign, like the steps, is Testors Brown with gold letters.
Conclusion
This
is a great kit, lots of fun and easy to build with the real challenge
at the painting stage – highly recommended for your next Halloween
or horror project.
|
|