Building From the Box: "Construction Tips For A Better
Airliner" Part Two
|
 |
This month we will continue with decaling the DC-9. I have received
several nice emails on last months article. From your comments and questions,
I have decided to extend this article into a model build. We will go over
the building techniques this month, with a step-by-step build over the
next few months so you can see how this all comes together as a finished
model.
Pre-Decaling
The first thing you need to be sure of, is that the model is really
dry from painting. This may sound strange, but it's a critical item for
a long lasting finish. I once rushed a 757 to meet a contest deadline
only to have it come back to bite me six months later. I primed, painted
and cleared the model in about four days. The base color didn't completely
release all it's drying agent resulting in minute cracks in the paint.
Too much too soon! Tamiya recommends a two week waiting period for the
base coat to dry and shrink down. With enamels, I use the smell test.
After a week or so, if I can smell any paint odors, I will give it some
more time to dry. I like to string some light wire through the wing or
stab holes and hang it in my model closet out of the way.
After it's dry, look over the surface of your paint job. Did you get
a good glossy finish? If your paint has a dry look to it, you'll have
to add a clear coat before you decal. If you're not up to speed on getting
a glossy finish with paint, you won't be able to get it with the clear
either. Don't worry, this will be real easy. Hopefully, you will already
have a bottle of Future floor finish. Go buy yourself a new 3/4"
or 1" super soft brush. Don't cheap out here, buy a good one. I use
this brush only for applying Future and nothing else. Lightly dip the
brush into the Future and coat just the one side of the  body.
Future has a self leveling agent in it so you can do sections at a time.
I will do the right tail and let it dry, followed by the right side of
the fuselage. If you're on a tight budget, you can apply Future even with
a cotton swab (Q-Tip). Just watch out for loose cotton strands, which
are easily removed and re-coated. My South
African B-737-800 was final glossed with this method. body.
Future has a self leveling agent in it so you can do sections at a time.
I will do the right tail and let it dry, followed by the right side of
the fuselage. If you're on a tight budget, you can apply Future even with
a cotton swab (Q-Tip). Just watch out for loose cotton strands, which
are easily removed and re-coated. My South
African B-737-800 was final glossed with this method.
Decaling
I think most of you have a pretty good handle on the basics of decaling.
The two points I want to cover are silvering and alignment.
One of the most challenging areas of decaling is silvering. Silvering
is when the decal film doesn't get all the air out from underneath the
decal, resulting in a "silvering" under the film. This shows
up often with the military modelers with their flat paint. Think for a
minute that the decal is a sheet of glass laying on a gravel road. The
glass can't fill in all the voids of the gravel. This is the silvering
you see. So, you'll have to get the surface as smooth as you can. If that
doesn’t work, you can soften the decal with a solvent that will
let it fill in any voids. My favorite is Solvaset by Walthers. One trick
I learned when you have a tough time with a decal is to brush a little
Future on the area and apply the decal on this. I used this technique
when I forgot to put a fuel cap decal on the DC-9 wing that I had already
flat coated. After I put the Future on and placed the decal, I then went
back and shot another coat of dull coat to cover the new decal.
Another trouble area with silvering is with multiple decal layering. We
will get into that in more depth in a future build article.
 The
next is alignment. This is a pet peeve of mine and most contest judges.
Most of our airline models have a lengthwise stripe or cheat line running
from nose to tail. After you have applied the stripe to the body and positioned
it, sight it from the nose to tail with one eye. What you are looking
for, is any slight wave up or down in the stripe. This may take several
attempts to persuade the decal to align straight. So, why is this important?
The stripe is the main focus for the eye to determine all the parallel
lines, the body, stripe and the windows. I start on the right side of
the body first. I reason I do this is, if any stripe will overlap on the
other side, the left side stripe will cover the seam. We tend to view
the model from the left side more than the right. The
next is alignment. This is a pet peeve of mine and most contest judges.
Most of our airline models have a lengthwise stripe or cheat line running
from nose to tail. After you have applied the stripe to the body and positioned
it, sight it from the nose to tail with one eye. What you are looking
for, is any slight wave up or down in the stripe. This may take several
attempts to persuade the decal to align straight. So, why is this important?
The stripe is the main focus for the eye to determine all the parallel
lines, the body, stripe and the windows. I start on the right side of
the body first. I reason I do this is, if any stripe will overlap on the
other side, the left side stripe will cover the seam. We tend to view
the model from the left side more than the right.
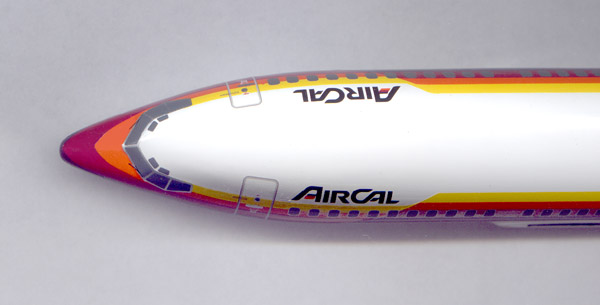
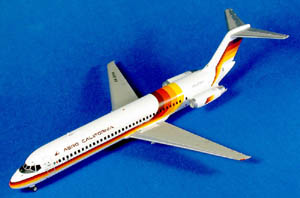
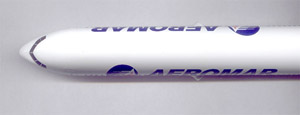 I
start with the stripe, then the logo. After this dries, I start the stripe
on the left side. What I have done is made a visual reference point as
viewed from the front and top. By sighting down the model from the nose,
you can see if you are high or low. Also, check the view at the tail.
Now, apply the logo and make sure it's at the same height above the stripe
as on the right side. This is where I see a lot of mistakes. The model
maker doesn't align the decal from the top view. These should parallel
with each other. The photo of the AirCal 737 is one that is aligned with
the other. The shot of my Aeromar 767, however is not. This is a case
of the logo being positioned in reference to the window count. This why
you need a photo of BOTH sides of the plane before starting to decal.
Finish up with all the detail decals. You can add some protection to ALPS
decals at this point by brushing or swabbing on some Future to the decals
which guards against any scratches in the ink. I
start with the stripe, then the logo. After this dries, I start the stripe
on the left side. What I have done is made a visual reference point as
viewed from the front and top. By sighting down the model from the nose,
you can see if you are high or low. Also, check the view at the tail.
Now, apply the logo and make sure it's at the same height above the stripe
as on the right side. This is where I see a lot of mistakes. The model
maker doesn't align the decal from the top view. These should parallel
with each other. The photo of the AirCal 737 is one that is aligned with
the other. The shot of my Aeromar 767, however is not. This is a case
of the logo being positioned in reference to the window count. This why
you need a photo of BOTH sides of the plane before starting to decal.
Finish up with all the detail decals. You can add some protection to ALPS
decals at this point by brushing or swabbing on some Future to the decals
which guards against any scratches in the ink.
You can look for more detail into all of these areas as we get into
the forthcoming build that we will do together. I look forward to having
you back next month as we build a better airliner.
|
|