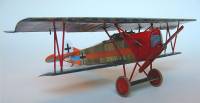
Roden 1/48th Fokker D.VII (Fokker-built Early)
|  |
History
So much has been written and discussed about the Fokker D.VII many modelers
may think to pass it by. Recent research provides for a new look at this
famous aircraft, its subtleties and large number of variants. It's not
your grandfather's D.VIIF…
By 1917, with the arrival of several superior Allied aircraft, Albatros
D.III, V, Fokker Dr 1 and Pfalz D.III fighters were increasingly outclassed.
Superiority had passed from German pilots back to Allied pilots. With
few exceptions, many top aces began clamoring for something with which
to regain their competitive edge. The German Air Service directed firms
to prepare new designs for a fighter competition to be held at Aldershof
in mid-January, 1918. Many top scorers were  invited
to test-fly and appraise all entrants to the comp. Criteria was based
on the venerable 160-hp Mercedes D.III in-line engine. Observant designers
sought to circumvent Germany's by-then restricted resources and construction
methods with expedient construction and materials. Fokker chose steel
tube, thick cantilever wood laminate wings and in some cases, aircraft
driven by rotary engine. In all, 28 types were tested. Manfred von Richthofen's
preferences weighed and swayed designers and pilots, alike. His choice
was enthusiastic and decisive: Anthony Fokker's V.11 prototype, the soon-to-be
D.VII. Taking MvR's comments into consideration, modification was made
to ensure directional stability and address some other concerns. An initial
order of 300 D.VIIs was placed with Fokker's firm, located at Schwerin,
to begin production. Additionally, orders were also placed for 600 machines
from each Albatros factory at Johannisthal and its subsidiary, Ostdeutche
Albatros Werke at Scheidemuhl. Johannesthal machines were designated D.VII(Alb)
and those from the Scheidemuhl D.VII(OAW). invited
to test-fly and appraise all entrants to the comp. Criteria was based
on the venerable 160-hp Mercedes D.III in-line engine. Observant designers
sought to circumvent Germany's by-then restricted resources and construction
methods with expedient construction and materials. Fokker chose steel
tube, thick cantilever wood laminate wings and in some cases, aircraft
driven by rotary engine. In all, 28 types were tested. Manfred von Richthofen's
preferences weighed and swayed designers and pilots, alike. His choice
was enthusiastic and decisive: Anthony Fokker's V.11 prototype, the soon-to-be
D.VII. Taking MvR's comments into consideration, modification was made
to ensure directional stability and address some other concerns. An initial
order of 300 D.VIIs was placed with Fokker's firm, located at Schwerin,
to begin production. Additionally, orders were also placed for 600 machines
from each Albatros factory at Johannisthal and its subsidiary, Ostdeutche
Albatros Werke at Scheidemuhl. Johannesthal machines were designated D.VII(Alb)
and those from the Scheidemuhl D.VII(OAW).
It is here that many of the subtle variations in this aircraft initiated.
All three firms went from Fokker plans and methods but were at liberty
to modify anything felt to be less than optimum. Many field modifications
occurred as well, notably, the amount of heat generated by the engine
necessitating revised engine panels, removed engine panels, wing axle
modification for ease of maintenance and so forth. In the summer of 1918,
many pilots began removing the top engine panels due to the heat of the
engine compartment cooking off rounds in ammunition canisters. All three
firms continued to modify right up through the BMW-engine D.VIIF, the
final mark, at which point general standardization was achieved.
 Early
D.VII's were streaked throughout, including flying surfaces and typical
Fokker Turquoise underneath the fuselage. The first dozen or so had the
older Eisencruz rather than the newer standardized Balkencruz. Struts
were finished in light grey. Engine panels were either left metal at the
factory or painted Fokker Drab. Shortly after the first batch of fifty
machines, four color lozenge printed fabric was used for covering all
flying surfaces, yielding to five color in the mid-200's, returning to
four color in the series designated 7700+. Most all fuselages were covered
in lozenge printed fabric after approximately the #400 batch. Early
D.VII's were streaked throughout, including flying surfaces and typical
Fokker Turquoise underneath the fuselage. The first dozen or so had the
older Eisencruz rather than the newer standardized Balkencruz. Struts
were finished in light grey. Engine panels were either left metal at the
factory or painted Fokker Drab. Shortly after the first batch of fifty
machines, four color lozenge printed fabric was used for covering all
flying surfaces, yielding to five color in the mid-200's, returning to
four color in the series designated 7700+. Most all fuselages were covered
in lozenge printed fabric after approximately the #400 batch.
German pilots would once again have an aircraft equal to their task
and the Allied challenge.
The Kit
Roden has achieved an excellent representation. Looking at various sources,
one notes they've managed to include and detail every signature feature
of this unique aircraft. It compares to any datafile with near-perfect
accuracy. The two wings, particularly the top wing, are beautiful. The
office is as busy as it needs to be and everything that was there is there.
The cockpit, in itself, is a pleasurable build. The engine detail is exemplary.
The struts are the correct profile and suitably delicate, as photos of
this plane show. An early radiator is present as are each of three different
propellers used. Many different options are available to the builder for
engine and compartment detail and are also a build in itself. Patience
is rewarded with as accurate a look at the business end as a modeler could
want in plastic. Control surfaces are separate and pose with accuracy.
Choice - choice - choice. There is much here to work with.
Construction
 Starting
with the cockpit items, wood floor, metal panels for rudder skids, clear
doped linen sides as the factory streaked paint did not soak through.
Brace wires were done with a sharp #4 pencil. The seat is stamped aluminum
typically painted black or covered with thin stitched leather and a padded
seat. Belts are beige canvas, metal buckled. Visible tube construction
is painted a "Fokker Olive Grey" which was mixed. The control
stick has rich wood handles and is two-grip as that is what pilots preferred.
The instrument panel is excellent and detail painting of wood laminate
and instruments was achieved using a tan base coat with a darker wood
colored wash. Instrument faces picked out in white, a needle stroke and
circled in black paint. Machine guns were left until final painting was
done on the fuselage. Starting
with the cockpit items, wood floor, metal panels for rudder skids, clear
doped linen sides as the factory streaked paint did not soak through.
Brace wires were done with a sharp #4 pencil. The seat is stamped aluminum
typically painted black or covered with thin stitched leather and a padded
seat. Belts are beige canvas, metal buckled. Visible tube construction
is painted a "Fokker Olive Grey" which was mixed. The control
stick has rich wood handles and is two-grip as that is what pilots preferred.
The instrument panel is excellent and detail painting of wood laminate
and instruments was achieved using a tan base coat with a darker wood
colored wash. Instrument faces picked out in white, a needle stroke and
circled in black paint. Machine guns were left until final painting was
done on the fuselage.
The floor piece, back "bulkhead", a framed, fabric stitch affair,
were each sanded gently to conform to a shape to fit. A few test fittings
and the rear fuselage assembly was ready to close and finalize. Putty
and set aside to cure.
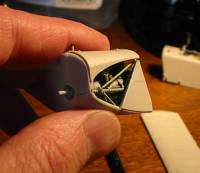
At this point, I just sat and stared at the engine compartment pieces
and instructions. Ulp. Another reminder of failing eyesight and 10 thumbs….
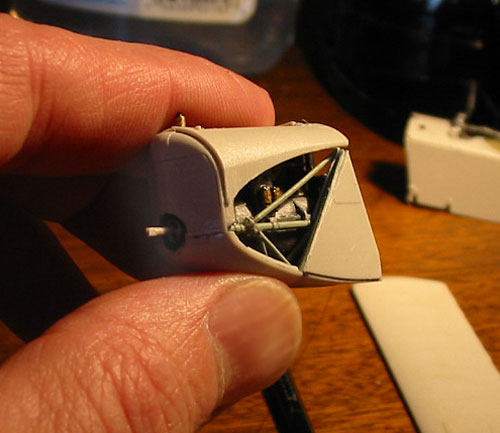
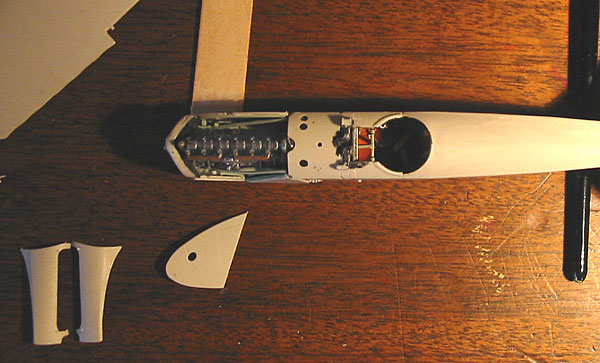
Front Engine Compartment.
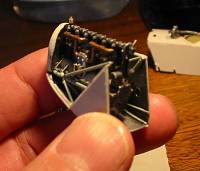 This
is where this kit really shines and really challenges. It's plastic, not
scale brass and certainly not real engine panels, so finesse of all the
pieces is paramount. So is an understanding of the D.VII engine compartment
and brazed tube framing, as you are going to become very well acquainted
with that in fitting the engine to its compartment. The instruction sheet
is helpful and so are online references, but any of the datafiles are
even more helpful. This
is where this kit really shines and really challenges. It's plastic, not
scale brass and certainly not real engine panels, so finesse of all the
pieces is paramount. So is an understanding of the D.VII engine compartment
and brazed tube framing, as you are going to become very well acquainted
with that in fitting the engine to its compartment. The instruction sheet
is helpful and so are online references, but any of the datafiles are
even more helpful.
It's a bag of sticks, in 1/48. I have no idea how this would accomplish
in any smaller scale.
I painted mine before assembly but would recommend doing so after assembly,
stopping at some logical point prior to engine installation.
Consider carefully the status of your finished bird:
Is it to be top covers off? Then ignore them and finesse "the look"
you need to obtain.
Is it to be all covers off? Then you must install the engine bearers and
frame work almost free-form without benefit of knowing exactly where everything
needs to locate.
Is it to be all covers on? Each one will need to be finessed to fit (as
if they were engine panels rather than planks of plastic.
If you are doing your version with the side covers on, this is important:
 The
odd-shaped thin tubing you see in pairs duplicates what is already molded
on the side covers. Do Not include these in your subassembly or your panels
will be too thick to fit. The
odd-shaped thin tubing you see in pairs duplicates what is already molded
on the side covers. Do Not include these in your subassembly or your panels
will be too thick to fit.
If you choose to do some variation of the above, trim the portion you
need an install that.
Early Fokkers had fabric leading all the way up to the engine panel. I
simulated this by trimming the panel off on the diagonal line at the juncture
of front & rear panel. I installed the rear triangle on the port side
and the complete panel on the starboard side.
You have three basic options: Completely open compartment, with all framing
and all of the engine visible, partially closed but side panels off, partially
closed but top panels off.
I chose "option four": Closed on the exhaust side, open on the
port side, top panels removable. "Option Five", side panels
removable, replaceable does not exist as the leading cabane will block
you. There are advantages to going with one side (at least) closed. In
looking at all the delicate pieces and the bottom cover for the engine,
there seems no point of reference as to what is plumb. I used one of the
covers to provide a ninety degree angle and a place to hang at least on
 side
of the engine. From there, confidence obtained in orienting the engine
bearers and the engine level. All would be visible with the option chosen.
I pre-painted these tubed items and proceeded with CA. The radiator, surprisingly,
went last. But I recommend test fitting for securing the orientation of
the drive shaft in the circle completed by the addition of this radiator.
A good reference would help visualize as much of the tubing runs in 3
axis. There are references online, notably a superb build by Ken Foran,
entirely in brass
to 1/16 scale. side
of the engine. From there, confidence obtained in orienting the engine
bearers and the engine level. All would be visible with the option chosen.
I pre-painted these tubed items and proceeded with CA. The radiator, surprisingly,
went last. But I recommend test fitting for securing the orientation of
the drive shaft in the circle completed by the addition of this radiator.
A good reference would help visualize as much of the tubing runs in 3
axis. There are references online, notably a superb build by Ken Foran,
entirely in brass
to 1/16 scale.
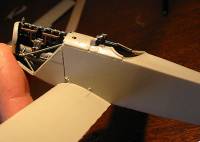
After that cocoon, the wing halves seemed easy enough and they are.
Care needs to be taken as you press halves such that you do not deflect
the plastic into an atypical profile when securing these halves. The scalloped
edges will need care to align but do so well. A word of advice that evidences
much, much later in the build:
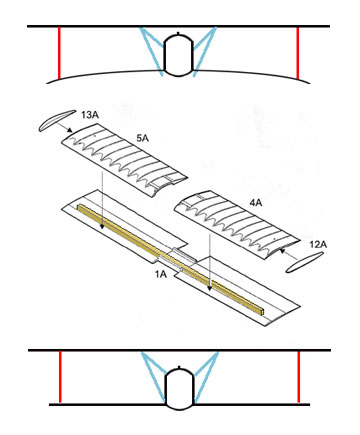
As per the attached image, the lower wing is weak and easily deflected
down by the interplane struts at the final stages of assembly. A brass
bar would strengthen nicely. 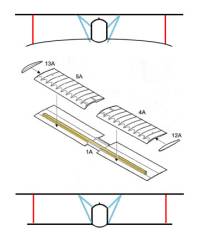 Like
a dodo, I of course, ignored every message in my mind that said "do
this now". But I can recommend it with good humor and confidence.
Much has been said about the crankiness of this kit but I find it most
pleasurable and the struts spot on. The brass re-enforcement will take
care of any final apprehensions. Like
a dodo, I of course, ignored every message in my mind that said "do
this now". But I can recommend it with good humor and confidence.
Much has been said about the crankiness of this kit but I find it most
pleasurable and the struts spot on. The brass re-enforcement will take
care of any final apprehensions.
Test fitting of the lower wing
The lower wing is quite thin and flexible. The fit to the fuse is very
tight. Repeated fittings and finesse filing is necessary to obtain a glove
fit such that the wings sit comfortably without imparting stressed anhedral.
In addition, the leading edge plastic face -the front engine bulkhead-
must be sanded so that the front engine assembly fits properly. It's easily
enough accomplished and test fitting is key.
Wrapping up fiddly bits, paint and install cross bar above dash. Paint
and install gundeck assembly. Putty front bulkhead, turtledeck, finesse
sand. Finesse sand underseam but leave as a seam for later detailing to
simulate Fokker stitching .
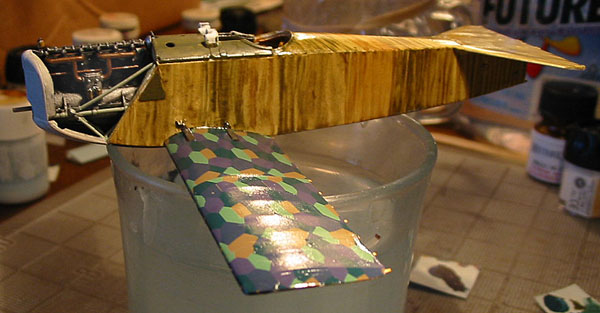
After covering both wings with lozenge, but not the tail assembly (in
these early production examples), the wings were set aside until the scheme
was finalized on the fuselage.
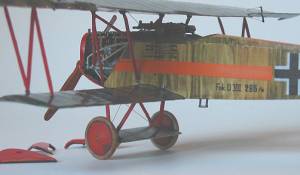
Painting & Lozenge decals
In that this is an Early Schwerin-built D.VII, the fuselage would be
streaked. Accordingly, benefit from additional research is recommended.
There are no known originals carrying this method of factory finish. The
one extant original, the so-called Knowlton Fokker in Canada, is an Albatros-built,
four color lozenge fabric covered example. The remainder exist in museums
as restorations or replicas. They are all beautiful but unfortunately,
though exhaustively researched, original streaked fabric evidence is lost.
 The
Streak: The
Streak:
Four types are thought to precede this aircraft. 1916 D.III & IV of
two blended colors, D.V had a slightly different, translucent application,
1917 F1 triplanes were brownish olive either streaked over turquoise or
blended with it and production Dr. 1 had wet blending of the following:
A similar brown olive, as per above, olive and a brighter, purer green,
dark green and grass greens. Period photos can not possibly distinguish
these nuance but paint receipts are kept and consulted from the period.
Lastly, the D.VII is likely two greens, however some aircraft were thought
to also have streaks of blue or brownish olive. All on the same aircraft.
You can choose for yourself. I whimped out after experimentation with
blues and browns and settled happily into a Dr. 1 looking streak. However,
obtaining it using acrylic paints and wet blending took practice. I ended
up using a lot of water, a fair amount of dish soap and thinking "streak"
and "craftsman, that day" and that's what came out of the brush.
It's okay but I'd like to have it feel more like a scale four inch utility
brush was used.
Would it be different next time around? Absolutely. This will either drive
you up the wall or be fun, depending on your enjoyment of this sort of
thing. It made it fun for me as I brush all my models and have no idea
how to use an airbrush. So this truly is a brush job!
 From,
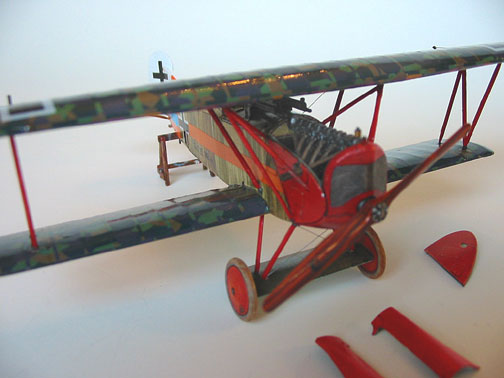
there, a turquoise was mixed from German blue #64. Stitching was painted
along the fuselage underside and an opening created for the tail drag.
A base coat of orange was laid down on the horizontal tail and rudder
fin and the rest left for later. Meantime, I had no idea how to hand brush
neat stripes. I threw myself on the tender mercies of Sanjeev Hirve to
make some orange and blue decal sheets in order for me to proceed to Stripeville.
Two pots of paint were mixed and shipped off to Sanjeev's workshop and
two sheets of decals and unused paint returned. The fuselage orange stripes
are decal as are all blue stripes. The horizontal tail and area below
it on the fuselage are brushed. Touch-ups completed the illusion and the
top orange stripe was hidden at the juncture of the tail to the fuse.
Red Engine panels were next. After re-checking fit - the top ones are
fussy - everything looked ready to mount up. From,
there, a turquoise was mixed from German blue #64. Stitching was painted
along the fuselage underside and an opening created for the tail drag.
A base coat of orange was laid down on the horizontal tail and rudder
fin and the rest left for later. Meantime, I had no idea how to hand brush
neat stripes. I threw myself on the tender mercies of Sanjeev Hirve to
make some orange and blue decal sheets in order for me to proceed to Stripeville.
Two pots of paint were mixed and shipped off to Sanjeev's workshop and
two sheets of decals and unused paint returned. The fuselage orange stripes
are decal as are all blue stripes. The horizontal tail and area below
it on the fuselage are brushed. Touch-ups completed the illusion and the
top orange stripe was hidden at the juncture of the tail to the fuse.
Red Engine panels were next. After re-checking fit - the top ones are
fussy - everything looked ready to mount up.
To expand on lozenge decals:
 Recommend
after-market here. Go with a known performer such as Eagle Strike, Pegasus
or Americal/Gryphon, in no order of preference. I have used each and am
very satisfied. The tapes are hand cut from A/G five color bolts and laid
on one by one. Draw the blade such that you cut the cal but not the backing.
Floor polish is a great sealer surface for these types of applications.
Kleer/Future and some Solvaset for stubborn moments. Snuggles down and
trims clean. Ailerons do not have tapes in D.VII's. Last, seeing the colors
still a bit too bright, I went with some tinted Future on the cals - a
tan mix to knock down the colors and mute them towards "period"
look. Recommend
after-market here. Go with a known performer such as Eagle Strike, Pegasus
or Americal/Gryphon, in no order of preference. I have used each and am
very satisfied. The tapes are hand cut from A/G five color bolts and laid
on one by one. Draw the blade such that you cut the cal but not the backing.
Floor polish is a great sealer surface for these types of applications.
Kleer/Future and some Solvaset for stubborn moments. Snuggles down and
trims clean. Ailerons do not have tapes in D.VII's. Last, seeing the colors
still a bit too bright, I went with some tinted Future on the cals - a
tan mix to knock down the colors and mute them towards "period"
look.
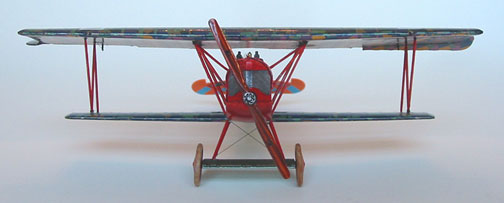
That finished, it was time to mount up. The top wing went thus: Interplanes
first, on top wing, turn round and set down on lower wing. It's square
so it's fairly straightforward.
At this point, when I went to install cabanes, the press of the interplanes
had warped an anhedral into the lower and they were far too long. It took
me a bit to understand the geometry, but once I did, I needed to do some
odd hand-held lower tip tweak and strut placement, simultaneously. The
first two, of 6 total cabanes would be key. It took three tries and an
entire day of fooling about. But. Finally square - to the leading edge.
Now for the trailing edge. Yikes. Not good. One try 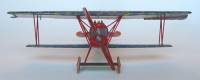 with
kit supplied thin plastic showed enough bow for a banana and no way to
correct the leaned trail edge. Out with brass tube, nip, nip, file, click,
done. with
kit supplied thin plastic showed enough bow for a banana and no way to
correct the leaned trail edge. Out with brass tube, nip, nip, file, click,
done.
I'd recommend the brass strengthener in that lower wing, folks. Then
you have no worries.
Rest was pretty standard.
The wheels are able to rotate but I did not build them as such. The prop
does also and that I did choose to pose differently on any whim.
The rigging is about as easy as it gets which is wonderful as I do not
care much for rigging.
Remember the aileron cables near the pilot and rear cabane. Else is wonderfully
unbraced.
Conclusion
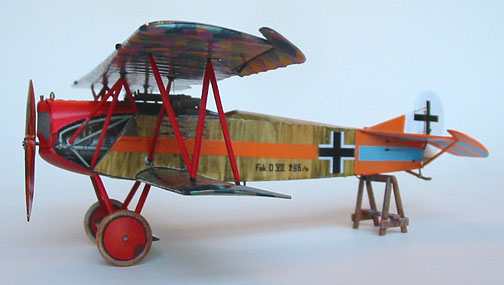
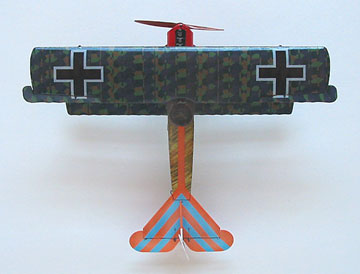
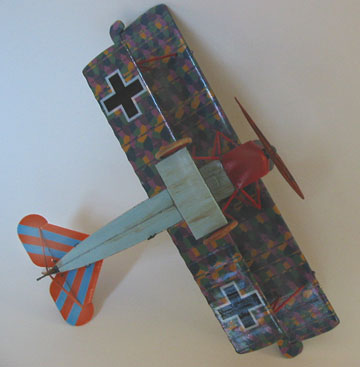
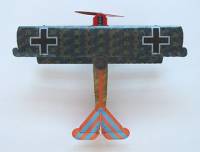
 This
is Willi Gabriel's early Fokker, Schwerin-built #286/18. It's been modeled
a fair amount, but I had difficulty finding a prettier looking early one
or a more interesting backstory than the rebellious Vzfw. Gabriel. I happen
to like the fact that he upset Herman Goring. And should probably leave
it at that, in good taste. Willi was a wannabe, that's for sure. A festive
looking bird for a festive acting pilot. Both Willi and his brother had
wanted to fly since they were boys and Willi certainly got his wish. The
last mount Gabriel flew was a BMW-engined D.VII the few days before Goring
sent him packing. No idea what that aircraft looked like and likely, Herr
Gabriel did not get a chance to drive some poor fitter crazy pointing
at this and that. They say youth is wasted on the young but Willi cut
his swath before Herman banned him from further hunts. Go Willi! This
is Willi Gabriel's early Fokker, Schwerin-built #286/18. It's been modeled
a fair amount, but I had difficulty finding a prettier looking early one
or a more interesting backstory than the rebellious Vzfw. Gabriel. I happen
to like the fact that he upset Herman Goring. And should probably leave
it at that, in good taste. Willi was a wannabe, that's for sure. A festive
looking bird for a festive acting pilot. Both Willi and his brother had
wanted to fly since they were boys and Willi certainly got his wish. The
last mount Gabriel flew was a BMW-engined D.VII the few days before Goring
sent him packing. No idea what that aircraft looked like and likely, Herr
Gabriel did not get a chance to drive some poor fitter crazy pointing
at this and that. They say youth is wasted on the young but Willi cut
his swath before Herman banned him from further hunts. Go Willi!
This is an excellent kit. I'd like to take this opportunity to pay respect
to all D.VII builders before Roden and this kit whom used to create this
early Schwerin-built, smooth paneled D.VII from scratch. Including the
complex early exhaust pipes! By comparison, this rendition is a breeze.
In any case, this is superior to the DML D.VII by a large margin.
As such, a total pleasure. Hats off as well to Roden. They have managed
a very nice kit. However, it is not for the faint of heart. Bring your
enthusiasm with you, at the least.
Thanks to Roden for the review
kit.
 Thank
you to Sanjeev Hirve, Robert Baumgartner, Pedro Soares, Shane Weier and
Fraser May for necessary assistance and consul in this build. Thanks to
Matt Bittner for the kit and the invitation to contribute. Thanks to all
my online pals. You make this more fun. Thank
you to Sanjeev Hirve, Robert Baumgartner, Pedro Soares, Shane Weier and
Fraser May for necessary assistance and consul in this build. Thanks to
Matt Bittner for the kit and the invitation to contribute. Thanks to all
my online pals. You make this more fun.
Every mistake is mine.
Sources
Fokker D.VII Anthologies No's. 1-3, Albatros Productions, Ltd.
Von Richthofen's Flying Circus, Windsock Fabric Special No. 1, Albatros
Productions, Ltd.
Fokker D.VII Aces of World War 1 - Part 1, Osprey Publications
Various online sources, notably World
War I Modeling Page
And The Aerodrome
The authors of these books may be found at the Aerodrome in the forum
section.
Their expertise is a treasure.
|
|