Accurate Miniatures 1/48 North American Mustang Mk.IA
|
 |
Background
We can thank the RAF for the existence of the P-51 Mustang. While United
States was maintaining its neutrality as the German and Japanese empires
were assimilating Europe and Asia, respectively, the British were bracing
for the worst. Their island home and their colonies around the world were
on the verge of being assimilated as well.
While British aircraft industries were ramping up production of new
and old designs to reinforce the RAF, delegates from the British government
embarked on an extended shopping trip to the United States for potential
American aircraft to fill the under-staffed RAF ranks. After visits to
Lockheed for the Hudson and Curtiss for the P-40, the delegates paid a
visit to North American Aviation to have them to build the P-40 under
license to augment Curtiss’ production lines.
North American convinced the British delegates that they could produce
a better fighter using the same engine and weapons as the Curtiss P-40,
and that a prototype would be in the air within nine months. The rest
is aviation history as the resulting P-51 Mustang family would not only
serve as a supplemental fighter with the RAF, it would become the mainstay
air superiority machine for the USAAF in skies over Europe and Asia.
The Kit
 Accurate
Miniatures (AM) has released this aircraft in a number of pre-P-51D variants
before the ‘old’ company crashed and burned. As the ‘new’
AM has been coming online, it is re-releasing these kits and producing
new variations with the associated parts and decals. These new variants
are currently recognizable by, shall we say, box art that is not the quality
that adorned the releases of the old AM. Accurate
Miniatures (AM) has released this aircraft in a number of pre-P-51D variants
before the ‘old’ company crashed and burned. As the ‘new’
AM has been coming online, it is re-releasing these kits and producing
new variations with the associated parts and decals. These new variants
are currently recognizable by, shall we say, box art that is not the quality
that adorned the releases of the old AM.
For those of you who’ve built AM kits before, you know that these
kits raised the bar in the plastic model industry for detail and quality
straight out of the box. Even the packaging was a step or two above the
rest of the industry. The new AM has not only retained the quality of
kit and packaging, they continue to improve upon the process to ensure
that all of the parts arrive on your workbench without scratches or other
damage.
 The
Mustang kit is molded in medium gray styrene and the parts are molded
with sharply scribed panel and rivet detailing and no molding flash. Dry-fitting
the parts together reveal that the fit is as tight as the first production
runs and that no filler would be needed. This kit, as with the Mustangs
that preceded it, will almost fall together on its own. The
Mustang kit is molded in medium gray styrene and the parts are molded
with sharply scribed panel and rivet detailing and no molding flash. Dry-fitting
the parts together reveal that the fit is as tight as the first production
runs and that no filler would be needed. This kit, as with the Mustangs
that preceded it, will almost fall together on its own.
On the other hand, the instructions are worse than before. I pulled
out an old set of Mustang instructions from one of AM’s early releases
and remembered that these were not very well illustrated back then. The
instructions in this Mustang Mk.IA kit are based on the old instructions,
but it appears that the diagrams have been combined, making parts placement
even more confusing if you’ve never built this kit before. Fortunately
the assembly of the kit is straightforward and I used the old instructions
and dutifully dropped the new instructions into the shredder. AM needs
to improve these ASAP.
Assembly
 Assembly
starts (as usual) with the cockpit. I sprayed all of the interior parts
with RAF Interior Green. Since the sidewall frames and associated black
boxes and controls were cleverly molded as separate parts from the fuselage
sides, I decided to shade the green on the fuselage sides with a light
coat of Tamiya Clear Smoke to add depth to the final product. After painting
all of the details in the cockpit and adding seat belts & harnesses
to the pilot’s seat, I assembled the cockpit and fuselage. Assembly
starts (as usual) with the cockpit. I sprayed all of the interior parts
with RAF Interior Green. Since the sidewall frames and associated black
boxes and controls were cleverly molded as separate parts from the fuselage
sides, I decided to shade the green on the fuselage sides with a light
coat of Tamiya Clear Smoke to add depth to the final product. After painting
all of the details in the cockpit and adding seat belts & harnesses
to the pilot’s seat, I assembled the cockpit and fuselage.
The wings go together nicely, and attaching these to the fuselage revealed
no gap/seam problems. Excellent! I finished assembly of the kit with all
of the parts save the landing gear, pitot tube and guns. These would all
go together after painting and decals.
Painting and Markings
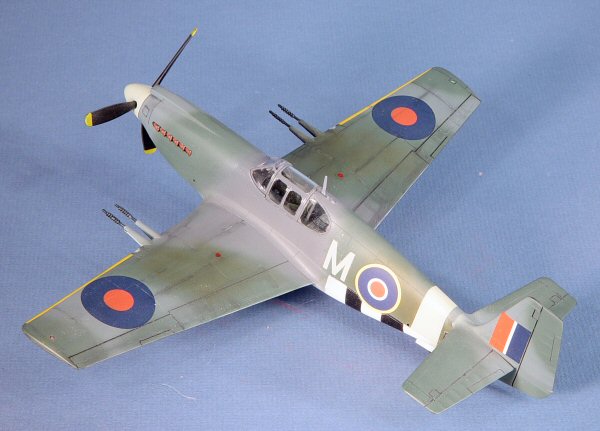
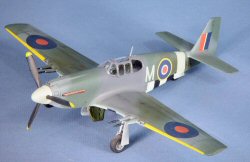
I followed the instructions for painting, using Dark Green/Ocean Gray
uppers and Medium Sea Gray undersides. The spinner and fuselage ID band
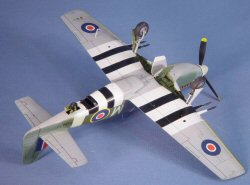
were painted Sky, the invasion stripes white and black, whilst the leading
edges of the wings were painted yellow.
 While
some of these features like the invasion stripes were provided as decals,
I elected to paint these myself. The fuselage was given a coat of gloss
white as a base coat for the invasion stripes and to look for any seam
problems. When this was dry, I masked off the areas for the invasion stripes
and applied a coat of sky where the fuselage ID band was located as well
as on the spinner. The fuselage band was also masked off after it was
dry and the camouflage was applied. Between each color, the model was
set aside to dry, then buffed with an old t-shirt to a smooth finish before
applying the next color. Once these three colors were on and dry, I removed
all of the fuselage and wing masking, then reapplied to new masks to apply
the black stripes for the invasion stripes and the yellow ID wing leading
edges. All masking used the excellent line of Tamiya masking tapes. While
some of these features like the invasion stripes were provided as decals,
I elected to paint these myself. The fuselage was given a coat of gloss
white as a base coat for the invasion stripes and to look for any seam
problems. When this was dry, I masked off the areas for the invasion stripes
and applied a coat of sky where the fuselage ID band was located as well
as on the spinner. The fuselage band was also masked off after it was
dry and the camouflage was applied. Between each color, the model was
set aside to dry, then buffed with an old t-shirt to a smooth finish before
applying the next color. Once these three colors were on and dry, I removed
all of the fuselage and wing masking, then reapplied to new masks to apply
the black stripes for the invasion stripes and the yellow ID wing leading
edges. All masking used the excellent line of Tamiya masking tapes.
The kits decals were used for this project and these were in register
and were applied using Microscale’s MicroSol/MicroSet with absolutely
no problems. Once the decaling was completed, the model was set aside
for the night to dry, then cleaned of any residual decal adhesive that
usually collects under the model. A coat of Future, was applied to provide
a nice protective coat for the next step.
Final Steps
 The
panel lines were given a wash of thinned black oil paint. Once this was
dry, the excess was buffed away leaving nice subtle details. A coat of
Future, mixed with Tamiya Flat Base was applied to provide a nice flat
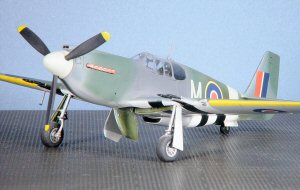
protective coat. The landing gear and other details were finally added
to the model. Care must be taken as these gear struts are delicate and
are easily broken. The
panel lines were given a wash of thinned black oil paint. Once this was
dry, the excess was buffed away leaving nice subtle details. A coat of
Future, mixed with Tamiya Flat Base was applied to provide a nice flat
protective coat. The landing gear and other details were finally added
to the model. Care must be taken as these gear struts are delicate and
are easily broken.
Conclusions
The Accurate Miniatures early Mustangs are the best kits of the pre-P-51D
lineage in any scale. The ease of assembly and detailing are second to
none. While I would recommend this kit to beginning modelers due to the
ease of assembly, the kit instructions limit my recommendations to more
experienced modelers at this time. I do hope that AM will improve these
soon as this kit is otherwise an easy build.
My sincere thanks to Accurate
Miniatures for this review sample!
|
|