HP Models'
1/700 HMS Dreadnought | 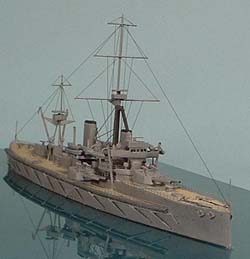 | History  The Dreadnought was the brainchild of Great Britain's First Sea Lord, Jackie Fisher, and naval architect Phillip Watts. They incorporated into their design technological innovation, radical styling, and unique operational features that put the ship head and shoulders above its contemporaries. The Dreadnought was the brainchild of Great Britain's First Sea Lord, Jackie Fisher, and naval architect Phillip Watts. They incorporated into their design technological innovation, radical styling, and unique operational features that put the ship head and shoulders above its contemporaries. The Dreadnought was a revolutionary design, but not for the reasons most people assume. Her all big gun main armament was evolutionary, not revolutionary – a logical step in the development of the battleship. The real impact of HMS Dreadnought was her propulsion system. Until Dreadnought, major warships of all nations used the triple expansion reciprocating steam engine, which produced a maximum speed of around 18 knots, with a degree of vibration that adversely affected range finding. The Royal Navy, in an uncommon act of unconventional thinking, adopted the Parsons turbine for Dreadnought. The turbine, which had been used only in smaller ships of the era, was an overwhelming success. The Dreadnought had a top speed of 21 knots – at least three knots higher than that of previous first class battleships. Also, maintenance time was greatly reduced, and the lack of the vibration allowed for more accurate range finding at much greater ranges.  But her effect on the world was more than in design and technology – it also included a historical impact that is still felt today. Before she was built, England's Navy was so superior that it was believed it could defeat the navies of any other two nations combined. They were so far ahead that no other nation could hope to catch up. But all that changed with the Dreadnought. When she was launched, all the battleships in the world were obsolete and everyone started even in a building race to see who could make the most dreadnoughts. It was the first modern arms race and was a significant factor in starting what became the first worldwide war. But her effect on the world was more than in design and technology – it also included a historical impact that is still felt today. Before she was built, England's Navy was so superior that it was believed it could defeat the navies of any other two nations combined. They were so far ahead that no other nation could hope to catch up. But all that changed with the Dreadnought. When she was launched, all the battleships in the world were obsolete and everyone started even in a building race to see who could make the most dreadnoughts. It was the first modern arms race and was a significant factor in starting what became the first worldwide war. The Kit This is a well-cast model with one glaring error--the kit comes without a provision for the torpedo nets and booms, which were a prominent part of her profile in 1907 and are even illustrated in the black/white and color drawings in the instructions. The hull piece is nine inches long and nicely cast with no pits or bubbles. Four resin wafers full of 96 parts make up the rest of the kit – there are no brass or white metal parts included. These parts are well cast, too. I did find one pit in the back of a gun turret that was easily filled with some putty. The gun barrels are cast separate from the turrets and needed some delicate sanding work to remove the seams. The instructions are rather basic and required additional research before assembly is started. Construction  After removing most of the parts from their carrier wafers, I washed everything with detergent soap. Some of the wafers were thin enough that I could remove the parts with a sharp knife; other wafers were so thick I had to sand them down until the parts came free. Some of the smaller parts, guns and searchlights, were left on their wafers for painting and were removed only when they were being added to the model. After removing most of the parts from their carrier wafers, I washed everything with detergent soap. Some of the wafers were thin enough that I could remove the parts with a sharp knife; other wafers were so thick I had to sand them down until the parts came free. Some of the smaller parts, guns and searchlights, were left on their wafers for painting and were removed only when they were being added to the model.  Because the instructions were very basic, the "Anatomy of the Ship: HMS Dreadnought" was very helpful in the construction of the kit. It is, literally the anatomy of Dreadnought from the keel all the way up to the topmast. It was most helpful in assembling the bridge/conning tower area, laying out the railings in the forward superstructure, placing the coaling gantries and planning the rigging. Because the instructions were very basic, the "Anatomy of the Ship: HMS Dreadnought" was very helpful in the construction of the kit. It is, literally the anatomy of Dreadnought from the keel all the way up to the topmast. It was most helpful in assembling the bridge/conning tower area, laying out the railings in the forward superstructure, placing the coaling gantries and planning the rigging.  I put on all of the ladders and some of the railings before painting, keeping in mind where fingers would have to hold the model and where the paintbrush would have to go. The other railings were cut and bent to fit and placed on two-sided tape for painting. Also left off before painting were a lot of the small parts (small guns, boats, gun turrets, etc.). The more you put on the model before painting, the easier the final assembly. But if you put too many things on, it makes painting the deck more difficult. It's best to make sure that you can get a brush into areas before gluing parts over them. I put on all of the ladders and some of the railings before painting, keeping in mind where fingers would have to hold the model and where the paintbrush would have to go. The other railings were cut and bent to fit and placed on two-sided tape for painting. Also left off before painting were a lot of the small parts (small guns, boats, gun turrets, etc.). The more you put on the model before painting, the easier the final assembly. But if you put too many things on, it makes painting the deck more difficult. It's best to make sure that you can get a brush into areas before gluing parts over them.  I airbrushed everything Dark Sea Gray, then went back with a brush and painted the decks. Then I touched up the gray where I slopped over. After all the painting was finished, I applied all the rest of the parts. The parts provided in the kit are very basic. To make a detailed model, some additions are necessary. I airbrushed everything Dark Sea Gray, then went back with a brush and painted the decks. Then I touched up the gray where I slopped over. After all the painting was finished, I applied all the rest of the parts. The parts provided in the kit are very basic. To make a detailed model, some additions are necessary. The details I added were: • All railings and ladders (aftermarket photoetch),
• two pairs of boat davits (florist's wire),
• three pairs of coaling gantries (styrene rod),
• the upper portions of the masts (shaped brass rod),
• torpedo nets (ladies' hosiery white-glued around .030 styrene rod),
• torpedo net booms (styrene rod) and
• the torpedo net shelf (strip styrene).  With the exception of the two forward legs of the foremast tripod, the lower portions of the masts were replaced with brass rod, as was the boat crane amidships. Some of the small caliber gun barrels snapped off during building and were replaced with styrene rod. With the exception of the two forward legs of the foremast tripod, the lower portions of the masts were replaced with brass rod, as was the boat crane amidships. Some of the small caliber gun barrels snapped off during building and were replaced with styrene rod. Rigging was next, applying the innermost lines first and working outward. In lieu of drilling holes, I tied half knots. The .003 fishing tippet line is thin enough that it can often be hidden underneath a coat of paint, especially if the half-knot is tied underneath a spar or yard. On masts, I tied the line around the mast and fixed it with thin CA. Then I applied thin CA on the yardarms at appropriate points equidistant from the mast. I took both ends and laid them against the yard, gently but firmly. It didn't take long to dry. For the signal halyards, I CAed several lines (all the same length) onto a length of .010 by .020 strip styrene – which became a scratched fife-rail. When dry, I attached the fife-rail below the foremast yards. Again, working from the inside out, I took one line on each side of the mast and CAed them to the proper yard (there are three of them) two at a time.  I have found it easier to apply lines equally to both ends of a yard. When you do it one side at a time the yard tends to get pulled out of alignment. After the lines were attached, and the CA had a substantial opportunity to dry, I went in with a pair of cuticle scissors to trim off the excess. A drop of paint went on each attachment point. Why? Because it looks better. I have found it easier to apply lines equally to both ends of a yard. When you do it one side at a time the yard tends to get pulled out of alignment. After the lines were attached, and the CA had a substantial opportunity to dry, I went in with a pair of cuticle scissors to trim off the excess. A drop of paint went on each attachment point. Why? Because it looks better. The only place I did not use tippet line for rigging was on the boat crane amidships. I could never get the lines tight enough without pulling the crane off the mast. I ended up using .005 steel wire, figuring the crane cable was thicker than the regular rigging on the prototype. I used slices of .040 rod for the pulleys. When everything was glued, painted and rigged, I sprayed the model all over with flat clear. Many ship modelers spend a lot of time putting waterline ships in a sea-going environment. I choose to display mine on glass that has been painted blue-green on the opposite side. It gives the effect of a ship sitting on very calm water. Conclusion  I found this to be a viceless kit, even if I had to make my own torpedo netting. The only problems I had were self-inflicted. I used a different type clear flat (PolyScale) than I was used to using and ended up with unsightly white deposits all over the ship. Touch-ups were required here and there. Then I used my old faithful Gunze-Sanyo Clear Flat. This is a good kit for modelers who don't mind adding aftermarket photoetch and scratching necessary details. And, as far as battleships go, it's easier than adding all the anti-aircraft weaponry common on World War II-era ships. Also, I rather prefer working with resin ships as the hull deck and some of the superstructure don't have to be assembled. The kit requires a lot of research as the exploded-view drawing and general arrangement view are not good enough on their own to build the kit. I found this to be a viceless kit, even if I had to make my own torpedo netting. The only problems I had were self-inflicted. I used a different type clear flat (PolyScale) than I was used to using and ended up with unsightly white deposits all over the ship. Touch-ups were required here and there. Then I used my old faithful Gunze-Sanyo Clear Flat. This is a good kit for modelers who don't mind adding aftermarket photoetch and scratching necessary details. And, as far as battleships go, it's easier than adding all the anti-aircraft weaponry common on World War II-era ships. Also, I rather prefer working with resin ships as the hull deck and some of the superstructure don't have to be assembled. The kit requires a lot of research as the exploded-view drawing and general arrangement view are not good enough on their own to build the kit. | 


|


