
Learning to Love the Academy 1/35 Abrams
By Al Superczynski
 |
|
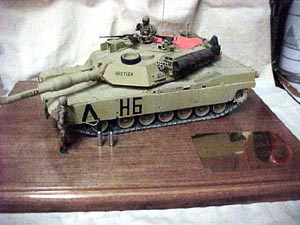
The Abrams was developed as a replacement for the US Army’s M60 series tanks after an abortive attempt to develop the MBT-70 in a partnership with the then West Germany. The first production M1 was delivered on 28 February 1980, armed with the M68 105mm rifled cannon as an interim measure pending availability of a German designed 120mm gun. The new tank took advantage of many technological innovations, giving it an edge The Abrams was powered by an extremely quiet 1500 HP Avco-Lycoming turbine engine, giving it a maximum speed of over 40 MPH on prepared roads and in excess of 30 MPH off road. Designed to primarily burn either diesel or jet fuel, this engine can even run on gasoline if required – a degree of flexibility that could prove to be a The Abrams’ suspension and environmental control systems gave the crew an unprecedented degree of comfort, helping them to be rested and efficient in combat. The real heart of the Abrams is its sophisticated fire control system. Consisting of an integrated laser rangefinder, digital computer, and infrared thermal sight the FCS allows the crew a high "first shot" kill probablilty while static or on the move regardless of visibility on the battlefield. The Abrams was put into production despite Congressional and media criticism of Inspired by the Allied Blitzkrieg during Desert Storm, I decided to build a tank for the first time in many years. As luck would have it a local friend had an Academy M1A1 Realizing that the Academy kit is not entirely accurate, and with apologies to the purist treadheads, I decided to go ahead using what I already had on hand. The finished product sure looks like an Abrams to me and I had fun building it – that's what counts most after all, isn't it? After cleaning up and test fitting all the parts I started working on the modifications I wanted to make to the kit. I opened up the lightening holes in the drive sprockets and 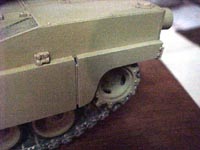
drilled out the front and rear tow hooks on the lower hull, added miscellaneous rivets from an old Testors M-47 hull, and closed off the sponsons with plastic card. I scratchbuilt better taillight guards from brass tubing, and opened a hole on the left side for a scratchbuilt fire extinguisher handle. I also scratchbuilt fender release bars from floral wire, cut a rectangular opening for later installation of a scratchbuilt fire 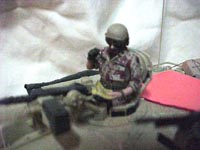
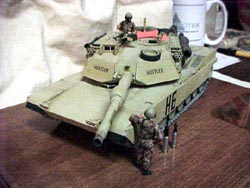
extinguisher handle, and scratchbuilt new tow cable brackets from scrap PE brass frets. I used plastic tubing & plastic card scraps to make a new coaxial machine gun extension and made a unit placard for the rear turret basket from .010 plastic card. I added wire lift rings to the commander's cupola, replaced the locker handles with Testors M-47 parts, and added wire mesh to the turret basket "floor". I then drilled out the headlight locations for later installation of MV lenses, added thin The next step was to spray the turret, hull, suspension/wheels, side skirts, and figures with a base coat of Polly S US Desert Sand. I applied decals from Tamiya's Desert Storm sheet directly on the flat paint 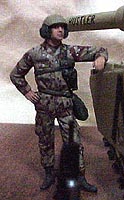
using a mixture of distilled water, Solvaset, and white glue. The Tamiya decals omitted the words "Go Irish" that belonged on the turret so I added them and the unit placard markings from dry transfers. I gouged up a few of the road wheels, completed the weathering on them and the remainder of the suspension and test fitted the tracks before adding the side skirts. Oddly, the kit tracks were too short - I found that Tamiya's tracks fit perfectly, while the Academy tracks were likewise a perfect fit on the Tamiya kit! Strange, but I swapped them out and installed the side skirts after painting/weathering the tracks. I then did a little cleanup of the hull/skirt joints and resprayed the basic Desert Sand color in that area as necessary. Now I applied washes and drybrushed to my taste, shoot Testors Dullcoat over the complete model, added some pastels, and misted on a couple final coats of the clear flat. 
I drilled out the machine gun barrels, substituting the Verlinden item for the commander's gun, and added the MV lenses, completing the basic vehicle. I then added external stowage using a combination of Verlinden, Tamiya, Italeri, and scratchbuilt items, weathered all of it to match the tank, and applied another light coat of clear flat to blend everything together. Finally, I installed the MV headlight lenses and began work on the figures. I used a combination of enamels, oils, and acrylics to paint the Verlinden tank commander 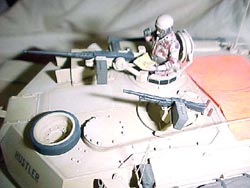
and the standing crewman from DML's modern US tanker set. I gouged out the lens area of the goggles on the commander figure, adding tinted epoxy later on to simulate the lenses, and added a map in his left hand. After painstakingly painting the desert camouflage on their uniforms I added washes and drybrushing to bring out the detail. I had a brass plaque made at a local trophy shop, cleaned up and painted Tamiya ammo rounds, and white glued everything to a plaque stained with Minwax, completing a fun project. Next time I build an Abrams I'll work with the more accurate DML or Tamiya kits, but I had a lot of fun with this one - it was an easy build and I think it looks every inch an Abrams, short of measuring it with a micrometer. I refer the Accuracy Polizei to my sig line on RMS. ;) |
 over other Main Battle Tanks (MBT) then in service around the world. Chobham armor and angled surfaces provided superior protection against both HE and shaped charge antitank rounds. Armored bulkheads separated the crew from the vehicle’s fuel tanks and sliding armored "blowout" doors covered the ammunition storage bins. An automatic HALON fire extinguishing system was installed, designed to smother engine fires in a matter of seconds.
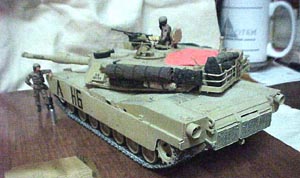 big plus on the modern highly mobile battlefield. A complete engine change can be accomplished in only an hour.
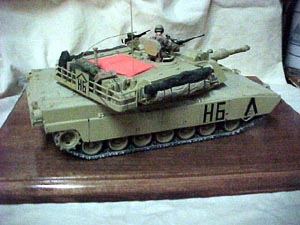 its high unit cost and the complexity of its systems. With the introduction of a 120 MM gun on the M1A1 version an already outstanding AFV became an even more formidable weapons system. Now only the test of actual combat remained for the US Army to show what their new toy could do. The test wouldn’t be long in coming – Iraq’s invasion of Kuwait and subsequent threats on Saudi oilfields galvanized the US and much of the Western world into action. The performance of Allied and US armored forces in the subsequent ground war was nothing short of phenomenal; the Abrams tanks of the US Army’s Armored Divisions decimating virtually any Iraqi forces foolish enough to engage them in combat.
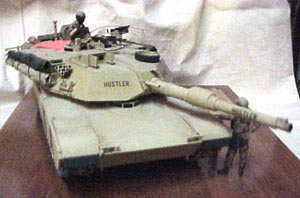 with the Verlinden detail set so we agreed on a swap & I was in business.
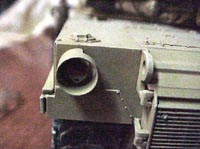 brass wire antennae with a tiedown, and installed blast panels & details on the rear hull deck using the Verlinden PE parts.